
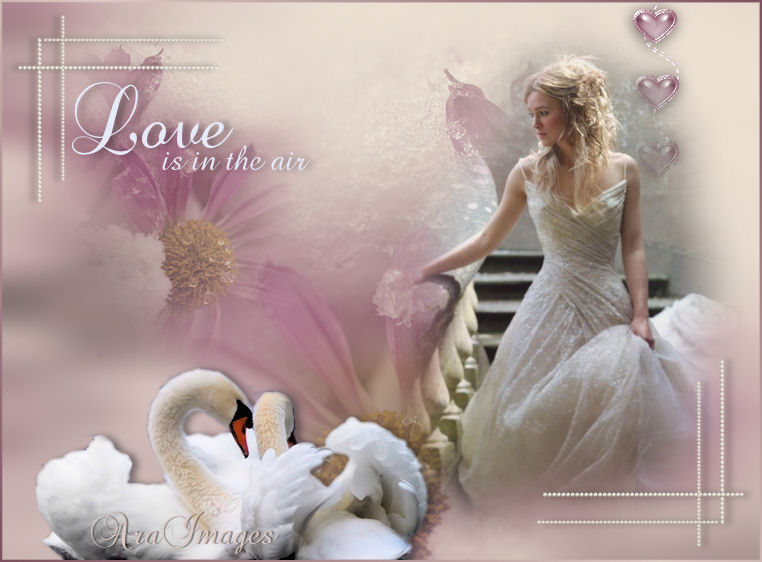
Love is in the Air
For an Italian, Danish and German translation, click on the flags.


For this tutorial you will need the materials in the zip file below.

The swan tube is from http://www.reveries.fr; the flower is from http://www.rireetpsp/ and the lady tubed by Alessandra at http://www.alegrafica.net". The beautiful tubes are used with permission from the tuber when they are known and can be contacted. For their work and permission, I give them thanks.
Use the bookmark below to mark your place along the way.

This tutorial was written using PSPX2. To work this tutorial, it is assumed you have some working knowledge of Paint Shop Pro. Let's get started!
1. Open your tubes in PSP, duplicate and close originals. Make a new image in the workspace 758px by 558px.
2. Set the foreground color in Materials at #dcc9c2, the background at #e6e9f8. Using your flood fill tool, flood fill the new image with foreground.
3. Make new Raster Layer, Select All. Open flower2Dec07doll tube, and using the bottom layer of the tube, copy and paste into Selection of the new image. Deselect. Lower opacity down to 50.
4. Using highlighted middle layer of tube flower2Dec07Doll, copy/paste as new layer into image. Lower opacity to 36. Image/Mirror.
5. Copy/paste flower image as new layer again, Image/Resize by 50%, all layers unchecked. Lower opacity to 40%. Pull to left into place as in finished picture.
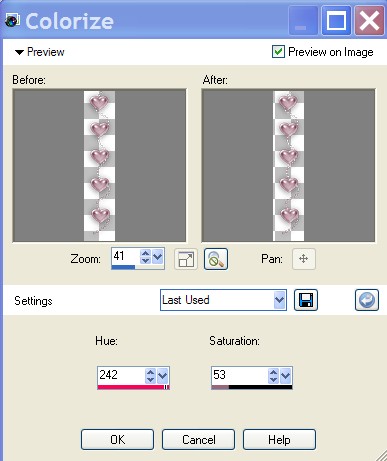
6. Open tube of hearts. Adjust/Hue and Saturation/Colorize. Change color of hearts using Hue of 242 and Saturation of 53, click OK.
7. Copy/paste new colored hearts into image, placing high up on right hand side. Using eraser tool set at Size 13, erase bottom two hearts and dash links.
8. Put a drop shadow on hearts using Effects/Drop Shadow/Vertical of 0, Horizontal of 6, Opacity of 40 and Blur of 10, color black.
9. Open image of lady tube. Copy/paste into image as new layer. Image/Mirror and place toward the right side of image. Lower opacity to 82.
10. Open image of swans. Reduce size with Image/Resize, resize by 45%, all layers checked. With middle of swan layer highlighted, Copy/paste into image.
11. Put a drop shadow on swans using same setting as for hearts. Vertical 0, Horizontal 6, Opacity 40 and Blur of 10, color black. Move swans into position toward bottom of image.
12. Open tube of corner beads. Copy/paste as new layer. Move to bottom right corner.
13. Put drop shadow on as on hearts and swans.
14. Highlight bead Layer in layer palette and duplicate. Image/Mirror/Flip. Merge Visible.
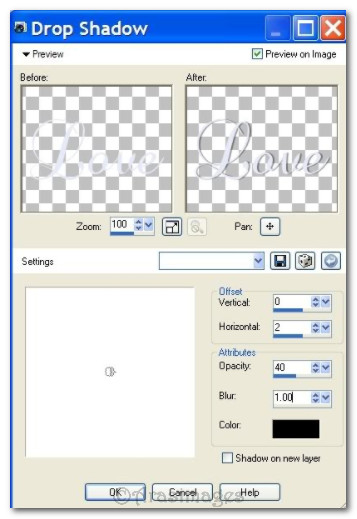
15. Using Text Tool, background set at #e6e9f8, choose a font of your liking or use BrockScript set at 72. Write the word Love, click Apply. Convert to Raster Layer. Move the word Love nicely tucked into the beaded corner image.
16. Put a drop shadow on it using Effects/Drop Shadow, Vertical 0, Horizontal 2, Opacity 40, Blur 1, black.
17. Using the same script set at 36, type "is in the air". Convert to Raster Layer. Put a drop shadow on it like you did the word Love. Place below the word love in a nice position.
18. We will now make the border. Image/Add Borders. Right click on Color and choose your color. I chose the foreground color using a 2 px top, right, bottom and left with Symmetric checked.
19. Using the Magic wand in the tools, click on the 2px border. You will see something that looks like marching ants.
20. In your Materials Palette, change your background to #7d515f. Choose Gradient, Style Linear, Angle of 45, Repeat 1, Invert not checked.
21. New Raster layer. Using your flood fill tool, flood fill inside the marching ants with background Gradient. Select none.
22. Using a font of your choice, sign your work, merge visible. Save as a jpg file and you are done!
I hope you have enjoyed my first tutorial!
If you are going to use this tutorial for stationery, cards or place the tutorial/tag on another site, I would appreciate you contacting me for permission, giving Arasimages credit for the original tutorial and if possible, a link back to my site. Thank you.
Copyright © Arasimages All Rights Reserved