
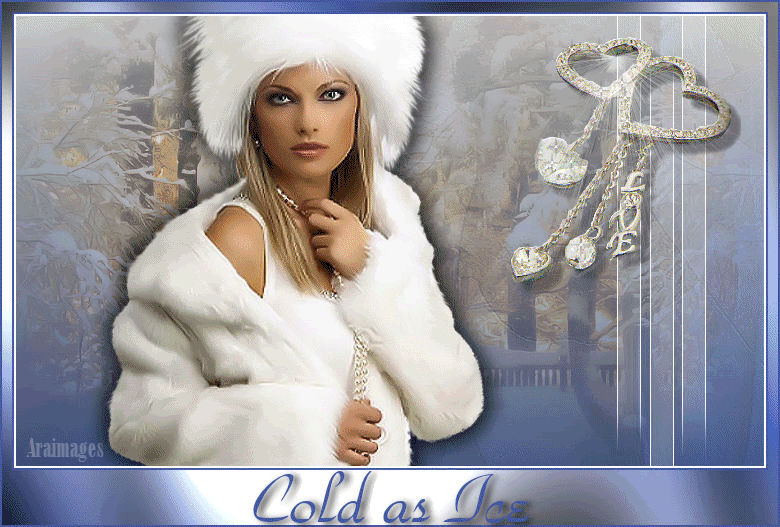
Cold as Ice
For Danish and German translation, click on the flags.


Unzip materials to your work folder. Put the geometric 10 brush in your My Documents/PSP brushes folder. Place Graphics Plus plugin in your My Documents/PSP plugin folder. Place star tube in your PSP tubes.

The lady tube is from kittypsplesson; the trees tube is from reveries; the background comes from JHanna at JeBe Quality Tubes and the jewel tube is from Marja. The beautiful tubes are used with permission from the tuber when they are identified and tuber contacted. For their work and permission, I give them thanks.
This tutorial was written using PSPX2. To work this tutorial, it is assumed you have some working knowledge of Paint Shop Pro. Hint: Create a new folder on your desktop naming it Cold as Ice. Unzip all your materials into that folder. If you have one of the newer versions of PSP, you can click on the Toggle Organizer next to the Open envelope at the top of PSP. All of your materials will show at the bottom of the workspace and double clicking on them will put them in the workspace. When the step is completed, just X off and they remain in the tray to use again if you wish. Let's get started!
Use the bookmark below to mark your place along the way.

1. Create a new image in the workspace 748px by 450px. Set the foreground color in Materials to #ffffff, the background to #4358ae.
2. Using the new image, Selections/Select All. Activate the JHanna 113 background. Copy/paste it into Selection. Select None.
3. Create a Gradient using the colors in the Materials palette by selecting Style Linear, Angle 0, Repeat 0 and Invert checked. Make new Raster Layer, and flood fill with Gradient. Lower opacity to 73.
4. Activate the paysages tree tube. Highlighting the middle layer, copy/paste as new layer into image. Move the trees to the right half of image. Lower opacity to 30. Duplicate tree layer, Image/Mirror and raise the opacity of left side to 70.
5. Activate the woman tube. Highlight the lower layer in the layer palette. Copy/paste as new layer into image. Move a little to the left.
6. Place a drop shadow on the woman with Effects/3-D Effects/Drop Shadow, first using Vertical 4, Horizontal 6, Opacity 75, Blur 30, Color black. Then apply again using -4, -6, 75, 30, black.
7. Change the Gradient back to #ffffff in the foreground of the Materials palette. Layers/New Layer.
8. Tool bar/Paintbrush and click on the drop down of your brush selections. Find geometric 10.
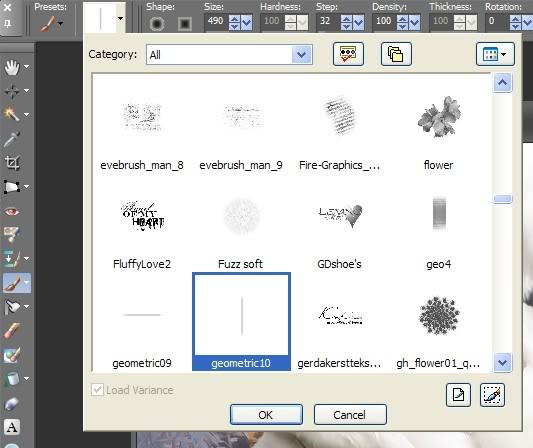
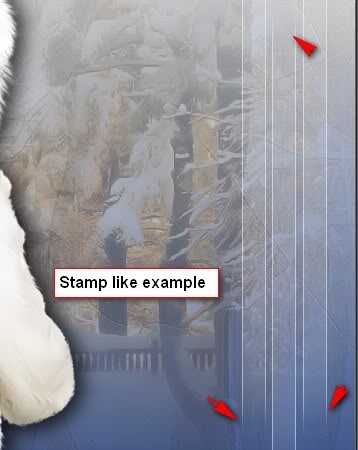
9. Use the same settings as in the snapshot. Left click, stamp the lines on the image using the foreground white color. Place the brush higher on the first bar to the right, lower for the middle bar and higher again for the left line.
10. Activate the Marja 028 tube, copy/paste as new layer into image. Move to the right over the bars.
11. Image/Add Borders and have Symmetric checked, make all 2px wide, foreground white color. Add another 2px border using background blue color.
12. Image/Add Borders and make them all 10px, uncheck Symmetric and make bottom 55px, foreground color. Go to Tool bar and choose Magic Wand, click inside your large border. You will see it surrounded with marching ants. Go back to your Materials palette and create a Gradient using Style Linear, Angle 45, Repeat 2, Invert checked.
13. Tool Bar/Flood Fill tool and left click inside the new border with Gradient.
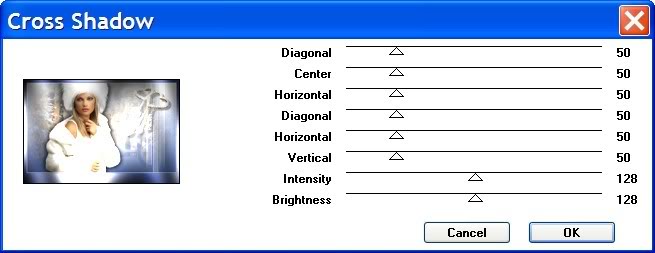
14. Effects/Graphic Plus/Cross Shadow and using standard setting, OK.
15. Selections/Select None. Image/Add Border of 2px in background color.
16. Activate the Park Avenue BT font and minimize to task bar. Using Tool bar/A text tool, Size at 72, write the words "Cold as Ice" in largest part of border using background color. Center text.
17. Convert Vector layer to Raster Layer in layer palette.
18. Effects/3-D Effects using drop shadow of Vertical 2, Horizontal -5, Opacity 88, Blur 10 and color black. Sign your name to your work. Merge/Merge Visible. File/Save As .jpg image and you are finished unless you wish to have animation to your tube.
If you wish to have the sparkles on the diamond jewelry, continue with tutorial.
19. Right click image in layer palette, duplicate image 3 times, having 4 images in layer palette. Close off bottom three layers by clicking on the eye in each of those 3 layers.
20. Having top layer activated, go to Tool Bar/Picture Tubes. Choose Star, Scale at 135. Click randomly on diamond hearts. Close off top layer.
21. Go to next layer beneath and open it, activate it. Change Scale to 100, randomly click on diamond hearts again. Close off layer.
22. Move to next to bottom layer. Open it and highlight, having Scale set to 85, randomly click on diamond hearts again. Close layer off, go to bottom layer and open it. Having it highlighted, Scale set to 75, click randomly on hearts again.
23. Now open all layers. File/Save As .psp Animation image in working folder.
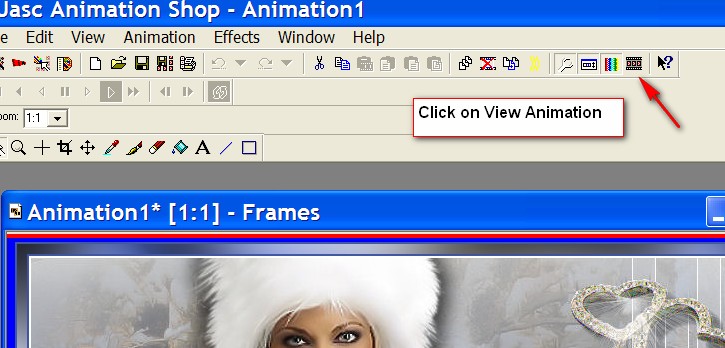
24. Open Animation Shop. File/Open and browse to where you saved the .psp file and open it. Click on View Animation and your sparkles should be sparkling!
25. Now go to File/Save As and your Save As box pops up. Name the animation file Cold as Ice, choose the Cold as Ice folder and click Save. Your Animation box pops up. Click Next 3 times as it prompts you and Finish. Your image should be saved in your folder, and you are done.
Congratulations on completing an animated PSP tutorial!
If you are going to use this tutorial for stationery, cards or place the tutorial/tag on another site, I would appreciate you contacting me for permission, giving Arasimages credit for the original tutorial and if possible, a link back to my site. Thank you.
Copyright © Arasimages All Rights Reserved