
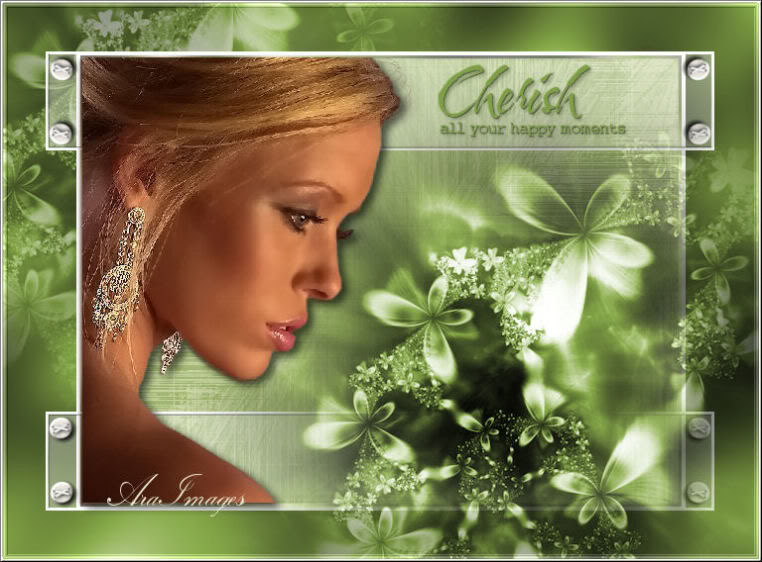
Cherish
For Portuguese, Italian, Danish and German translation, click on the flags.


For this tutorial you will need the materials in the zip file below.

Unzip materials to your folder named Cherish. Open the agi-Cherish Brush tip and Export it in PSP to your PSP Brush folder.
You will need the Plugins Distort, Filters Unlimited2 and Graphics Plus for this tutorial.
I would like to give credit for the lovely floral background to Benelal Mists and Tubes
This tutorial was written using PSPX2 and it is assumed you have a working knowledge of PSP.
Use the bookmark below to mark your place along the way.

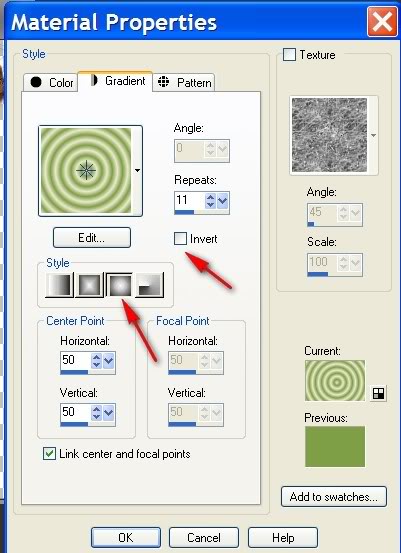
1. In your Materials palette, set your foreground color to #eae9cd and your background color to #7e9f46. Make a Gradient using Sunburst, no Angle with Repeat of 11. Invert unchecked.
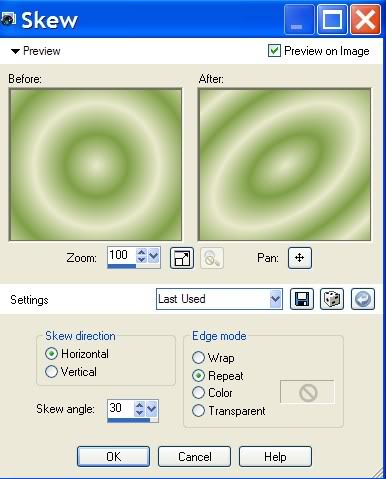
2. New Raster Layer 600px Width X 450px Height. Flood fill with Gradient. Effects/Geometric Effects/Skew with settings of Horizontal ticked, skew angle 30, edge mode repeat.
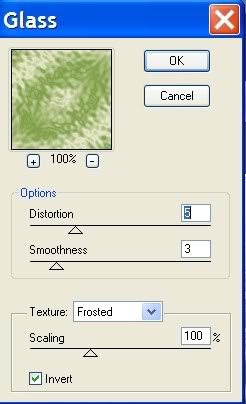
3. Effects/Plugin Distort/Glass. Distortion 5, Smoothness 3, Texture Frosted, Scaling 100%, Invert checked.
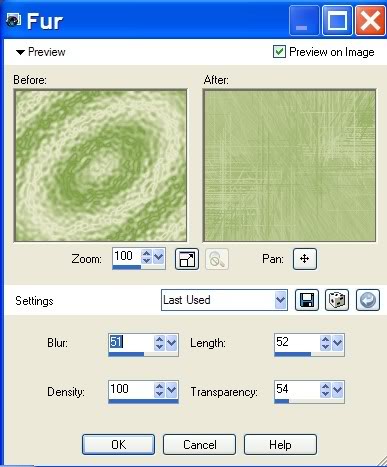
4. Effects/Texture/Fur. Settings at Blur 51, Density 100, Length 52, Transparency 54.
5. Image/Add Borders. Symmetric checked, Size 3px, color White.
6. From Tool Bar, choose Magic Wand. Click on 3px border to activate marching ants. Flood fill with gradient.
7. Apply Effects/GraphicsPlus/Cross Shadow with default settings of 50, 50, 50, 50, 50, 50, 128, 128. Selections/Select None.
8. Image/Add Border of 4px, having Symmetric checked, color white. Minimize this image to task bar for now...you will use it later.
9. New Raster Layer of 762px Width X 562px Height. Selections/Select All.
10. Open Fractal1Fev08bnll image, highlight bottom layer. Adjust/Hue Saturation/Colorize, settings at Hue 57 and Saturation of 99. Copy/paste into Selection.
11. Open minimized image, copy/paste as new layer.
12. Open scrap tube 24, copy/paste as new layer. Pull down even with middle image bottom. Duplicate and flip.
13. Open Fractale1Fev08bnll. Highlight middle flower layer. Copy/paste as new layer. Adjust/Hue and Saturation/Colorize, with settings at Hue 57, Saturation of 99. Image/Resize by 65%, all layers unchecked. Place in lower right hand side.
14. Duplicate layer #4. Pull copy of Raster #4 below Copy of Raster Layer #2. Place copy of Raster #4 to top left corner, lower opacity to 57. Hint: Close off layer #4 temporarily for ease of placement of copy. Activate and open Layer #4.
15. Open tube of woman. Copy/paste as new layer. Carefully place, fitting on left side inside Gradient/Cross Shadow border.
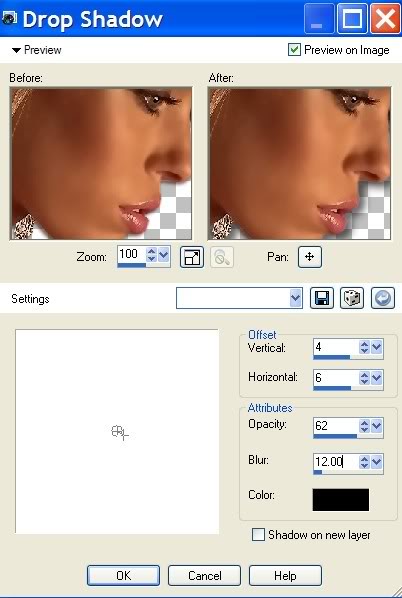
16. Effects/Effects3-D/Drop Shadow. Vertical 4, Horizontal 6, Opacity 62, Blur 12 and color Black.
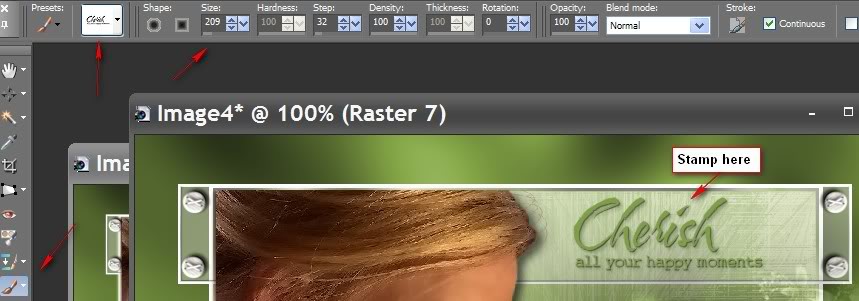
17. Layers/New Raster Layer. From Tool Bar, choose Paint brush tool. Open agi_Cherish brush, size 209, using background color, stamp on top scrap tube.
18. Image/Effects/3-D Effects/Drop Shadow. Vertical 1, Horizontal 1, Opacity 74, Blur 1 and color Black.
19. Choose your font and sign your name. In Layer Palette, convert Vector Layer to Raster Layer.
20. Image/Add Border of 3px white, Symmetric checked.
21. Promote background layer to raster layer in layer palette.
22. Effects/Filters Unlimited2/Buttons and frames/3D/Glass Frame1. Settings of Size 8, Contrast 128.
You are finished! I hope you have enjoyed doing this tutorial.
If you are going to use this tutorial for stationery, cards or place the tutorial/tag on another site, I would appreciate you contacting me for permission, giving Arasimages credit for the original tutorial and if possible, a link back to my site. Thank you.
Copyright © Arasimages All Rights Reserved