

Listen to your Heart
For Portuguese, Danish and German translation, click on the flags.


For this tutorial you will need the materials in the zip file below.

You will need the Plugin SinedotsII for this tutorial.
Unzip materials to your folder named Listen to your Heart. Open the Sinedots cfg files and place in SinedotII folder. Open brush and Export it into your PSP Files/Brushes.
I would like to give credit for the lovely red flower tube to PSP_Jet at top_design tubes@Yahoo.com and to Suzi Sgai for the beautiful lady tube
This tutorial was written using PSPX2 and it is assumed you have a working knowledge of PSP.
Use the bookmark below to mark your place along the way.

1. In PSP open the flower tube, the lady tube and the heart pattern, make copies and close originals.
2. In your Materials palette, set your background color to #000000 and your foreground color to #a20e11. Open the hearts pattern, right click in Layers Palette and Promote Background Layer. In Materials palette, choose Pattern set at Angle 0, Scale 80. Set foreground to hearts.
3. Open new transparent Layer 762px Width X 562px Height. Flood fill with black background.
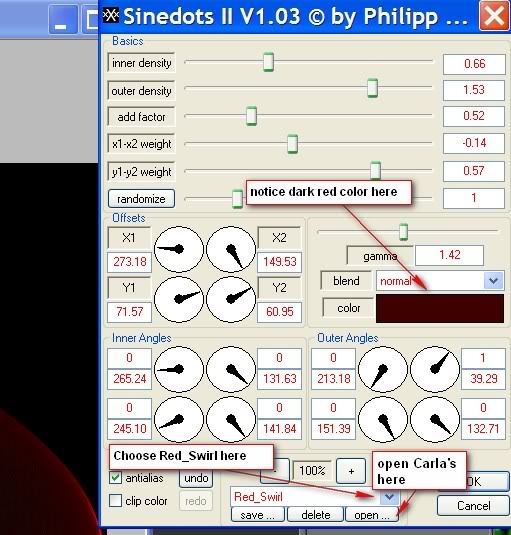
4. Effects/Dragonfly/SinedotsII. Open Carla's Rosebud, from dropdown choose Red Swirl and apply to black layer. Image/Mirror.
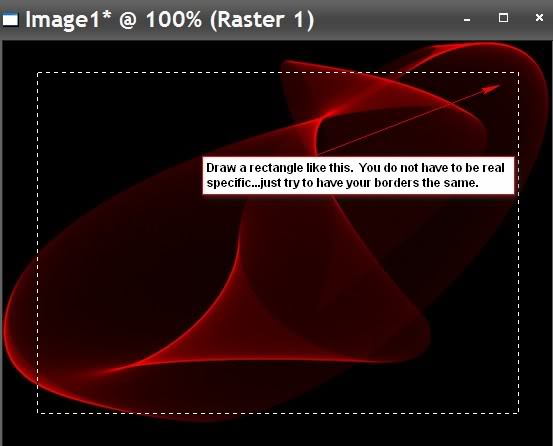
5. From Tool Bar, choose Selection Tool and draw a rectangle similar to the example.
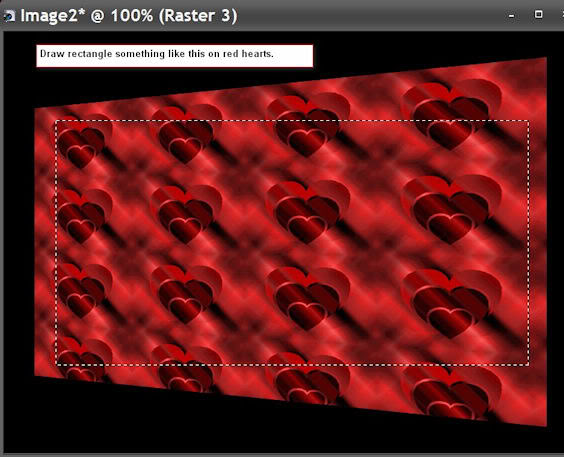
6. Raster/New Raster Layer. Flood fill inside marching ants with hearts pattern.
7. Effects/Geometric Effects/Perspective-Horizontal. Settings (minus) -28, transparent ticked. You now have a floating image. Selections/Select Defloat. Selections/Invert. Hit Delete key on keyboard. Selections/None.
8. In Materials Palette, change foreground to #000000. From Tool Bar, choose Selections Tool and draw a rectangle on hearts layer, see example.
9. Layers/New Raster Layer. Flood fill inside marching ants with foreground of black.
10. Effects/Geometric Effects/Perspective-Horizontal. Settings 28, transparent ticked. Click OK. You now have a floating image. Selections/Select Defloat. Selections/Invert. Hit Delete key on keyboard. Selections/None.
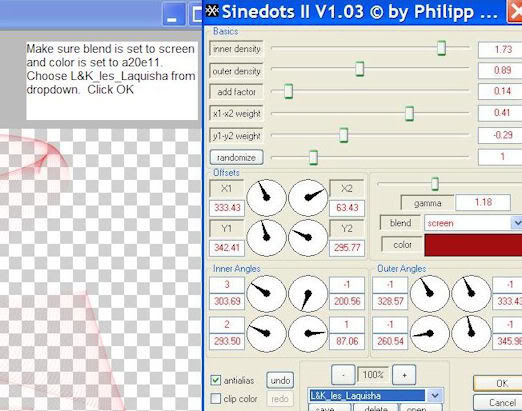
11. Layers/New Raster Layer. Effects/Dragonfly/SinedotsII. Open L&K_les_Laquisha, choose L&K les_Laquisha in dropdown, follow directions on example, click OK.
12. Open SS_pspimage of lady. Copy/paste as new layer. Image/Resize by 80%, all layers unchecked. Duplicate and merge down. Move lady into position.
13. In Tool Bar, choose your eraser tool. Highlight Raster #4 and erase Sinedots from woman's chest. Go back to Raster #5 again.
14. Open Jet-redflowers-maar tube. Copy/paste as new layer. Image/Resize by 65%, all layers unchecked. Move up and to right over black rectangle.
15. Effects/3-D Effects/Drop Shadow of Vertical -2, Horizontal 8, Opacity 74, Blur 7, color Black. Effects/3-D Effects/Drop Shadow of Vertical 2, Horizontal -8, Opacity 74, Blur 7, color Black.
16. Change Materials palette foreground to #e7d1bd. Layers/New Raster Layer.
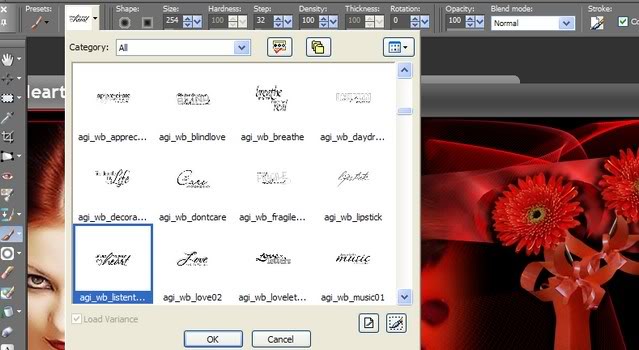
17. In Tool Bars, choose Brush/Paint Brush. Find brush Listen to your Heart. Size 254, stamp one time over vase. (see example).
18. Change Materials palette foreground to #a20e11 and background to #831325. Sign your name (I used size 48 and Vector layer) with background color. Convert Vector Layer to Raster Layer.
19. Image/Add Border of 2px, using background color, Symmetric checked.
20. Image/Add Border of 12px using #000000 color, Symmetric checked.
21. Image/Add Border of 2px, using foreground color, Symmetric checked.
You are finished! I hope you have enjoyed doing this tutorial.
Thank you to my testers, Evatexas and PamelaD. Below are their versions of the tutorial using tubes and colors of their choice.


If you are going to use this tutorial for stationery, cards or place the tutorial/tag on another site, I would appreciate you contacting me for permission, giving Arasimages credit for the original tutorial and if possible, a link back to my site. Thank you.
Copyright © Arasimages All Rights Reserved