
Sweethearts
For Italian, Danish and German translation, click on the flags.


For this tutorial you will need the materials in the zip file below.

For this tutorial, you will need Plugin Penta
You will need Animation Shop for this tutorial if you use the animated hearts.
You can find a free Animation Shop program HERE
I would like to thank and give credit to the wonderful work of tuber JHanna for the background
I would like to thank and give credit to Lori Rhae for the flowers, bianca for the scrap paper and the other tubes originations are unknown. If any of these are yours and you would like to be linked back, please let me know and I would be happy to do so and give you proper recognition.
Use the bookmark below to mark your place along the way.

This tutorial was written using PSPX2 and it is assumed you have a working knowledge of PSP. Let's get started and have some fun!
1. In PSP open the background, pearl, flowers and couple tubes, make copies and close originals.
2. In Materials palette, set your foreground to #faf2f3, background to #c2587a.
3. Open new transparent image 762px Width x 562px Height. Selections/Select All. Open JHanna_260 tube and copy/paste into selection. Selections/Deselect.
4. Effects/Art Media/Brush Strokes set to example shown.

5. Adjust/Sharpness/Sharpen.
6. Layers/New Raster Layer. Flood fill with background color #c2587a. Lower Opacity to 34.
7. Open bianca_rahmen tube. Image/Resize by 160%, resize all layers checked! Copy/Paste as new Raster Layer.
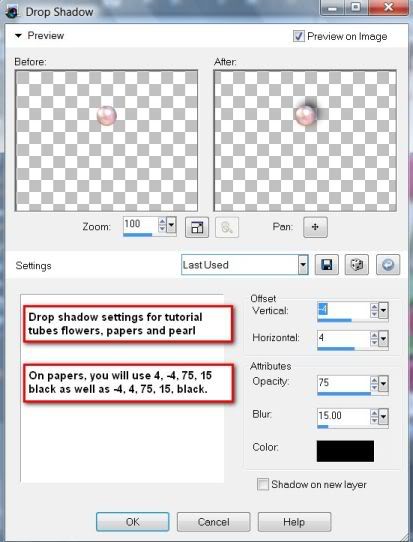
8. Effects/3-D Drop Shadow set to Vertical -4, Horizontal 4, Opacity 75, Blur 15, color Black. Drop shadow again only this time, use Vertical of 4, Horizontal of -4, Opacity 75, Blur 15, color Black.
9. Open Susan_T_3673 tube, Image/Resize by 105%, resize all layers checked!. Copy/Paste as new raster layer.
10. Open flower tube Image15Touch of Spring_LR_06_07_09 by Lori Rhae. Image/Resize by 65%, resize all layers checked!
11. Copy/Paste as new raster layer. Pull down to bottom left corner. Effects/3-D Drop Shadow of Vertical -4, Horizontal 4, Opacity 75, Blur 15, color Black.
12. Duplicate flower layer. Image/Mirror. Image/Flip. Pull a little up into right upper corner to position.
13. Open pearl tube. Copy/Paste as new Raster Layer. Effects/3-D Drop Shadow set to Vertical -4, Horizontal 4, Opacity 75, Blur 15, color Black.
14. Duplicate pearl layer. Image/Mirror. Image/Flip. You might have to move it just a little to the left to center it in the bottom right corner of paper.
15. Open Aurora Script and minimize to bottom. In Tool Bar, choose your Text Tool, set the Size to 110, Vector Layer, Leading, Kearning and Tracking all set at 0, color #c2587a and type Sweethearts. Convert to Raster layer.

16. On your Sweethearts text, put a drop shadow with settings of Vertical -4, Horizontal 4, Opacity 75, Blur 10, color #faf2f3.
17. In Materials palette, reverse colors so lighter color is at bottom. Sign your name in a dark space of image using #faf2f3, the lighter color. Convert to raster layer.
18. Image/Add Borders of 2px, color #faf2f3, Symmetric checked.
19. Image/Add Borders of 5px, #c2587a. Symmetric checked.
20. From your Tool Bar, choose your Magic Wand and click on 5px border to select it.
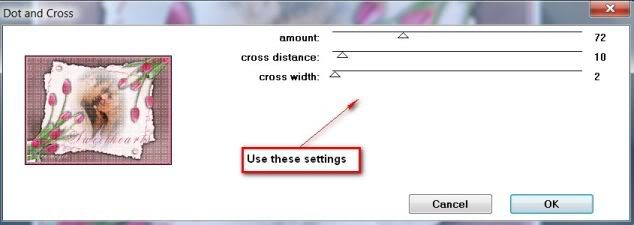
21. Effects/Penta/Dot and Cross. Use settings as in example below. Select None.
22. Image/Add Borders of 2px, using light color #faf2f3.
23. File/Save As/ .jpg file called Sweethearts.
24. You are finished with your main image. If you wish to add the animated hearts, then continue with the tutorial below.
ANIMATION SHOP DIRECTIONS
25. In Animation Shop, Edit/Open your .jpg Sweethearts image. Edit/Duplicate till you have 9 frames total. Click on FIRST frame, Edit/Select All.
26. Open hearts animation which has 9 frames. Click FIRST frame, Edit/Select All. Go to top of frames on blue bar and right click/Copy.
27. On Sweetheart image, right click inside FIRST frame, left click Paste into Selected frame. Guiding your cursor/hearts with your mouse, paste your hearts in a place you like by clicking left mouse button.
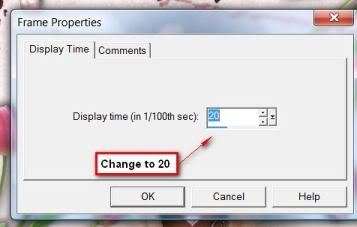
28. Now go to top tool bar of Animation Shop and click on Animation and watch your hearts float! For a slower motion, go to Animation/Frame Properties, change to 20. (see below example).
29. File/Save As/ .gif file. When box comes up, choose where you want to save it, give it a name (Sweethearts) and click Save. Click Next, Next, Next and Finish. You are done!
I hope you have enjoyed doing this tutorial and like your results. Try doing it using other tubes and animations. It is fun!
Thank you to my testers, Evatexas and PamelaD. Below are their versions of the tutorial using tubes and colors of their choice.


If you are going to use this tutorial for stationery, cards or place the tutorial/tag on another site, I would appreciate you contacting me for permission, giving Arasimages credit for the original tutorial and if possible, a link back to my site. Thank you.
Copyright © Arasimages All Rights Reserved