

Jesus
For Danish translation, click on the flag.

For this tutorial you will need the materials in the zip file below.

You will need the Plugin Simple Filter for this tutorial.
Unzip materials into a folder you have named Jesus.
A big thank you to the tubers for their beautiful tubes used in this tutorial. Nikita has tubed the cathedral door, Jet has tubed the flower and the corner, fish and Jesus image are unidentified clearly. If you are the tuber of these tubes, please let me know and I will be happy to give you credit. Please visit the tuber sites listed on my Links page.
Use the bookmark below to mark your place along the way.

Open the tubes in PSP, duplicate and close originals.
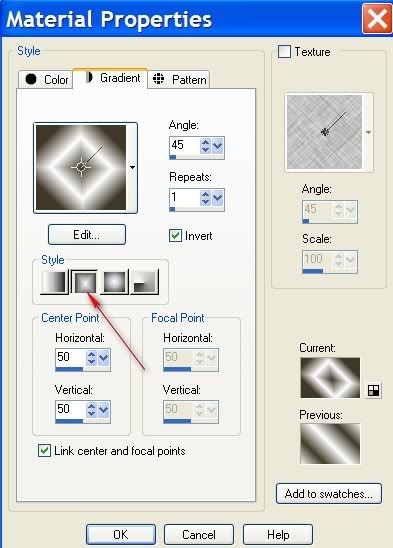
1. In Materials Palette, set the foreground color to #ffffff, background color to #403928. Set the Gradient to Style Rectangular, Angle 45, Repeats 1, Invert checked.
2. New/New Image 702px by 502px. Flood fill with Gradient.
3. Adjust/Blur/Gaussian Blur/Radius 37.
4. Open 1220639652-Divers cathedral door tube. Copy/Paste as new layer.
5. Pull the door tube a little to the right. Lower Opacity to 65.
6. Open jet-flower2-Jan tube. Copy/Paste as new layer. Image/Mirror.
7. Pull to the right so only part of the flower is showing. (See example below).

8. Lower Opacity of flower to 68.
9. Effects/3-D Effects/Drop Shadow Vertical -3, Horizontal -13, Opacity 41, Blur 16.
10. Layers/Duplicate. Image/Mirror.
11. Image/Add Borders, 20px, color #ffffff, Symmetric checked.
12. From Tool bar, activate the Magic Wand. Click inside the 20px border.
13. In Materials Palette, using same foreground/background colors as they are set, set the Gradient to Linear, Angle to 45, Repeats 3, Invert checked.
14. Flood fill the 20px border.
15. Keep border selected. In Layers Palette, right click on Background and Promote Background Layer.
16. Effects/3-D Effects/Drop Shadow, Vertical -4, Horizontal 7, Opacity 61, Blur 7, color #000000.
17. Effects/3-D Effects/Drop Shadow, Vertical 4, Horizontal -7, Opacity 61, Blur 7, color #000000.
18. Selections/Select None.
19. Image/Add Borders of 50px, Symmetric checked.
20. From Tool bar, activate the Magic Wand. Click inside the 50px border.
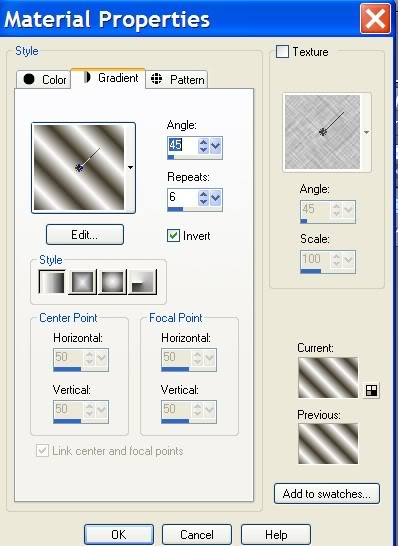
21. In Materials Palette, change the Repeats of the Gradient to 6. Flood fill the 50px border with this Gradient setting (See below).
22. Adjust/Blur/Gaussian Blur, Radius set at 15.
23. Selections/Invert. In Layers Palette, right click on Background layer and Promote Background Layer.
24. Effects/3-D Effects/Drop Shadow, Vertical -4, Horizontal 5, Opacity 61, Blur 13, color #000000.
25. Effects/3-D Effects/Drop Shadow. Vertical 4, Horizonal -5, Opacity 61, Blur 13, color #000000.
26. Selections/Select None.
27. Open Frame 013 corner tube. Copy/Paste as new layer.
28. Place in upper left corner. (See example below).

29. Effects/3-D Effects/Drop Shadow. Vertical -3, Horizonal -5, Opacity 61, Blur 3, color #000000.
30. Effects/Simple Filter/top left mirror. (I love this easy way to place the corners!)
31. Open Jesus2_Sandi tube. Copy/Paste as new layer. Move a little to left center and to bottom of 50px border. Use my image as an example.
32. Open jet_flower2 tube. Copy/Paste as new layer.
33. Image/Mirror. Pull to right bottom of image. Use my image as an example.
34. Effects/3-D Effects/Drop Shadow. Vertical -3, Horizonal -13, Opacity 41, Blur 16, color #000000.
35. In Materials Palette using the arrows, switch the foreground which is the Gradient with the background color.
36. From Tool bar, activate the text tool. Choose your font and size, using Vector setting and the Gradient. Type in your name or place your watermark. I used Bickham Script Fancy2 font, size 72 and a drop shadow. You may use any font, size and drop shadow you wish.
37. Convert to Raster Layer.
38. Image/Add Borders, 3px, Symmetric checked, color #403928.
39. Save as .jpg. I hope you have enjoyed doing this Easter tutorial and remember the meaning of Easter.
A big thank you to my testers, Evatexas and PamelaD upon whom I depend to find my boo-boos!
If you are going to use this tutorial for stationery, cards or place the tutorial/tag on another site, I would appreciate you contacting me for permission, giving Arasimages credit for the original tutorial and if possible, a link back to my site. Thank you.
Copyright © Arasimages All Rights Reserved