

St. Paddy's Mouse
For Danish, German and French translation, click on the flags.


For this tutorial you will need the materials in the zip file below.

You will need Plugin Filters Unlimited2 for this tutorial.
Unzip materials into a folder you have named St. Paddy's Mouse.
Use this Pot O Gold to mark your place along the way.

Open the tubes in PSP, duplicate and close originals.
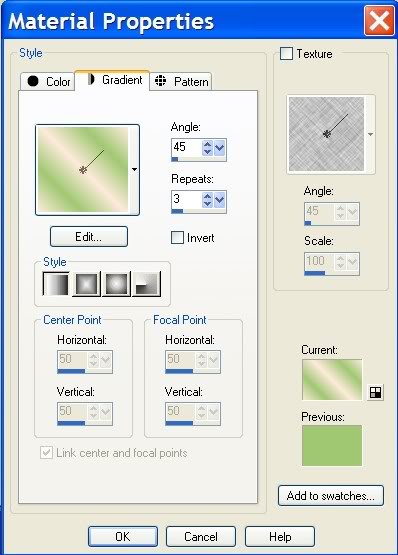
1. In Materials Palette, set foreground color to #fdeabd, background color to #a0c872. Set to Gradient to Style Linear, Angle 45, Repeats 3, Invert unchecked.
2. New/New Image 762px by 562px. Flood fill with Gradient.
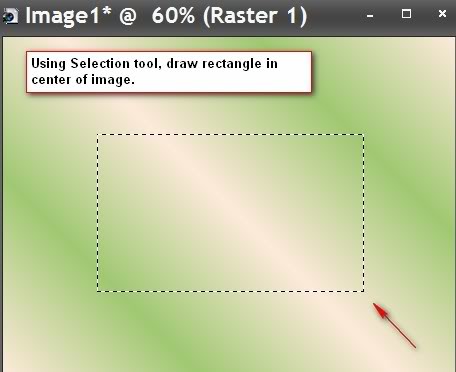
3. Using Selections tool from Tool bar, Select a rectangle in center of your image similar in size to the example below.
4. Layers/New Raster Layer.
5. Flood fill inside the selection with the background color #a0c872.
6. Effects/3-D Effects/Drop Shadow, Vertical -4, Horizontal 4, Opacity 50, Blur 24, color #000000.
7. Effects/3-D Effects/Drop Shadow, Vertical 4, Horizontal -4, Opacity 50, Blur 24, color #000000.
8. Selections/Select None.
9. Open SPD clover tube. Copy/Paste as new layer.
10. Imaage/Resize/Resize by 80%, Resize all layers unchecked. Pull under Raster 2, and up toward top right corner as in my image, behind rectangle.
11. Effects/3-D Effects/Drop Shadow, Vertical -4, Horizontal 4, Opacity 50, Blur 24, color #000000.
12. Paste clover as new layer (it is still in Copy), Image/Mirror. Pull to left and down into place as in my image, behind rectangle.
13. Effects/3-D Effects/Drop Shadow, Vertical 4, Horizontal -4, Opacity 50, Blur 24, color #000000.
14. Highlight Raster 2. Paste clover as new layer again (it is still in Copy). Resize by 40%.
15. Pull down to bottom right hand corner of rectangle.
16. Effects/3-D Effects/Drop Shadow, Vertical -4, Horizontal 4, Opacity 50, Blur 24, color #000000.
17. Open PotOfGold tube. Copy/Paste as new layer.
18. Image/Resize by 80%. Pull to bottom right of rectangle. Pull below Raster 5.
19. Effects/3-D Effects/Drop Shadow, Vertical -4, Horizontal 4, Opacity 50, Blur 24, color #000000.
20. Open Rainbow tube. Copy/Paste as new layer. Right click, Arrange/Bring to Top.
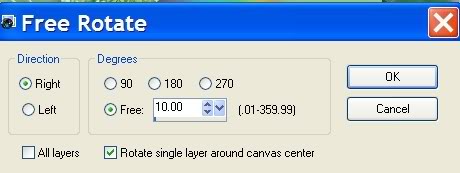
21. Layers/Duplicate. Image/Free Rotate/Rotate as in example below.
22. Pull both layers of rainbow in position so they align, making an arc from top to bottom of image. If there is an overlap, highlight the overlapping layer and use eraser tool to erase the overlap.
23. Open CGS_MBStPaddyacardLGE mouse tube. Copy/Paste as new layer.
24. Image/Resize by 70%, Resize all layers unchecked. Pull into position as in my image.
25. Effects/3-D Effects/Drop Shadow, Vertical 4, Horizontal -4, Opacity 50, Blur 24, color #000000.
26. Effects/3-D Effects/Drop Shadow, Vertical -4, Horizontal 4, Opacity 50, Blur 24, color #000000.
27. In Materials Palette, change the background color to #324809. Select the Text tool from Tool bar and write "Oh Happy St. Paddy's Day". Use font of your choice and size, vector or you may use font Palace Script MT, Size 72, Vector as I did.
28. Convert to Raster Layer.
29. Effects/3-D Effects/Drop Shadow, Vertical 2, Horizontal -2, Opacity 50, Blur 12, color #000000.
30. Merge Visible.
31. Effects/Filters Unlimited2/Buttons and frames/3-D Glass frame 2. Frame size set to 39, Contrast set to 39.
32. Open CGS_MBStPaddyacardLGE mouse tube. Image/Resize by 25%, Resize all layers checked!
33. Copy/Paste as new layer. Image/Mirror. Place at right bottom of image.
34. Effects/3-D Effects/Drop Shadow, Vertical 3, Horizontal -3, Opacity 50, Blur 14, color #000000.
35. Effects/3-D Effects/Drop Shadow, Vertical -3, Horizontal 3, Opacity 50, Blur 14, color #000000.
36. Merge/Merge Visible.
37. Sign your name or leave your watermark. Save as .jpg.
This tutorial was written at the request and honor of our dear Sonjia. She has shown extraordinary advances in learning PSP under the excellent teaching of Evatexas. Eva was also my teacher and is one of my testers along with PamemaD. I thank each of you for your assistance and friendship; both are invaluable.
If you are going to use this tutorial for stationery, cards or place the tutorial/tag on another site, I would appreciate you contacting me for permission, giving Arasimages credit for the original tutorial and if possible, a link back to my site. Thank you.
Copyright © Arasimages All Rights Reserved