
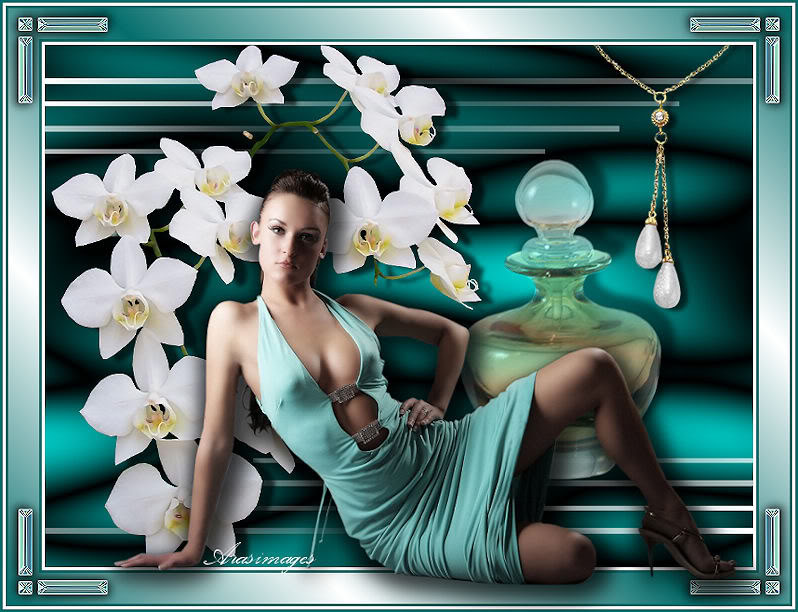
Lady Emerald
For Italian and Danish translation, click on the flags.


For this tutorial you will need the materials in the zip file below.

You will need the Mask BJ3 and the Plugin Simple for this tutorial.
Unzip materials into a folder you have named Lady Emerald. Place the mask in your PSP Files/Masks.
I give credit to the tubers Graca_Macedo, Mou, MS ArtScrapKit, ScrapKit by Angie and Arasimages for the beautiful tubes used in this tutorial. Links can be found on my Links page. I encourage you to visit their sites. Many more beautiful tubes are on Arasimages Tubes also.
Use this arrow to mark your place along the way.

This tutorial was written using PSPX2 and it is assumed you have a working knowledge of PSP.
Open the tubes in PSP, duplicate and close originals.
1. In Materials Palette, set foreground color to #ffffff, background color to #056e6c. Set to Gradient, Style Linear, Angle 45, Repeats 3, Invert unchecked.
2. New/New Image 762px by 562px. Selections/Select All.
3. Open Emerald Background, Copy/Paste into Selection. Selections/Select None.
4. Layers/New Raster Layer. Flood fill with foreground color #ffffff.
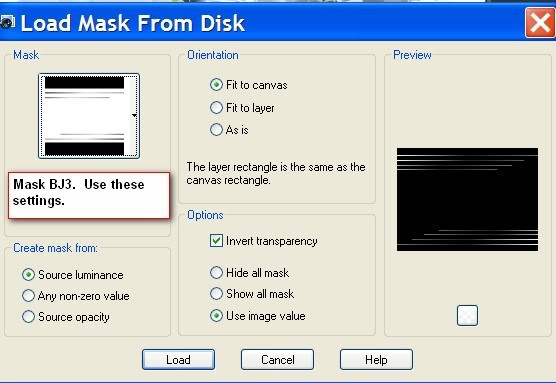
5. Layers/Load/Save Mask/Load Mask from disk. Right click top layer/Merge/Merge Group.
6. Open GoldBottle.pspimage perfume tube, Copy/Paste as New Layer. Move to right.
7. Image/Resize/Resize by 76%, Resize all layers unchecked. Lower Opacity to 50.
8. Open XBA~Alan Black Aphrodite Orchid tube, Copy/Paste as New Layer. Move to left.
9. Effects/3-D Effects/Drop Shadow. Vertical 3, Horizontal 14, Opacity 65, Blur 7, color #000000.

10. Open Mou_necklace_pink_drop_(recolored for you) tube, Copy/Paste as New Layer.
11. Image/Resize/Resize by 80%, Resize all layers unchecked. Move to right into place.
12. Effects/3-D Effects/Drop Shadow. Vertical 3, Horizontal 8, Opacity 65, Blur 7, color #000000.
13. Merge/Merge Visible.
14. Image/Add Borders 3px, color #ffffff.
15. Image/Add Borders 3px, color #056e6c.
16. Image/Add Borders 33px, color #ffffff.
17. Using Magic Wand from Tool bar, having Tolerance and feather set to 0, click on 33px border.
18. In Materials Palette, have Gradient set to Angle 45, Repeats 3, Invert checked.
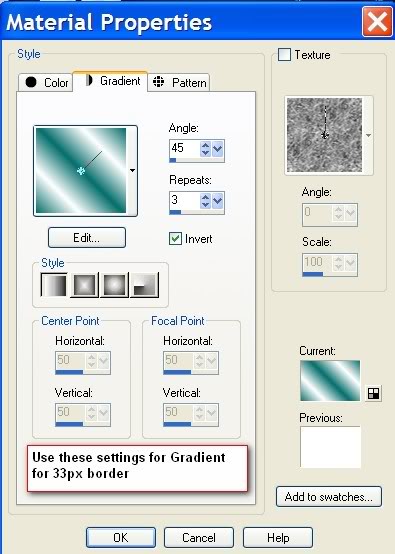
19. Flood fill 33px border with Gradient. Selections/Select None.
20. Image/Add Borders 3px, color #056e6c.
21. Image/Add Borders 3px, color #ffffff.
22. Image/Add Borders 3px, color #056e6c.
23. Open sde_cometome emerald jewel corner. Copy/Paste as New Layer. Move to upper left corner.
24. Effects/3-D Effects/Drop Shadow. Vertical -3, Horizontal 3, Opacity 65, Blur 14, color #000000.
25. Effects/3-D Effects/Drop Shadow. Vertical 3, Horizontal -3, Opacity 65, Blur 14, color #000000.
26. Effects/Simple/Top Left Mirror.
27. Open Graca_Macedo_BR woman tube. Copy/Paste as New Layer. Move woman down toward the bottom frame, so her hand rests on the border.
28. Effects/3-D Effects/Drop Shadow. Vertical 3, Horizontal 14, Opacity 65, Blur 24, color #000000.
29. Effects/3-D Effects/Drop Shadow. Vertical 8, Horizontal -3, Opacity 65, Blur 24, color #000000. Apply two times.
30. On Raster 2, Adjust/Sharpness/Sharpen.
31. Sign your name using the font and size of your choice or apply watermark. I used the font Palace Script MT Size 48, Vector.
32. Right click Vector layer in layer palette, Convert to Raster Layer.
33. Merge/Merge Visible. Save as .jpg. You are finished. I hope you have enjoyed doing this tutorial!
I give thanks to my wonderful testers, Evatexas and PamelaD. I appreciate them as my valued advisors and best friends whose help I find invaluable.
If you are going to use this tutorial for stationery, cards or place the tutorial/tag on another site, I would appreciate you contacting me for permission, giving Arasimages credit for the original tutorial and if possible, a link back to my site. Thank you.
Copyright © Arasimages All Rights Reserved