
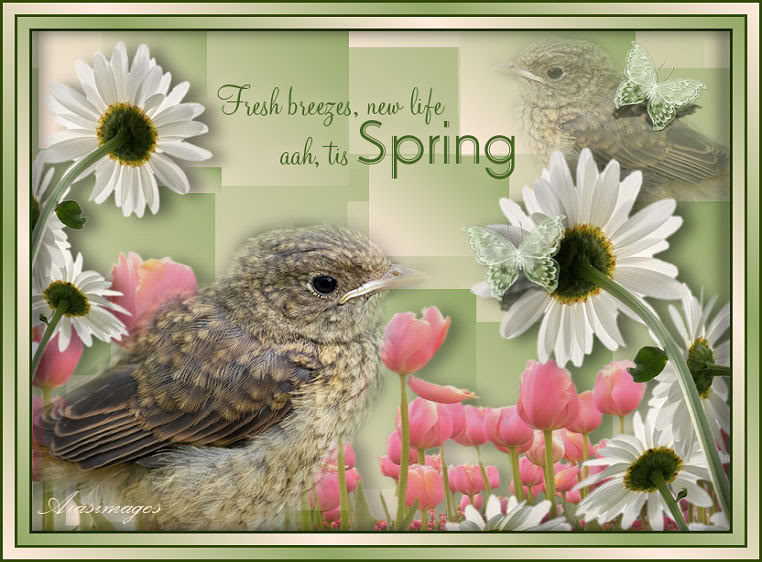
Spring Baby
For Italian, Danish and German translation, click on the flags.


For this tutorial you will need the materials in the zip file below.

You will need Plugin MuRa's Meister for this tutorial.
Unzip materials into a folder you have named Spring Baby.
I give credit to the tubers Dakara, Irene and mou for the beautiful tubes used in this tutorial. Links can be found on my Links page; I encourage you to visit their sites.
This tutorial was written using PSPX2 and it is assumed you have a working knowledge of PSP.
Use the bookmark below to mark your place along the way.

Open the tubes in PSP, duplicate and close originals.
1. In Materials Palette, set foreground color to #ffebdd, background color to #92a867. Set to Gradient, Style Linear, Angle 45, Repeats 0, Invert unchecked.
2. New/New Image 762px by 562px. Flood fill new image with Gradient.
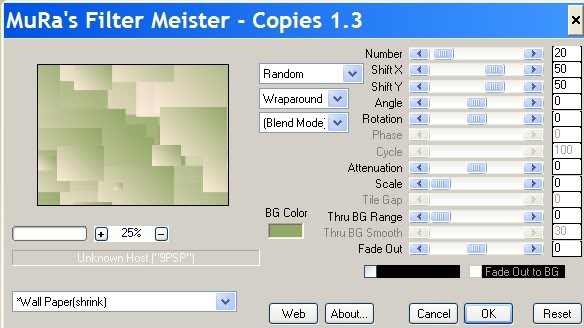
3. Effects/MuRa's Meister/Copies/use settings as in example below.
4. Open mou_honeycombs flower image. Copy/Paste as new layer.
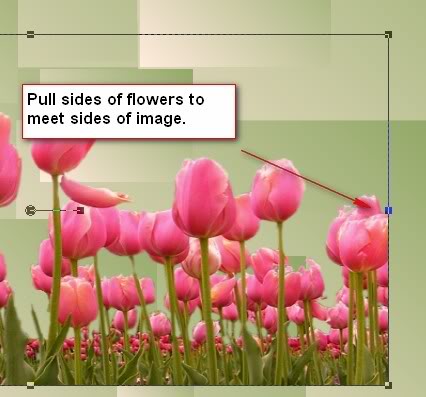
5. From Tool bar, use your Pick tool (by Move tool) and stretch the tulips on each side to fit image. (See example below) Change back to Move tool.
6. Pull flowers down to bottom of image. Lower Opacity to 70.
7. Effects/3-D Effects/Drop Shadow. Vertical 3, Horizontal 14, Opacity 50, Blur 24, color #000000.
8. Open cal-guis-marguerite daisy image. Copy/Paste as new layer.
9. Image/Resize by 50%, Resize all layers unchecked. Image/Mirror. Pull to right and down.
10. Effects/3-D Effects/Drop Shadow. Vertical 3, Horizontal 14, Opacity 50, Blur 24, color #000000.
11. Open cal-guis-marguerite daisy image. Copy/Paste as new layer.
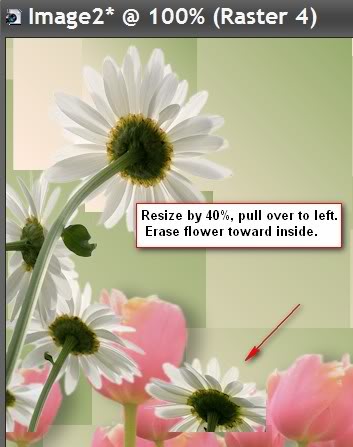
12. Image/Resize by 40%, Resize all layers unchecked. Pull to left and using Eraser tool, erase the inside flower as shown in example.
13. Effects/3-D Effects/Drop Shadow. Vertical 3, Horizontal 14, Opacity 50, Blur 24, color #000000.
14. Open DI_tube1180 of baby bird. Copy/Paste as new layer. Resize by 80%, Resize all layers unchecked. Move down and to left.
15. Layers/Duplicate. Image/Mirror. Image/Resize by 50%, Resize all layers unchecked. Lower Opacity to 74.
16. Pull Copy of Raster 5 below Raster 3. Highlight Raster 5.
17. Open Greenbutterfly image. Copy/Paste as new layer. Image/Resize by 65%, Resize all layers unchecked. Move upwards over smaller bird.
18. Using same Copy as before, Paste as new layer. Image/Resize by 70%, Resize all layers unchecked.
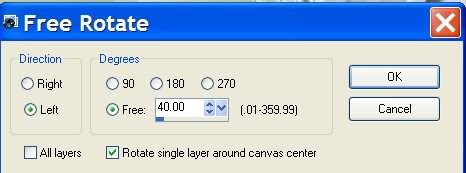
19. Image/Free Rotate as shown in example below. Move into place over daisy on right.
20. Effects/3-D Effects/Drop Shadow. Vertical 3, Horizontal 14, Opacity 50, Blur 24, color #000000.
21. In Materials Palette/Change background color to #324809.
22. Using Text tool, write Fresh breezes, new life. Convert to Raster Layer. (I used Monterey BT font, Size 48 Vector setting. You may choose to use another font and size.
23. Continue using same font, write aah, tis. Change to different font and larger size, type Spring. Convert to Raster layer. (I changed to Odessa LET, Size 72 Vector setting.)
24. Images/Add Borders 3px, color #324809.
25. In Materials palette, have foreground set to #ffebdd, background #92a867. Set Gradient to Style Linear, Angle 45, Repeats 3, Invert checked.
26. Images/Add Borders 13px, color #ffffff. From Tool bar, choose Magic Wand. Click 13px border. Flood fill with Gradient settings.
27. Layers/Promote Background Layer.
28. Effects/3-D Effects/Drop Shadow. Vertical 3, Horizontal 14, Opacity 50, Blur 24, color #000000. Drop Shadow again, only change Vertical to -3 and Horizontal to -14, all others stay the same. Selections/Select None.
29. Images/Add Borders 3px, color #324809.
30. Images/Add Borders 13px, #ffffff. Select 13px border with Magic Wand. In Materials Palette, uncheck Invert.
31. Flood fill 13px with Gradient. Selections/Select None.
32. Images/Add Borders 3px, color #324809.
33. Sign your name or watermark and save as .jpg.
I wish to give thanks to my wonderful testers, Evatexas and PamelaD. I appreciate them as my valued advisors and best friends.
If you are going to use this tutorial for stationery, cards or place the tutorial/tag on another site, I would appreciate you contacting me for permission, giving Arasimages credit for the original tutorial and if possible, a link back to my site. Thank you.
Copyright © Arasimages All Rights Reserved