
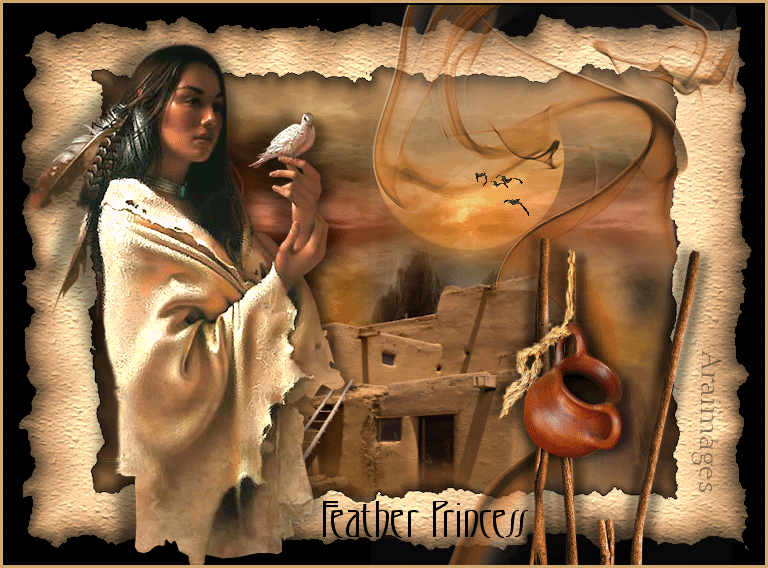
Feather Princess
For Italian, Danish and German translations, click on the flags.


For this tutorial you will need the materials in the zip file below.

You will need Plugin Alien Skin Xenofex 2 for this tutorial.
Unzip materials into a folder you have named Feather Princess. Place Texture Corel_15_037 (Cork) in your Corel textures if not there by default.
I give credit to the tubers Nikita, MDS, @nn, MarieL, LoriRhae and Macha for the beautiful tubes used in this tutorial. Links can be found on my Links page; I encourage you to visit their sites.
Use the bookmark below to mark your place along the way.

This tutorial was written using PSPX2 and it is assumed you have a working knowledge of PSP.
Open the tubes in PSP, duplicate and close originals.
1. In Materials Palette, set the foreground color to #fed7a6, background color to #000000.
2. New/New Image 762px by 562px. Flood fill new image with background color #000000.
3. Layers/New Raster Layer. Flood fill with foreground color #fed7a6.
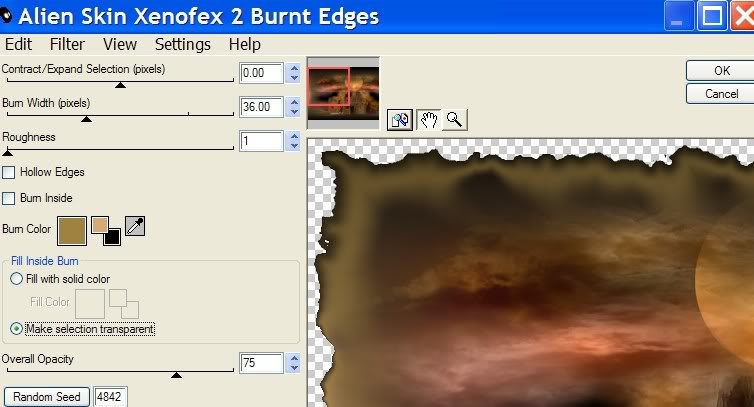
4. Effects/Alien Skin Xenofex 2/Burnt Edges, Burn color #97663e (as in example below).

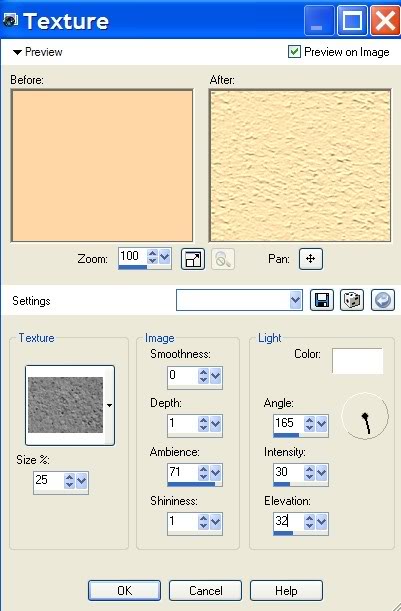
5. Effects/Texture Effects/Texture/(see settings in example below). Close off Raster layers 1 and 2.
6. Layers/New raster layer. Flood fill with foreground color #fed7a6.
7. Open Macha_Oct08_misted Islandofnoreturn tube. Copy/Paste as new layer. Move to left a little. Right click in Layers Palette on tube layer and Duplicate. Image/Mirror. Move Duplicated layer to the right till moon aligns. Merge/Merge Down.
8. Open MDS7268_New_Mexico tube. Copy/Paste as new layer. Move down but not all the way to bottom of image. Merge/Merge Visible.
9. Effects/Alien Skin Xenofex 2/Burnt Edges, Burn color #9f8240. (see example of settings below).
10. Image/Resize by 80%, Resize all layers unchecked. Open Raster layers 1 and 2.
11. Open Image13NA 7 Peace_LR of Indian lady. Image/Resize by 80%, Resize all layers checked. Image/Mirror.
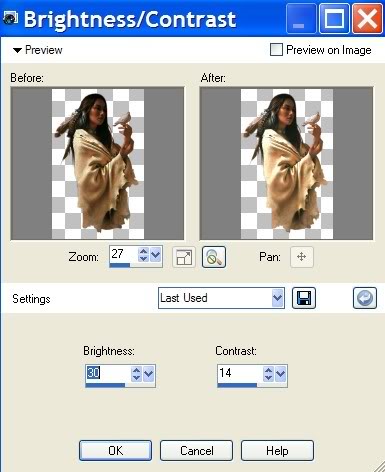
12. Adjust/Brightness and Contrast/Brightness and Contrast. Brightness set at 30, Contrast to 14. (See example below).
13. Copy/Paste Indian lady image, move to left into position.
14. Effects/3-D Effects/Drop Shadow, Vertical 3, Horizontal 9, Opacity 50, Blur 18, color #000000. Again with Drop Shadow, Vertical -3, Horizontal -19, (yes, I mean -19), Opacity 50, Blur 18, color #000000.
15. Open MarieL2006juin_smokebluet image. Copy/Paste as new layer. Resize/Resize 112%, Resize all layers unchecked.
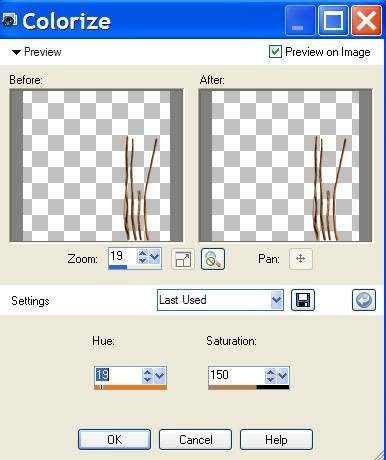
16. Adjust/Hue and Saturation/Colorize. Hue at 19, Saturation at 150. (Example below will be used for both smoke and branches). Set Opacity at 76 for smoke.
17. Open @nn_300907_takken sticks. Copy/Paste as new layer. Adjust/Hue and Saturation/Colorize. Hue at 19, Saturation at 150. (See example above).
18. Effects/3-D Effects/Drop Shadow Vertical 3, Horizontal 9, Opacity 50, Blur 13, color #000000. Repeat Drop Shadow with Vertical at -3, Horizontal -9 and the rest of the settings the same.
19. Open nikita_reveries_d_10_04.08 pot image. Copy/Paste as new layer. Image/Resize by 60%. Resize all layers unchecked. Move so that it hangs from middle tall stick.
20. Effects/3-D Effects/Drop Shadow of Vertical 3, Horizontal 9, Opacity 50, Blur 13, color #000000. Repeat Drop Shadow except Vertical -3, Horizontal -9, the rest all the same.
21. From Tool bar, click on Text tool. I have used Gradl Font set at Size 60, Vector using background color #000000. (See example of settings below). Type Feather Princess. Layers/Convert to Raster Layer.

22. Effects/3-D Effects/Drop Shadow of Vertical 3, Horizontal 9, Opacity 50, Blur 13, foreground color #fed7a6. Feel free to use whatever Font you like and drop shadow you like.
23. Image/Add Borders of 3px, Symmetrical checked, color #d1ab72.
24. Save as .jpg. You are now finished with the image unless you want to add the flying birds. In that case continue on with the Animation.
ANIMATION
1. Open Animation Shop. File/Open the .jpg image you just created. Edit/Duplicate Selected till you have 6 frames of the .jpg. Use your mouse scroll button to make the .jpg image smaller so you can see the frames if they are hidden. Click inside the FIRST frame. Edit/Select All.
2. File/Open the animated birds. Click inside the FIRST frame, Edit/Select All. On the blue top border, right click, left click Copy.
3. Now go to your .jpg image and INSIDE THE FIRST FRAME, right click, Paste/Into Selected Frame. Move your mouse over the moon to position your birds where you want them to be, left click mouse when they are positioned and they are in all of the frames of your .jpg!
4. Now at the top of Animation Shop, click on the View Animation and your birds should be flying. If you don't like where you put them, Click Undo arrow and repeat Step 3 again till they are in a pleasing position.
5. If the birds are flying faster than what you like, go to Animation/Frame Properties and under Display time, change from 10 to 15. The higher the number, the slower the birds will fly.
I hope you have enjoyed working this tutorial. Remember that you can change the tubes used to those of your liking and use the instructions to create something uniquely yours.
If you are going to use this tutorial for stationery, cards or place the tutorial/tag on another site, I would appreciate you contacting me for permission, giving Arasimages credit for the original tutorial and if possible, a link back to my site. Thank you.
Copyright © Arasimages All Rights Reserved