
Night Runners
For Italian and Danish translation, click on the flags.


For this tutorial you will need the materials in the zip file below.

You will need Plugins Alien Skin Xenofex 2 and VM Toolbox for this tutorial.
Unzip materials into a folder you have named Night Runners.
A big thank you to the tubers for their beautiful tubes used in this tutorial. The horses are tubed by Irene,JHanna has tubed the background, the metalringribbons by JoLovesDogs, the Pay-JLL2007 sea scene tubed by Angie, SparkleDust tubed by Silvie and the side bar is from Yoka. Please visit the tuber sites listed on my Links page.
Use the bookmark below to mark your place along the way.
Open the tubes in PSP, duplicate and close originals.
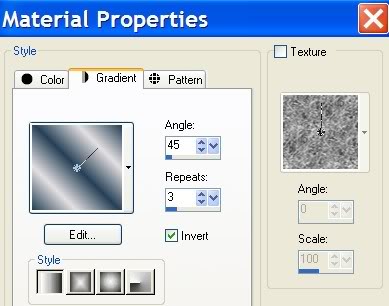
1. In Materials Palette, set foreground color to #ffffff, background color to #264057. Set Gradient to Style Linear, Angle 45, Repeats 3, Invert checked.
2. New/New Image 762px by 562px. Flood fill with Gradient.
3. Adjust/Blur/Gaussian Blur, Radius set to 37.
4. Layers/New Raster Layer. Selections/Select All.
5. Open the JHanna-230 background. Copy/Paste into Selection.
6. Image/Flip. Image/Mirror. Selections/Select None.
7. In Layers Palette, set Blend Mode to Luminance/Luminance Legacy.
8. Open Pay-JLL2007 sea scene. Copy/Paste as new layer. Pull to the right and down a little.
9. Paste Pay-JLL2007 sea scene again. Pull to the left and down a little, keeping horizon even so sea appears to be continuous.
10. Merge/Merge Visible. Effects/Edge Effects/Enhance.
11. Open DI_1337 tube of horses. Right click on top of horses image, Copy/Paste as New Image in workspace.
12. Effects/Edge Effects/Enhance.
13. Effects/3-D Effects/Drop Shadow. Vertical -3, Horizontal 4, Opacity 64, Blur 2, color #ffffff (white).
14. File/Save As/PSP Animation Shop.psp image. Save it in your working folder you have named Night Runners. You will use this saved image later in the tutorial.
15. Open Yoka_JDL_Serenity_Rand_bar tube. Copy/Paste as new layer on the Merged image.
16. Image/Resize/Resize by 105%, Resize all layers unchecked. Pull over to the far right side of image so it fits between top and bottom.
17. Layers/Duplicate. Image/Mirror.
18. Highlight Raster 1. Effects/3-D Effects/Drop Shadow. Vertical -3, Horizontal 2, Opacity 64, Blur 5, color #000000 (black).
19. Highlight Copy of Raster 1. Effects/3-D Effects/Drop Shadow. Vertical 3, Horizontal -2, Opacity 64, Blur 5, color #000000 (black).
20. Open metalringribbons_joluvesdogs tube. Copy/Paste as new layer.
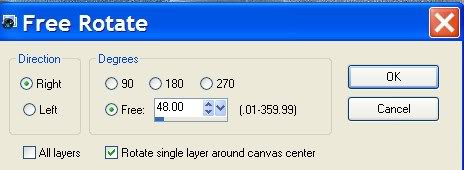
21. Image/Free Rotate. Rotate by 48 degrees/right. (See example for proper settings).
22. Pull metalringribbons to bottom right corner, placing as in my example (below).
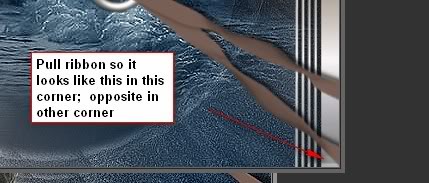
23. Layers/Duplicate. Image/Mirror. Image/Flip. You may have to pull ribbons into place so they are opposite each other in corners.
24. In Layers Palette, Merge/Merge down.
25. Effects/3-D Effects/Drop Shadow, Vertical -3, Horizontal 2, Opacity 64, Blur 5, color #000000 (black).
26. Image/Add Borders, 22px Symmetric, color #ffffff (white).
27. From Tool bar, select Magic Wand. Click inside 22px border to select it. Flood fill with existing Gradient. Keep border selected.
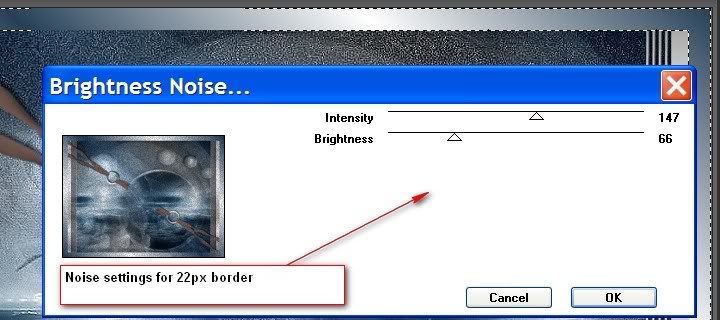
28. Effects/VM Tool Box/Brightness Noise. Intensity of 147, Brightness of 66. (See example below).
29. In Layers Palette, right click on Background layer/Promote Background Layer. Keep border selected.
30. Effects/3-D Effects/Drop Shadow, Vertical -3, Horizontal 4, Opacity 64, Blur 2, color #000000 (black).
31. Effects/3-D Effects/Drop Shadow, Vertical 3, Horizontal -4, Opacity 64, Blur 2, color #000000 (black).
32. Selections/Select None.
33. In Materials Palette, set Background color to #ffffff, (white).
34. From Tool bar, select Text tool. I chose Continuum Light font, Size 60, Vector. (See example below). Type in "Night Runners", Convert to Raster Layer. Place in upper left corner area.

35. Effects/3-D Effects/Drop Shadow. Vertical -3, Horizontal 2, Opacity 64, Blur 2, color #000000 (black).
36. From Tool bar, using Text tool, sign your name or leave your watermark. I used the same font as text of Night Runners, Size 36, Vector, no drop shadow. Convert to Raster Layer. Place where you want. You may use the same font, sizes and shadow as I did in Steps #36 through #38 or those of your own choice. This is a personal choice I like to give my tutorial guests.
37. Merge/Merge Visible. Save as.jpg named Night Runners in your working folder. You will use this in Animation Shop.
38. We will now make the animation on the SparkleDust_30 tube. Open the tube, Copy/Paste as New Image on your workspace.
39. Duplicate the SparkleDust layer 2 times so you end up with 3 layers total. Close off top 2 layers by clicking the eye of the Layers.
40. Highlight first layer, Raster 1.
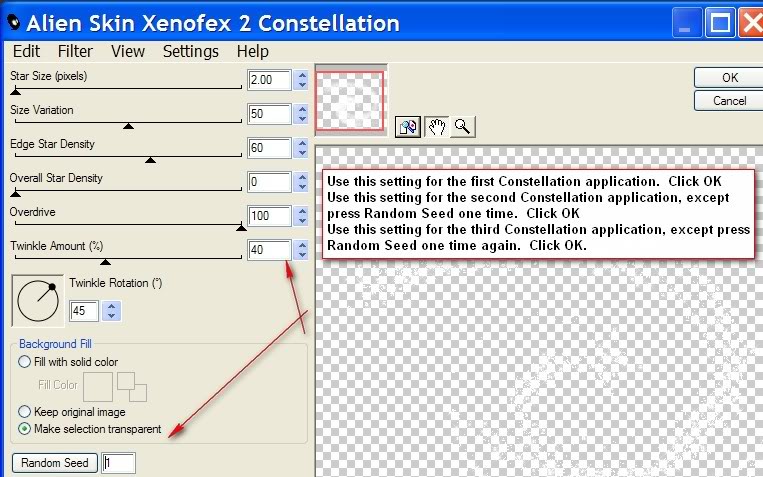
41. Effects/Alien Skin Xenofex 2/Constellation using these settings. (See example below).
42. Close off first layer by clicking eye.
43. Open Copy of Raster 1. Highlight it.
44. Effects/Alien Skin Xenofex 2/Constellation, using same settings except click Random Seed one time.
45. Close off Copy of Raster 1, open Copy 2 of Raster 1. Highlight top layer.
46. Effects/Alien Skin Xenofex 2/Constellation, using same settings except click Random Seed one time.
47. Unlock the layers you have closed. File/Save As/Animation Shop psp image.
48. Open this file in Animation Shop.
49. In Animation Shop, File/Open/Night Runners.jpg image. Edit/Duplicate twice making three frames in all. Click bar to highlight FIRST frame.
50. Edit/Select All.
51. Click on your SparkleDust animation at the top, highlighting FIRST frame. Edit/Select All. Right click blue bar/copy.
52. Right click INSIDE the FIRST frame of your background image, Paste into Selection...hover your mouse to guide where you want the animation and left click to put it in place.
53. Click the Animation button at the top to check your animation. If it works the way you want it to, then let's go to the next step.
54. In Animation Shop, File/Open Horses.psp image. Right click/Copy at the blue top of image.
55. Go back to your main image. Click the first frame, Edit/Select All, Edit/Propagate Paste, right click INSIDE the first frame. Paste into Selection hovering/holding your mouse, guiding where to place the horses. Place them exactly in the bottom left corner of the image, above frame. Left click mouse to drop/place them there. They should go in all of the frames at once. Check your animation again to see that all is as it should be. If satisfied with your creation, go to the next step of saving.
56. File/Save As and a box will come up. Give your creation a File name (Night Runners) and direct where to save it. Click Save. When the next box appears, click Next, then Next, then Next again as each box comes up, and finally Finish.
You are now finished with a long and more advanced animation tutorial. Congratulations!
A big thank you to my testers, Evatexas and PamelaD whose help I truly appreciate!
If you are going to use this tutorial for stationery, cards or place the tutorial/tag on another site, I would appreciate you contacting me for permission, giving Arasimages credit for the original tutorial and if possible, a link back to my site. Thank you.
Copyright © Arasimages All Rights Reserved