

African Beauty
For Danish and German translation, click on the flags.


For this tutorial you will need the materials in the zip file below.

You will need the Plugin Fun House.
A big thank you to the tubers Karine, garlins and Mario C for their beautiful tubes used in this tutorial. Please visit the tuber sites listed on my Links page.
Use the bookmark below to mark your place along the way.

Open the tubes in PSP, duplicate and close originals.
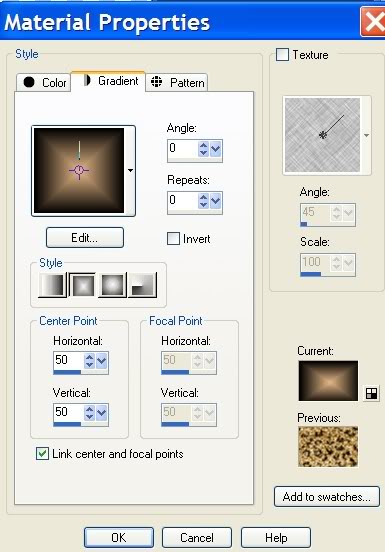
1. In Materials Palette, set foreground color to #e6b886, background color to #000000. Set to Gradient, Style Rectangular, Angle 0, Repeats 0, Invert unchecked.
2. New/New Image 708px by 508px. Flood fill with Gradient.
3. Open garlins-flower1 tube. Copy/Paste as new layer.
4. Move to just right of center of image. Lower Opacity to 43.
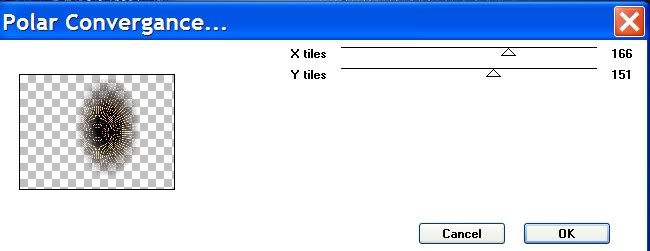
5. Effects/Fun House/Polar Convergence. (Use settings in example below).
6. Paste the garlins-flower1 tube as new layer once again. Move toward top of image.
7. In Layers Palette, lower Opacity of flower to 61.
8. Paste the garlins-flower1 tube as new layer once more.
9. In Layers Palette, lower Opacity of flower to 61. Image/Mirror.
10. Open MC1580 leopard tube. Copy/Paste as new layer.
11. Image/Mirror.
12. Image/Resize/Resize to 80%. Resize all layers unchecked.
13. Move leopard to right side of image and down so part of the ground is not seen.
14. Effects/3-D Effects/Drop Shadow, Vertical -2, Horizontal 8, Opacity 75, Blur 23, color #000000 (black). Repeat drop shadow.
15. Layers/Duplicate. Image/Mirror. Move copy of leopard tube over to left so edges meet. HINT: Use keyboard arrow keys if you are not steady of hand with the mouse.
16. Open Karine-dreams_Black Beauty tube. Copy/Paste as new layer.
17. Image/Mirror.
18. Image/Resize/Resize by 70%, Resize all layers unchecked. Move into place on left side of image.
19. Effects/3-D Effects/Drop Shadow of Vertical -2, Horizontal 8, Opacity 75, Blur 23, color #000000 (black). Repeat drop shadow.
20. With Copy of Raster 5 highlighted, using Eraser tool, erase leopard from behind woman's neck area. Highlight Raster layer 6 of woman to keep in order.
21. From Tool bar, select Text tool. For my signature, I used Aurora font, Size 72, Vector, background color #000000 (black) See settings below. (You may sign your name/watermark using font/size of your choice.)

22. In Layers Palette, Convert to Raster Layer.
23. I applied a drop shadow behind my signature so it would show more prominently. Drop Shadow used: Vertical -2, Horizontal 8, Opacity 75, Blur 23, Color #e6b886.
24. Using Text tool, choose font Patrick regular, size 120, Vector, color #000000 black. (See settings below). Type in the letter "A".

25. Convert to Raster Layer.
26. Effects/3-D Effects/Drop Shadow, Vertical -2, Horizontal 8, Opacity 90, Blur 20, color #e6b886.
26. Change size of font to 72. Type in "frican". Place to the right of the "A".
27. Convert to Raster Layer. Repeat Drop Shadow.
28. Using Text tool, type in "beauty" using same settings as above. Place below the word African.
29. Convert to Raster Layer. Apply Drop Shadow on beauty as you did on African.
30. Image/Add Borders, 6px, Symmetric checked, color #e6b886.
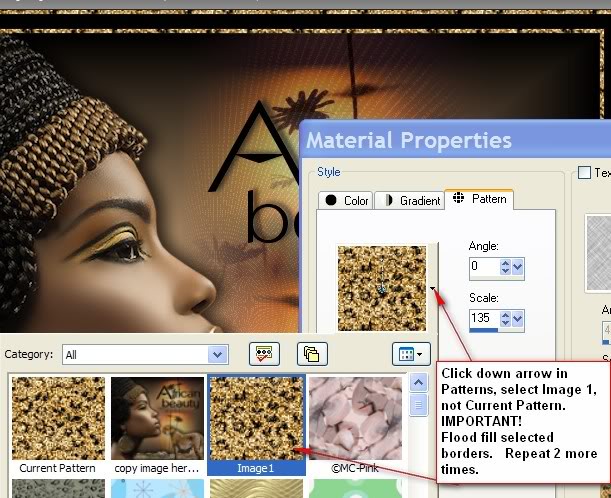
31. Image/Add Borders, 16px, Symmetric checked, color #000000.
32. Image/Add Borders, 6px, Symmetric checked, color #e6b886.
33. Layers/Promote Background Layer.
34. ANIMATION SHOP WORK BEGINS HERE.
35. Animation Shop/File/Open the gl_20% leopard.gif file. Notice it has 3 frames. Edit/Select All.
36. File/Export frames to PSP. (Or Edit/Copy and paste frames in PSP as a new image.)
37. In PSP, notice you now have three (3) frames in the Layers Palette. Close off Layers 2 and 3. Highlight Layer 1.
38. In Materials Palette, change Foreground color to Pattern, chose Image 1 of leopard.
39. On main image, holding down Shift key, select both 6px borders.
40. Duplicate image two (2) times, having three (3) layers total.
41. Close off top two layers, highlight the bottom layer.
42. In Materials Palette/Patterns, select leopard glitter Image 1.
43. Flood fill the two 6px borders with pattern. Close off Layer 1.
44. Move to middle layer and open it.
45. Highlight glitter image. Close off layer 1. Open and highlight middle layer.
46. In Materials Palette/Patterns, select leopard glitter Image 1.
47. Flood fill both 6px borders with pattern. Close off middle layer.
48. Move to top layer, open and highlight it.
49. Back to glitter image, close off middle layer. Open and highlight top layer.
50. In Materials Palette/Patterns, select leopard glitter Image 1.
51. Flood fill both 6px borders with pattern. (Layer 3).
52. Open middle and bottom layer. (All layers open).
53. Selections/Select None.
54. File/Save As/PSP Animation Shop file.
55. Go to Animation Shop, File/Open the file you just saved.
56. Click on Animation button to see if you have animation that pleases you. If so, go to File/Save As. When box comes up, choose where to save your newly created image, name it African Beauty. Click Save, then Next 3 times, then Finish.
You are finished! I hope you enjoyed doing this animated tutorial.
A big thank you to my testers, Evatexas and PamelaD whose time I so appreciate!
If you are going to use this tutorial for stationery, cards or place the tutorial/tag on another site, I would appreciate you contacting me for permission, giving Arasimages credit for the original tutorial and if possible, a link back to my site. Thank you.
Copyright © Arasimages All Rights Reserved