
Sweet Surrender
For Danish and German translation, click on the flag.


For this tutorial you will need the materials in the zip file below.

Unzip materials into a folder you have named Sweet Surrender. Put the mask in Mask folder and Selection in Selection folder in PSP Files, open the brush in PSP and import it to your PSP brushes.
A big thank you to the tubers Karine and Misssilly for their beautiful tubes used in this tutorial. Please visit the tuber sites listed on my Links page.
Use the bookmark below to mark your place along the way.
Open the tubes in PSP, duplicate and close originals.
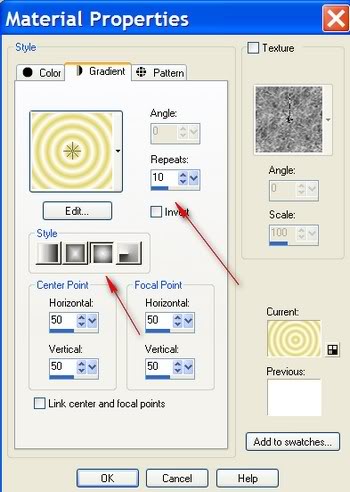
1. In Materials Palette, set foreground color to #ffffff, background color to #e2d566. Set to Gradient, Style Sunburst, Angle (grayed out), Repeats 10, Invert unchecked.
2. New/New Image 762px by 562px. Flood fill with Gradient.
3. Adjust/Blur/Gaussian blur/Radius of 30.
4. Layers/New Raster Layer. Flood fill with Background #e2d566.
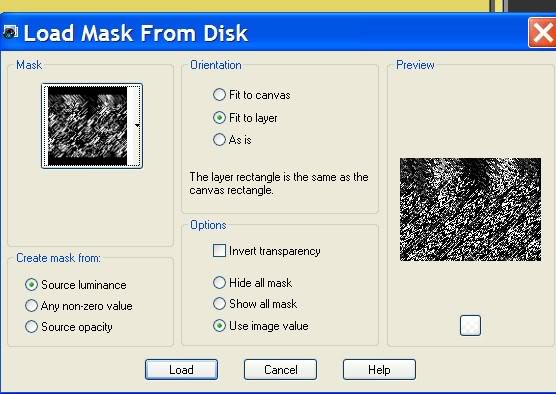
5. Layers/Load/SaveMask/Load Mask from Disk. Choose sg_geometric_texture 5. Load.
6. Layers Palette/Merge/Merge Group.
7. Open K@rine_dreams_Pretty_face tube. Copy/Paste as new layer.
8. Image/Mirror. Move into position on left.
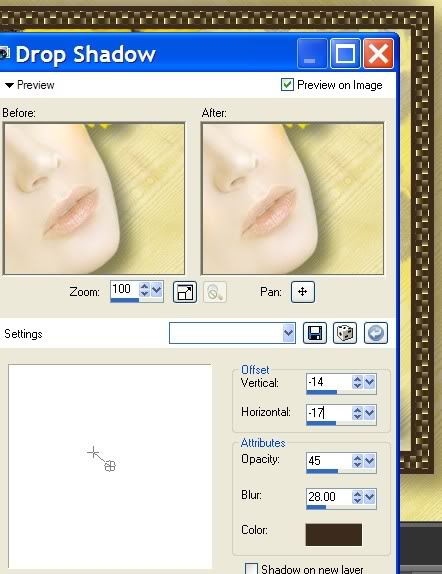
9. Effects/3-D Effects/Drop Shadow, Vertical 14, Horizontal 17, Opacity 45, Blur 28, color #3d2b1b.
10. Tool bar/find Eraser tool and erase line you see in center of page.
11. Again Paste woman tube as New layer.
12. Image/Resize/Resize by 80%, Resize all layers unchecked. Move to right, drop Opacity to 25. Pull Raster 3 below Raster 2. Highlight Raster 2.
13. Open Misssilly_Mistvases tube. Copy/Paste. Move to right side, just right of woman's eye. Layers/Merge/Merge Visible.
14. Image/Resize/Resize by 75%, Resize all layers CHECKED.
15. Image/Add Borders 23px, Symmetric checked, color #3d2b1b.
16. From Tool bar, select Magic Wand. Click on 23px border.
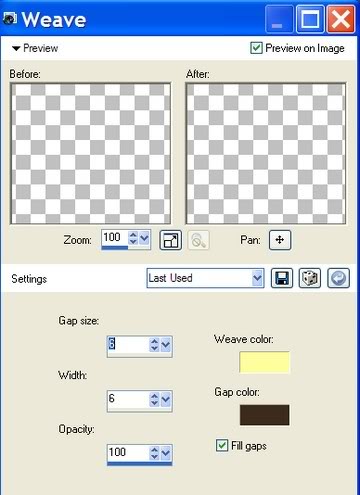
17. Effects/Texture Effects/Weave. Use settings in example below, using color #ffff9c for Weave and color #3c291a for Gap.
18. In Materials Palette, change background color to #3d2b1b.
19. Layers/New Raster Layer. Flood fill still active border with background color.
20. Selections/Modify/Contract by 5px. Press Delete Key. Selections/Select None.
21. Layers Palette/Merge/Merge Visible. Minimize image to task bar for use later.
22. In Materials Palette, change background color back to #e2d566. Make sure the Materials Palette is set to Gradient like in beginning.
23. New/New Image/762px by 562px. Flood fill with Gradient.
24. Adjust/Blur/Gaussian blur/Radius of 30.
25. Layers/New Raster Layer. Flood fill with background color #e2d566.
26. Layers/Load/SaveMask/Load Mask From Disk. Load. (Use same Mask as before on first image).
27. Layers/Merge/Merge Group.
28. Activate minimized image from Task bar. Copy/Paste as new layer.
29. Effects/3-D Effects/Drop Shadow, Vertical 14, Horizontal 17, Opacity 45, Blur 28, color #2b1b0e. Repeat Drop Shadow using Vertical -14 and Horizontal -17, all other settings the same.
30. Image/Add Borders 3px, Symmetric checked, color #2b1b0e.
31. Layers/New Raster Layer. Tool Bar/Activate Paint Brush. Select brush agi_wb_Sweetsurrender. Using color #2b1b0e, stamp on bottom center of image.

32. Sign your name using Font, size, Vector setting and color of your choice. Convert to Raster Layer.
33. Layers/Merge/Merge Visible. Save as .jpg file in your working folder.
TO MAKE YOUR OWN ANIMATED SQUARES FOR ON THE BORDER, CONTINUE WITH INSTRUCTIONS, OR YOU MAY USE THE "READY-MADE" ONES I HAVE PROVIDED. (Be adventuresome, try making your own! It is fun.
34. New/New Image 762px by 562px. Flood fill with #ffffff.
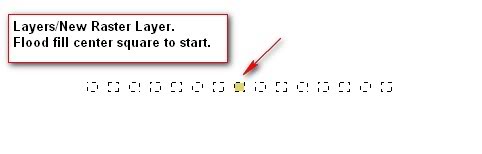
35. Layers/New Raster Layer.
36. Selections/Load/Save Selection/Load Selection from Disk. Choose sde_butterflies_4. Load.
37. In "marching ant squares", flood fill one square, starting with center square with color #e2d566.
38. Right click on top of Image, Copy.
39. Open Animation Shop. Paste as New Animation.
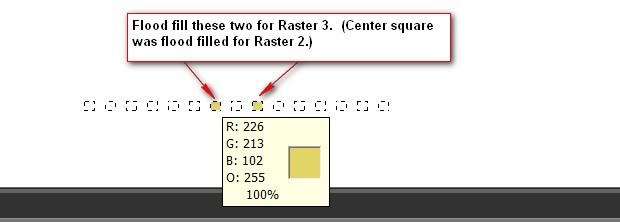
40. Go back to PSP. Layers/New Raster Layer. Flood fill one square on each side of center square with color #e2d566. Close off layer with filled center square. Right click top of Image, Copy.
41. Back to Animation Shop. Right click on image, Paste/ After Current Frame. (Hint: Keep the last frame you pasted highlighted for adding the next frame. You will be repeating these steps as you move outward, flood filling more squares.)
42. Back to PSP. Layers/New Raster Layer. Flood fill one square on each side of the two you just worked with, color#e2d566. Close off the layer you just worked with. Copy.
43. Back to Animation Shop. Right click on image, Paste/ After Current Frame. Keep highlighted.
44. Back to PSP. Layers/New Raster Layer. Flood fill one square on each side of the two you just worked with, color #e2d566. Close off the layer you just worked with. Copy.
45. Back to Animation Shop. Right click on image, Paste/ After Current Frame. Keep highlighted.
46. In PSP, continue flood filling the squares on each side of the last ones filled and Copy/Paste After Current Frame until you have them all flood filled and Copied/Pasted in AS. You should end up having eight (8) frames in Animation Shop.
47. Click on the Animation Shop animation button to check how your new animation looks. If it works correctly, File/Save As/.gif file in your working folder. Keep open in your AS workspace.
START HERE FOR PLACING THE ANIMATION ON THE MAIN IMAGE, whether you use the ready-made animation or created your own.
48. In Animation Shop, open your saved .jpg Sweet Surrender image. Edit/Duplicate until you have eight (8) frames.
49. Highlight the first frame. Edit/Select All.
50. On your animated squares you just created, click to highlight the first frame. Edit/Select All. Right click on top, Copy.
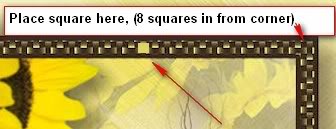
51. Go back to the first frame of Sweet Surrender image, right click inside and Paste/Into Selected Frame. Find the spot where you want your animation to be on the top and left click. See example below for where I placed mine.
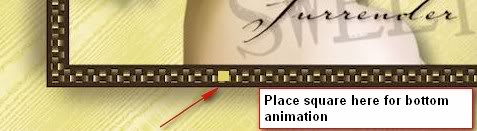
52. In the first frame of Sweet Surrender image, right click inside and Paste/Into Selected Frame again, only this time on the bottom. See example below.
53. Now click on the animation button in Animation Shop and see if you like where you have placed the animated squares. If you want to change their position, simply Undo and place them again.
54. Animation/Frame Properties/ change the 10 speed to 15 to slow down the squares.
55. File/Save As. When box comes up, Save in your working folder, give your work a name (Sweet Surrender), click Save. Then click Next three (3) times, then Finish. You are now finished with a complicated tutorial. Give yourself a pat on the back for a job well done!
I hope you have enjoyed doing this tutorial and have learned how to create your own animation!
A big thank you hug to my testers, Evatexas and PamelaD whose time and input I so appreciate!
If you are going to use this tutorial for stationery, cards or place the tutorial/tag on another site, I would appreciate you contacting me for permission, giving Arasimages credit for the original tutorial and if possible, a link back to my site. Thank you.
Copyright © Arasimages All Rights Reserved