
Glamour
For Danish and German translation, click on the flags.


For this tutorial you will need the materials in the zip file below.

You will need the plugin AlienSkin Xenofex2/Constellation to do this tutorial. I have used PSPX3 to create this tutorial but you may use an earlier version. It is assumed you have a working knowledge of PSP.
A big thank you to the tubers Colombe and Karine for their beautiful tubes used in this tutorial. Please visit the tuber sites listed on my Links page.
Use the bookmark below to mark your place along the way.
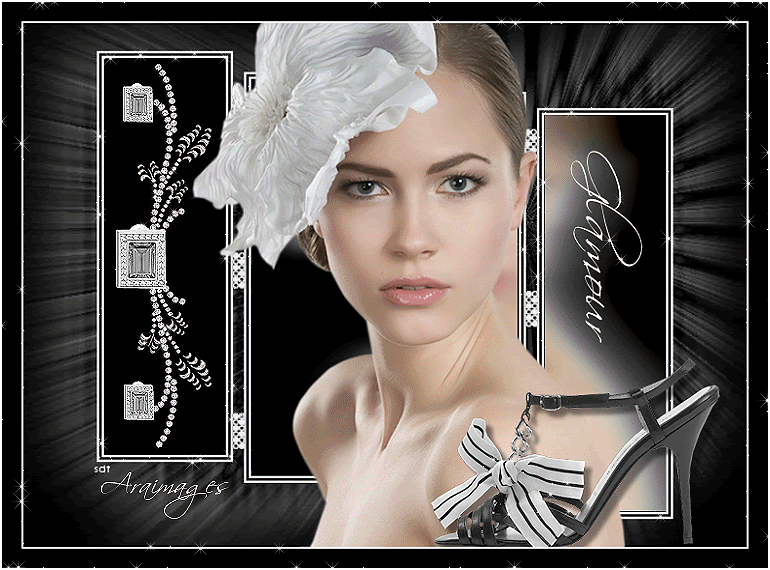
1. New/New Image 742px by 542px. Flood fill with #000000, black.
2. Layers/New Raster Layer. Selections/Select All.
3. Open sdtMask236. Copy/Paste into Selection. Selections/Select None.
4. Using Selections Tool, select by clicking inside each of the rectangles while holding down Shift key. Press Delete key once. You will still see black from the layer beneath. Selections/Select None.
5. Open K@rine_Dreams_Pretty_face_881. Highlight Layer 2 (bottom layer). Copy/Paste as New Layer. Pull down between Layer 1 and 2 of Image. Leave open as we will be using K@rine_Dreams_Pretty_face881 again.
6. Image/Resize/Resize by 80%, Resize all layers unchecked. Move image over toward right side of rectangle.
7. Highlight Raster 3 (top layer).
8. Move to Layer 1 (center layer) of woman. Copy/Paste as New Layer.
9. Image/Resize/Resize by 90%, Resize all layers unchecked. Move into place as in my image.
10. Adjust/Sharpness/Sharpen.
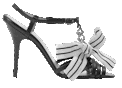
11. Open Chaussure01-01_tube_Colombe shoe. Copy/Paste as New Layer.
12. Image/Resize/Resize by 65%, Resize all layers unchecked.
13. Move to right/bottom side of image.
14. Adjust/Sharpness/Sharpen.
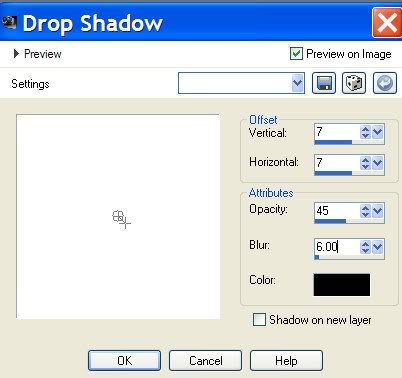
15. Effects/3-D Effects/Drop Shadow, Vertical 7, Horizontal 7, Opacity 45, Blur 6, color #000000, black.
16. Open diam010 tube of jewel. Copy/Paste as New Layer.
17. Image/Resize/Resize by 88%, Resize all layers unchecked. Move to left rectangle.
18. Adjust/Sharpness/Sharpen.
19. In Tool bar, choose font Scriptina, Size 60, Vector setting, color #ffffff, white. Type Glamour. Using turning tool, turn so Glamour is vertical. (See example for settings).

20. Layers/Convert to Raster Layer.
21. Sign your name or place watermark in your choice of font and size.
22. Image/Add Borders, 2px white, Symmetric checked.
23. Image/Add Borders, 20px black, Symmetric checked.
24. Image/Add Borders, 2px white, Symmetric checked.
25. In Layers Palette, duplicate the image twice having a total of three (3) layers.
26. Close off top and middle layer by clicking the eye of each of those layers. Highlight bottom layer.
27. Effects/AlienSkin Xenofex 2/Constellation. Use these settings as shown below for the bottom layer of image. Click OK.
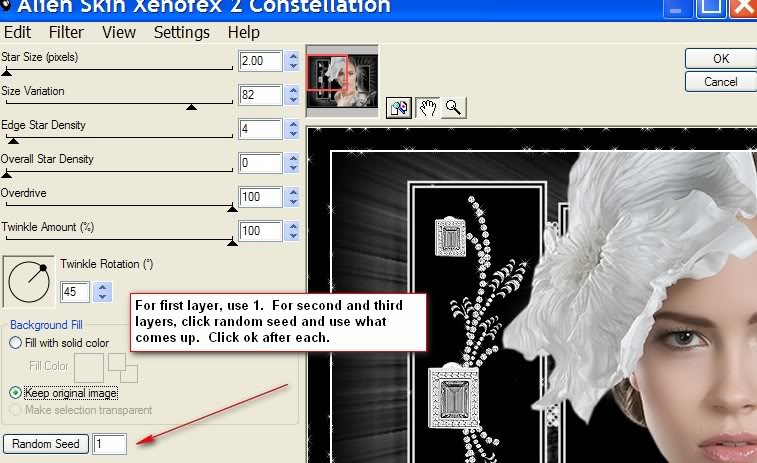
28. Close off bottom layer. Highlight and open middle layer.
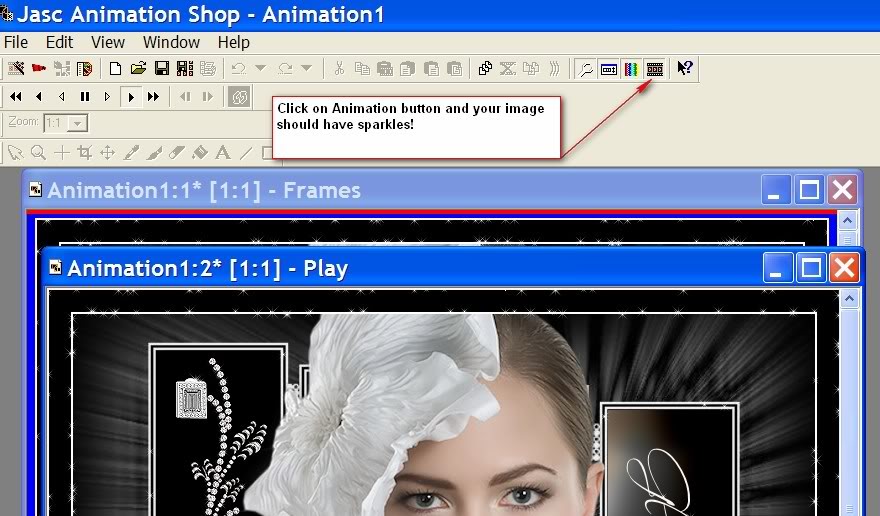
29. Effects/AlienSkin Xenofex 2/Constellation. Using same settings as above, click Random Seed, click OK.
30. Close off middle layer. Highlight and open top layer.
31. Effects/AlienSkin Xenofex 2/Constellation. Using same settings as above, click Random Seed, click OK.
32. Having all layers open, File/Save As/PSP Animation Shop file. Give your image a name and save it in your working folder.
33. Open Animation Shop. File/Open the file you just saved.
34. Click on the Animation button as in the image below and if your image has sparkles to please you, then you are ready to save as a .gif file.
35. File/Save As. When the "Save As" box comes up, give your image a name (Glamour), appoint where to save it as a .gif file. Click Next 3 times and Finish.
Congratulations on completing an animated image! Thank you for using my tutorial. I write these for my enjoyment and your pleasure.
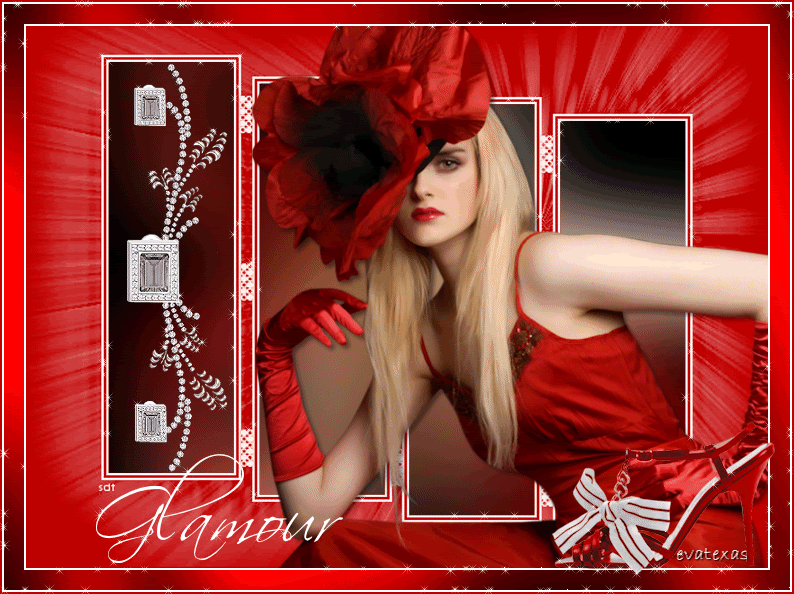
The very beautiful image below is one created by Evatexas using the tutorial above. She changed the color black to red and did her Mask a bit differently, but for the most part, she followed the tutorial. This is an example of how you can use a tutorial and make it your own by changing the tubes and colors. I think she did a marvelous job!
A big thank you to my testers, Evatexas and PamelaD whose time and help I so appreciate!
If you are going to use this tutorial for stationery, cards or place the tutorial/tag on another site, I would appreciate you contacting me for permission, giving Arasimages credit for the original tutorial and if possible, a link back to my site. Thank you.
Copyright © Arasimages All Rights Reserved