

Faces of Eve
For Italian, Danish, German and French translation, click on the flags.


For this tutorial you will need the materials in the zip file below.

Unzip the materials into a working folder. Open the materials in PSP, copy and close originals. You will need Mura's Meister, Xero and AlienSkin Xenofex 2 plugins to do this tutorial. I have used PSPX3 to create this tutorial but you may use an earlier version. It is assumed you have a working knowledge of PSP.
Thanks go to Karine and Yoka for the beautiful tubes used. Please visit the tuber sites listed on my Links page.
Use the arrow below to mark your place along the way.
![]()
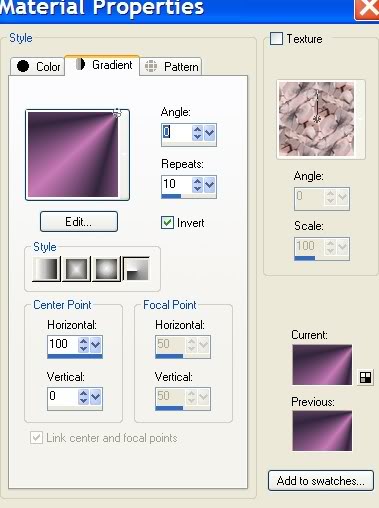
1. In Materials Palette set Foreground to c87ab8, Background to #32263c. Under the Gradient tab, set the Style to Radial, Angle 0, Repeats 10, Invert checked.
2. New/New Image 762px by 562px. Flood fill with Gradient.
3. Layers/New Raster Layer. Selections/Select All.
4. Open 1217491257_masques.pspimage. Copy/Paste into Selection.
5. Selections/Select None.
6. Blend Mode/Luminance (Legacy). Drop Opacity to 62.
7. Open k@rine_dreams_Pretty_Face_1024_Mai 2010.pspimage of woman. Copy/Paste as New Layer.
8. Move woman over to left side of image.
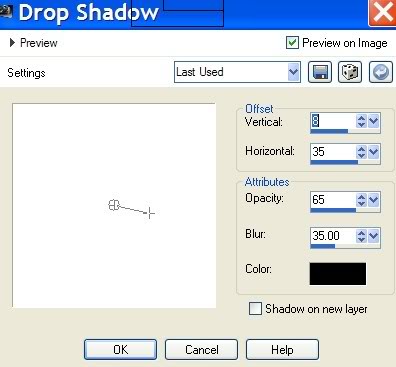
9. Effects/3-D Effects/Drop Shadow, Vertical 8, Horizontal 35, Opacity 65, Blur 35, color #000000.
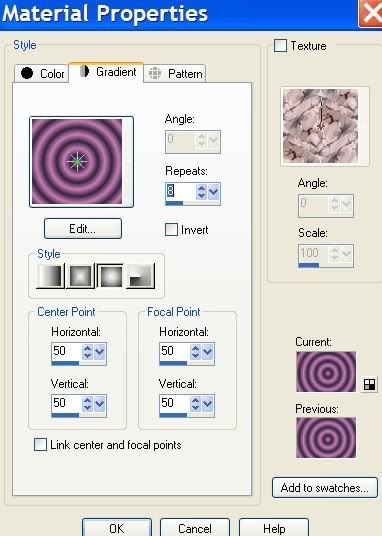
10. In Materials Palette, set Foreground Gradient to Style Sunburst, Angle to 0, Repeats to 8, all Horizontal and Vertical settings to 50. See my example for settings.
11. Image/Add Borders 20px, Symmetric checked, color #000000.
12. From Tool bar, select Magic Wand. Click inside 20px border to activate it.
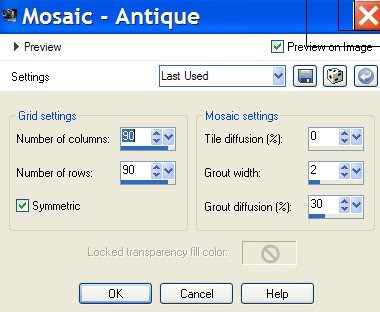
13. Flood fill with Gradient. Effects/Texture Effects/Mosaic-Antique. (See example for settings).
14. Effects/3-D Effects/Drop Shadow, Vertical 8, Horizontal 8, Opacity 65, Blur 20, color #000000. Then repeat changing Vertical -8, Horizontal -8 only, leaving the rest the same.
15. Selections/Select None.
16. Image/Add Borders 1px, Symmetric checked, color #000000.
17. Image/Resize/Resize 50%, Resize All Layers checked. Copy/Minimize.
18. Image/New Image, 762px by 562px.
19. In Materials Palette, set the Gradient as it is in Step #1.
20. Flood fill new image with Gradient.
21. Paste minimized image as New Layer.
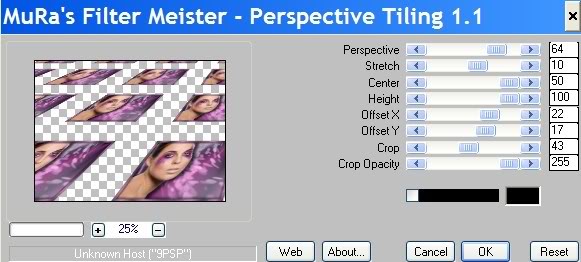
22. Effects/Mura's Meister/Perspective Tiling. Use settings as in my example below.
23. Open Yoka_Flowers_Goldenlight_PB_231007.pspimage. Copy/Paste as New Layer.
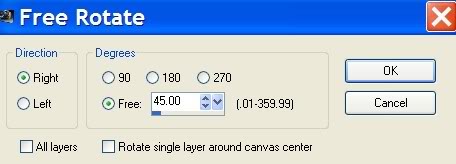
24. Image/Free Rotate/Right/45 degrees. (See example for settings).
25. Effects/3-D Effects/Drop Shadow, Vertical 8, Horizontal 35, Opacity 65, Blur 35, color #000000.
26. Open k@rine_dreams_Pretty_Face_1024_Mai 2010.pspimage of woman. Copy/Paste as New Layer.
27. Move lady to left side of image.
28. Effects/3-D Effects/Drop Shadow, Vertical 8, Horizontal 35, Opacity 65, Blur 35, color #000000.
29. Using Copy of the woman tube, Paste as New Layer. Image/Mirror.
30. Image/Resize/Resize by 75%, Resize all Layers unchecked. Move woman to right side of image.
31. Move resized woman down between Raster 1 and Raster 2, having her eyes showing between the boxes as in my finished image.
32. Lower opacity on resized woman to 47.
33. Effects/3-D Effects/Drop Shadow, Vertical -8, Horizontal -35, Opacity 65, Blur 35, color #000000.
34. Highlight Raster 4 to continue on with tutorial.
35. Image/Add Borders 1 px, Symmetric checked, color #3d2c45.
36. Image/Add Borders 10px, Symmetric checked, color #ffffff.
37. From Tool bar, select the Magic Wand. Click on the 10px border to activate it.
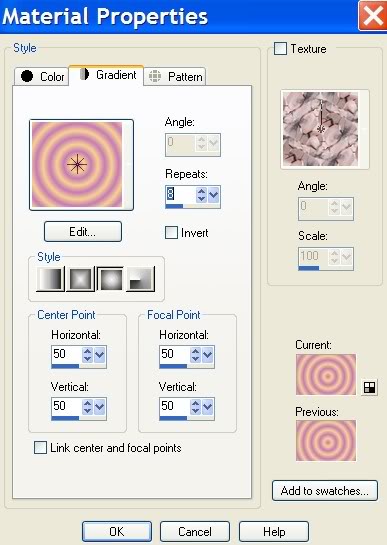
38. In Materials Palette, change the Background color to #f5d290. Foreground color remains #c87ab8. Set Gradient to Style Sunburst, Angle is grayed out, set Repeats to 8, all Horizontal and Verticals are set to 50. (See example below).
39. Flood fill the 10px border with Gradient.
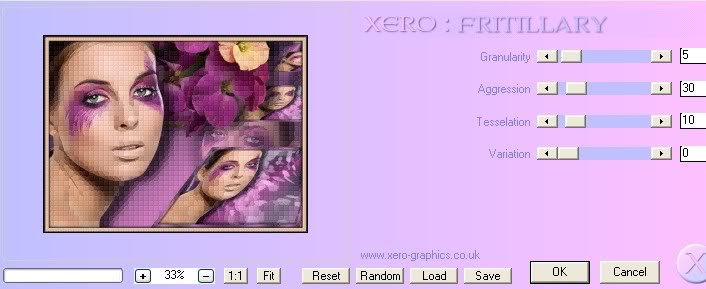
40. Effects/Xero/Fritillary. Use settings below.
41. Effects/Edge Effects/Enhance.
42. Effects/3-D Effects/Drop Shadow, Vertical 3, Horizontal 3, Opacity 79, Blur 9, Color #000000.
43. Repeat Drop Shadow with changes to vertical -3 and Horizontal -3 only.
44. Selections/Select None.
45. Image/Add Borders of 18px, Symmetric checked, color #3d2c45.
46. Open Yoka_Flowers_Goldenlight_PB_231007.pspimage. Copy/Paste as New Layer.
47. Image/Free Rotate as in #6.
48. Image/Resize/Resize by 50%, Resize all Layers unchecked. Move to lower left corner of image.
49. Effects/3-D Effects/Drop Shadow, Vertical -8, Horizontal -35, Opacity 65, Blur 35, color #000000.
50. From Tool bar, select text tool. Select font SplendidOrnamenty, Size 72, Vector. Using Background color #f5d290, type your name or leave watermark. (See example for settings)

51. Layers Palette/Convert to Raster Layer.
52. Effects/3-D Effects/Drop Shadow, Vertical 8, Horizontal 5, Opacity 65, Blur 7, color #000000.
53. Merge/Merge Visible. You are finished with the Image. Save as .jpg file.
ANIMATION FOLLOWS AND IS OPTIONAL.
54. From Tool bar, select the Freehand Selection Tool/Freehand Selection. Working on image you just finished, holding down the Shift key, select all around the eye area you wish to have glitter, connecting line ends. Then move to other eye area while still holding down Shift key.
55. Duplicate the image 4 times. Close off all layers except the top layer.
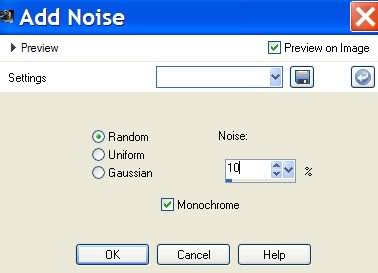
56. Adjust/Add/Remove Noise/Add Noise. Start with Noise of 10. (See example for where to change noise settings).
57. Close off top layer. Move down to next layer, open it and highlight it. Apply Noise of 15. Close off layer.
58. Move down to next layer, open it and highlight it. Apply Noise of 20. Close off layer.
59. Move down to next layer, open it and highlight it. Apply Noise of 25. Close off layer.
60. On bottom layer, open and highlight it. Apply Noise of 30. Open all closed layers. Selections/Select None.
61. Now we will save the animated image and take it to Animation Shop for more work.
62. File/Save As, save as PSP Animation Shop (*.psp) image.
63. Open Animation Shop program. File/Open the PSP Animation Shop image you just saved.
64. Click on the Animation Shop button in the tool bar at the top and see if your animation is working as you wish it to be.
65. Assuming it is working correctly, now save your work. File/Save As/ and a box will come up. Name your finished image, type where you want to save it and click Save. As the box changes, continue to click Next 3 times, then Finish. This saves your work as a .gif image.
66. You have now completed the animated tutorial. Congratulations!
I leave a huge thank you and hug to both Evatexas and PamelaD who so faithfully test my tutorials for me.
If you are going to use this tutorial for stationery, cards or place the tutorial/tag on another site, I would appreciate you contacting me for permission, giving Arasimages credit for the original tutorial and if possible, a link back to my site. Thank you.
Copyright © Arasimages All Rights Reserved