
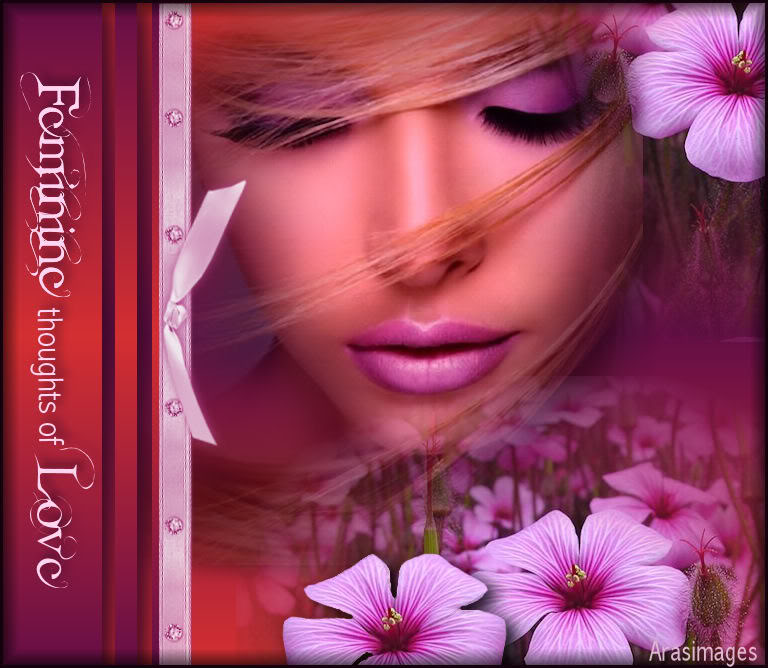
Feminine thoughts of Love
For German, Italian and Danish translation, click on the flags.


For this tutorial you will need the materials in the zip file below.

Unzip the materials into a working folder. Open the materials in PSP, copy and close originals. You will need no plugins. I have used PSPX3 to create this tutorial but you may use an earlier version. It is assumed you have a working knowledge of PSP to do this tutorial.
Credit is given for materials when original author is known. Nikita.fr and Arasimages tubes are used in this tutorial. Please visit the tuber sites listed on my Links page. You will also find many more tubes in my all-free Tubes section.
Use the flower pin below to mark your place along the way.

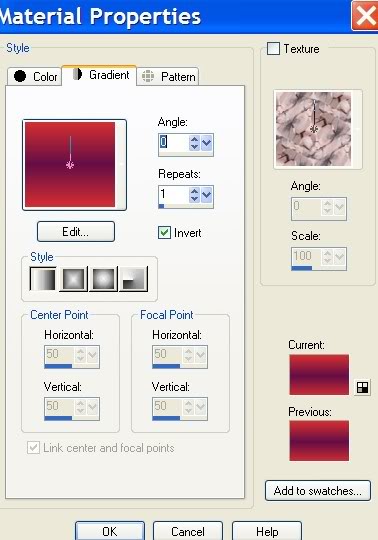
1. In Materials Palette, set Foreground to color #d42f31, Background to color #640e46.
2. Set Materials to Gradient. Angle 0, Repeats 1, Invert checked.
3. New/New Image 762px by 662px. Flood fill with Gradient.
4. Open LoviliesE.pspimage of flowers. Copy/Paste as New Layer.
5. Image/Mirror. Move to upper right corner.
6. Open 12479954951_femmes.pspimage. Copy/Paste as New Layer.
7. Image/Resize/Resize by 84%, Resize all layers unchecked. Place even with top of image.
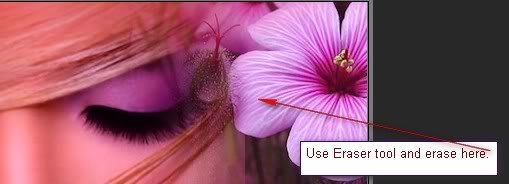
8. Erase her image off the left petal of upper right corner flower.
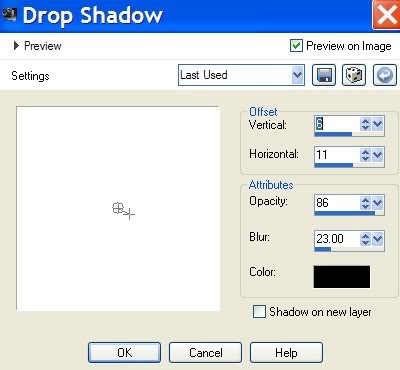
9. Effects/3-D Effects/Drop Shadow. Vertical 6, Horizontal 11, Opacity 86, Blur 23, color #000000.
10 Open LoviliesE.pspimage of flowers. Copy/Paste as New Layer.
11. Move to bottom right corner.
12. Open LoviliesE1.pspimage. Copy/Paste as New Layer.
13. Move to left of bottom flower group.
14. Effects/3-D Effects/Drop Shadow. Vertical 6, Horizontal 11, Opacity 86, Blur 23, color #000000.
15. Layers/New Raster Layer.
16. Selections/Load/Save Selections/Load Selection from Disk. Choose Ara's Woman Thing 3. Load.
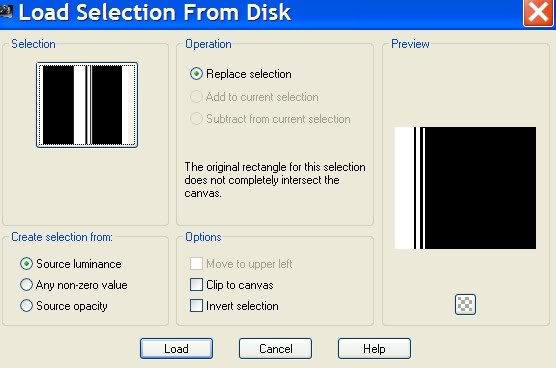
17. In Materials Palette, uncheck Invert. Flood fill the Selection with Gradient.
18. Effects/3-D Effects/Drop Shadow. Vertical 6, Horizontal 11, Opacity 86, Blur 23, color #370724.
19. Selections/Selections None.
20. Open border_strap.pspimage. Copy/Paste as New Layer. Use Pick tool to stretch to fit vertically.
21. Move to right of Selections. Adjust/Hue and Saturation/Colorize. Hue 228/Saturation 115.
22. Layers/Set Opacity to 92.
23. From Tool bar, select the Text tool. Open the font Al Fantasy Type and minimize to task bar.
24. Using color #deb6d1, Size 90, and the font Al Fantasy Type, type "Feminine". Turn so text is vertical using double arrow of text box. Promote to Raster Layer.

25. Using same as above, type the word "Love". Turn to vertical position. Promote to Raster Layer.
26. Using Abadi MT Condensed Light in Size 36, color same as above, type the words "thoughts of". Turn to vertical position. Promote to Raster Layer.

27. Arrange all words in a straight line, activating View/Grid if you need a line to follow.
28. Merge/Merge down all three layers of the text into one layer.
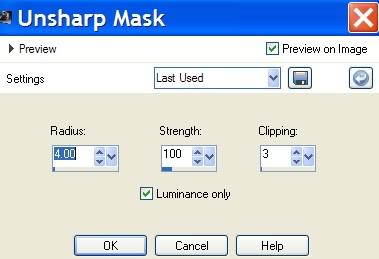
29. Adjust/Sharpeness/Unsharp Mask as in example below.
30. Effects/3-D Effects/Drop Shadow, Vertical -6, Horizontal 6, Opacity 86, Blur 14, color #370724.
31. Image/Add Borders/3px, color #370724, Symmetric checked.
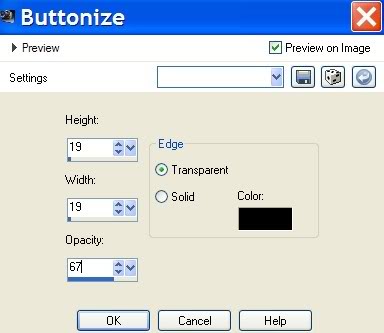
32. Effects/3-D Effects/Buttonize. Use example as below.
33. Add your watermark or your name. Convert to Raster Layer.
34. Merge/Merge Visible. You are finished!
Thank you Pamela and Eva for testing this tutorial for me.

If you are going to use this tutorial for stationery, cards or place the tutorial/tag on another site, I would appreciate you contacting me for permission, giving Arasimages credit for the original tutorial and if possible, a link back to my site. Thank you.
Copyright © Arasimages All Rights Reserved