
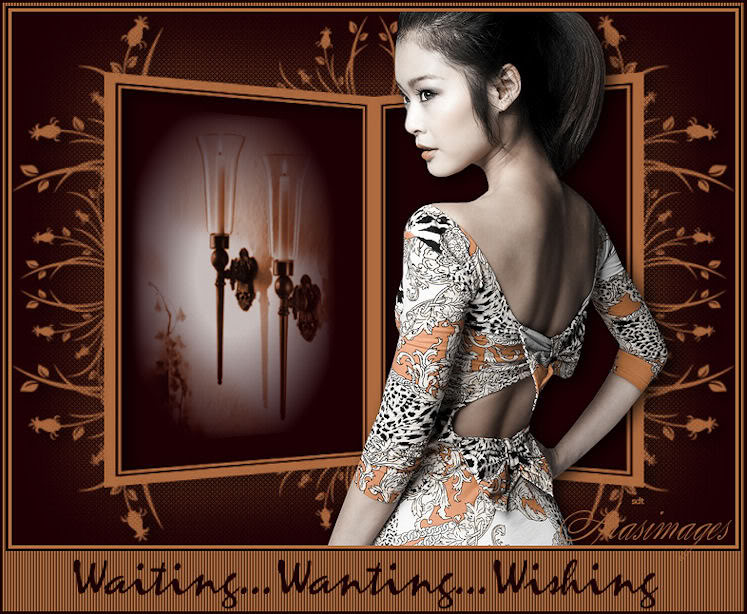
Waiting Wanting Wishing
For Danish and German translation, click on the flags.


For this tutorial you will need the materials in the zip file below.

Unzip the materials into a working folder. Open the materials in PSP, copy and close originals. You will need no special plugins. I have used PSPX3 to create this tutorial but you may use an earlier version. It is assumed you have a working knowledge of PSP.
Thanks go to Karine and DieterundMarion for the beautiful tubes used. Please visit the tuber sites listed on my Links page.
Use the arrow below to mark your place along the way.

1. In Materials Palette, set the Foreground color to #ae6b40, Background to #1d0004.
2. New/New Image 762px by 562px. Flood fill with Background color #1d0004.
3. Layers/New Raster Layer. Flood fill with Foreground color #ae6b40.
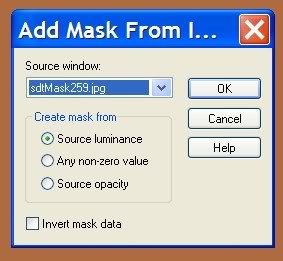
4. Open sdtMask259.pspimage.
5. Activate your working image.
6. Layers/New Mask Layer/From Image. Choose sdtMask259 in Source Window when it appears. See example below.
7. Layers/Merge/Merge Group.
8. Effects/3-D Effects/Drop Shadow, Vertical 4, Horizontal 7, Opacity 76, Blur 23, Color #000000.
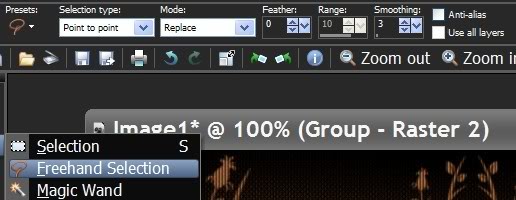
9. Using Freehand Selection tool, Freehand Selection, settings as below, draw a selection inside the left rectangle. Keep activated.
10. Layers/New Raster Layer.
11. Open mds7501dekomist.pspimage of lamp. Copy/Paste into Selection.
12. Selections/Select None.
13. Image/Resize/Resize by 90%, Resize all layers unchecked. Move slightly to center it.
14. Adjust/Hue and Saturation/Colorize. Set Hue to 17, Saturation to 118.
15. Layers Palette/lower Opacity to 76.
16. Open k@rine_dreams_Oriental_girl1158_JUIN2010.pspimage of woman. Copy Paste as New Layer.
17. Image/Resize/Resize by 70%, Resize all layers unchecked.
18. Move Oriental woman a little to right and down.
19. Effects/3-D Effects/Drop Shadow, Vertical 4, Horizontal 7, Opacity 76, Blur 23, Color #000000.
20. Image/Add Borders of 3px, Symmetric checked, Color #ae6b40.
21. Image/Add Borders of 3px, Symmetric checked, Color #1d0004.
22. Image/Add Borders/Symmetric unchecked. Have top and both sides set to 3px and bottom to 63px, color #ae6b40.
23. Activate border with Magic Wand.
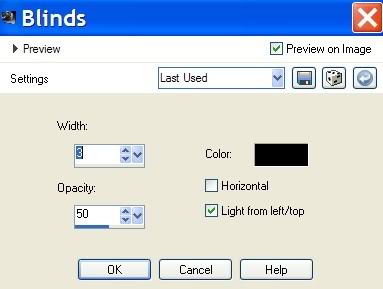
24. Effects/Texture Effects/Blinds. Use settings seen below.
25. Selections/Select None.
26. Image/Add Borders of 3px, Symmetric checked, Color #1d0004.
27. Adjust/Sharpness/Sharpen.
28. Select Font Zephyr, Size 48, color #1d0004 with settings as seen below.

29. Write Waiting...Wanting...Wishing.
30. Layers/Convert to Raster Layer.
31. Sign your name or place your watermark using any font and size/color you wish.
32. Layers/Merge/Merge Visible. Save as .jpg file.
Big hugs and thanks to both Evatexas and PamelaD who so faithfully test my tutorials for me.
If you are going to use this tutorial for stationery, cards or place the tutorial/tag on another site, I would appreciate you contacting me for permission, giving Arasimages credit for the original tutorial and if possible, a link back to my site. Thank you.
Copyright © Arasimages All Rights Reserved