
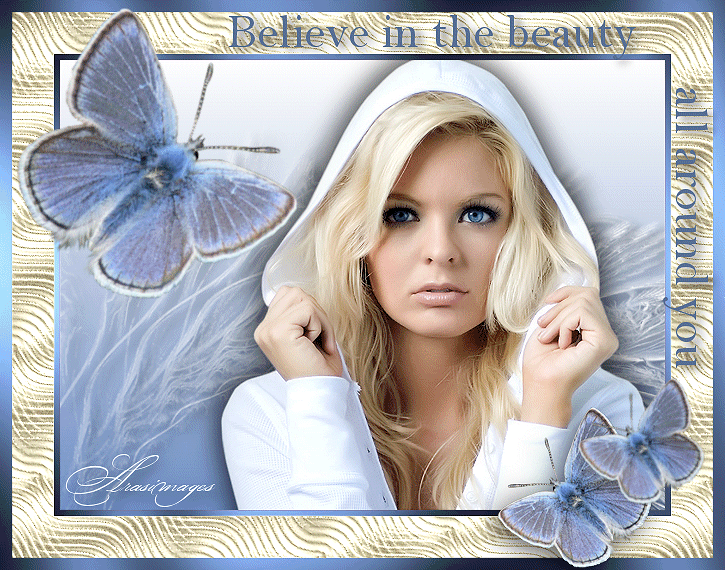
Believe in the Beauty around You
For Danish, German and French translation, click on the flags.


For this tutorial you will need the materials in the zip file below.

Unzip the materials into a working folder. Put the Pattern in your Patterns folder. I believe the font is standard in PSP, but if you do not have it, then place the font in your Font Folder. For the brush, open it in PSP. File/Export/Custom Brush. Choose the fractal brush7 and export it into your Brush folder. Open the materials in PSP, copy and close originals. You will need the plugins Graphics Plus and Nik Software ColorEfexPro3.1 for this tutorial. If you choose, you may use the ready-made frame included in materials instead of using the Nik plugin. I have used PSPX3 to create this tutorial but you may use an earlier version. It is assumed you have a working knowledge of PSP.
Thanks go to Karine_Dreams for the lovely woman used in this tutorial and the butterfly is one of Arasimages tubes which will soon be available on this site. Please visit the tuber sites listed on my Links page.
Use the bookmark below to mark your place along the way.

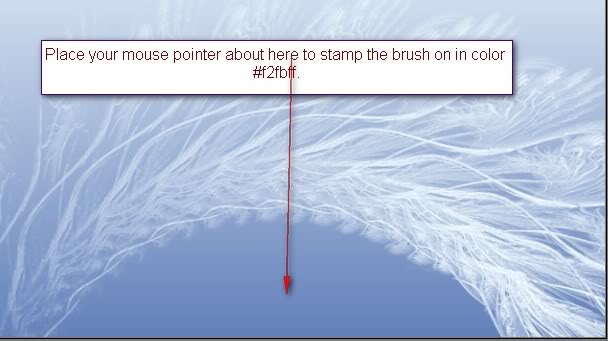
1. In Materials Palette, set the Foreground to #f2fbff, Background to #6e8ec4.
2. In Materials Palette, set to Gradient, Linear, Angle 0, Repeats 0, Invert checked.
3. New/New Image, 600px by 450px.
4. Flood fill New Image with Gradient.
5. Layers/New Raster Layer.
6. From Tool bar, choose the Paint Brush/Fractal7. Using color #f2fbff, stamp brush on image where the red arrow points as in example and settings below.

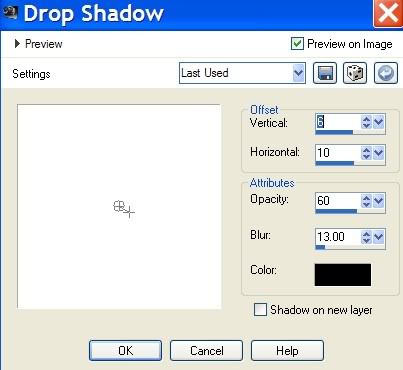
7. Effects/3-D Effects/Drop Shadow, Vertical 6, Horizontal 10, Opacity 60, Blur 13, Color #000000 black.
8. Open K@rine_dreams_pretty_woman 1129 Juin2010.pspimage. Copy/Paste as New Layer.
9. Pull downward and to the right a bit as I have in my image.
10. Effects/3-D Effects/Drop Shadow, Vertical 6, Horizontal 6, Opacity 60, Blur 36, Color #000000 black.

11. Repeat with the Drop Shadow effect, only apply Vertical -6, Horizontal -6, the rest the same as above.
12. Image/Add Borders, 6px, color #000000, Symmetric checked.
13. Select Magic Wand and click inside 6px border. Flood fill with Background color #6e8ec4.
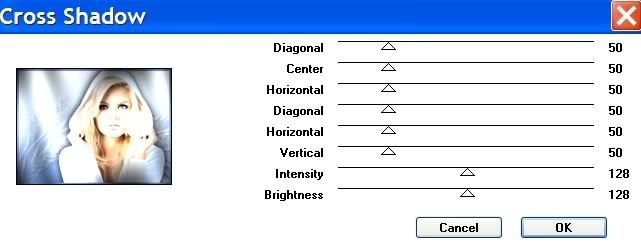
14. Effects/Graphics Plus/Cross Shadow set to default settings. Selections/Select None.
15. Image/Add Borders, 42px, color #ffffff, Symmetric checked. Promote Background layer.
16. If you choose not to install Nik plugin and want to use the ready-made 42px gold border, open gold border furnished in materials. Copy the border image. Use your Magic Wand and click inside the #ffffff border. Edit/paste into selection. Selections/Select none. Skip steps #17 through 20.
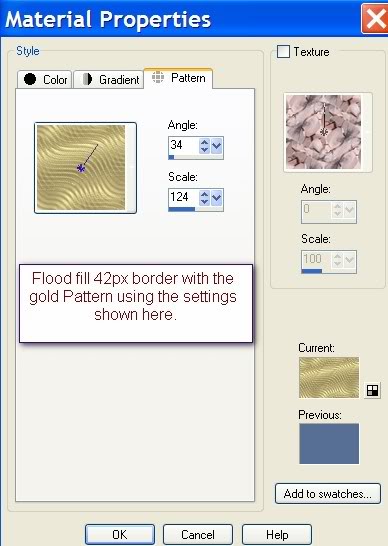
17. Select Magic Wand and click inside 42px border.
18. In Materials Palette, click Pattern tab and select ABGold2.bmp. Flood fill 42px border with gold pattern.
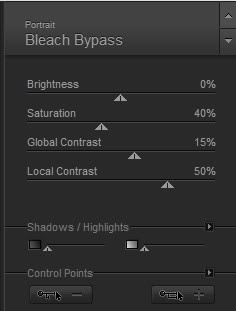
19. Effects/Nik/ColorEffectsPro3.0/Portrait/Beach Bypass, using settings seen below in example.
20. Selections/Select None.
21. Image/Add Borders/12px, Symmetric checked, color #000000.
22. Select Magic Wand and click inside 12px border. Flood fill with Background color #6e8ec4.
23. Effects/Graphics Plus/Cross Shadow set to default settings. Selections/Select None.
24. In Materials Palette, set Background color to #586f95.
25. Activate Text tool, choose Font Bell MT, Size 48, color #586f95. Type the words "Believe in the beauty." Convert to Raster Layer. Move into place in gold border in upper right corner area.

26. Effects/3-D Effects/Drop Shadow, Vertical 3, Horizontal 6, Opacity 60, Blur 13, Color #000000.
27. Using the same font, size and color, type the words "all around you". Using the turn node, turn text so that it is vertical.
28. Convert to Raster Layer and move into position in right 42px border as I have in my finished image.
29. Effects/3-D Effects/Drop Shadow, Vertical 3, Horizontal 6, Opacity 60, Blur 13, Color #000000.
30. Open Mission_Blue_butterfly1.pspimage. Copy tubed layer/Paste as New Layer.
31. Image/Mirror.
32. Image/Resize/Resize by 50%, Resize all layers unchecked. Move to lower right corner as I have mine placed.
33. Effects/3-D Effects/Drop Shadow, Vertical 6, Horizontal 6, Opacity 60, Blur 36, Color #000000.
34. Sign your name using font, color and size of your choice. Merge/Merge Visible.
35. Save as .jpg image, naming it Butterfly background in your working folder.
36. We will now begin working on the animated butterflies. Open the Mission_blue_butterfly .pspimage in workspace.
37. Copy/Paste as New Image. Close original.
38. Image/Resize/Resize by 90%, Resize all layers unchecked.
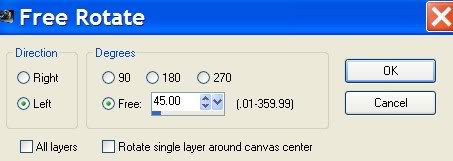
39. Image/Free Rotate/Rotate left by 45 degrees.
40. In Layers Palette, rename Raster 1 BF1.
41. In Layers Palette, Duplicate BF1 and rename it BF2.
42. With BF2 highlighted, activate Pick tool (or deform tool depending on which PSP version you are using). Using side nodes, pull inward about a quarter of the way toward center of butterfly. Do this on both left and right sides.
43. Duplicate BF2 and rename it BF3. With BF3 highlighted, using side nodes, again pull inward about a quarter of the way towards center.
44. Duplicate BF3 and rename it BF4. With BF4 highlighted, using side nodes, again pull inward so wings are almost vertical.
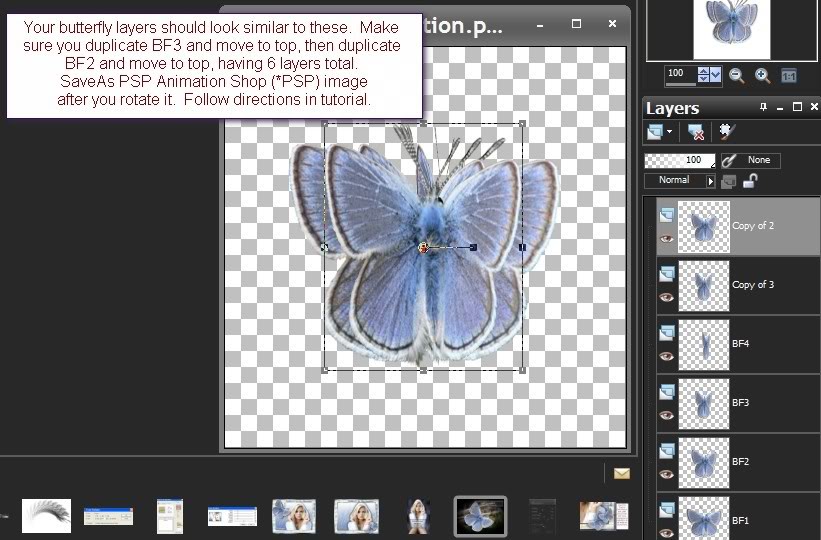
45. Duplicate BF3 and arrange to top of layers.
46. Duplicate BF2 and arrange to top of layers.
47. You should now have 6 layers of butterflies in the layers palette.
48. Image/Free Rotate/Rotate right by 45 degrees, All layers checked.
49. SaveAs PSP Animation Shop (*PSP) file in working folder.
50. Open Animation Shop. File/Open the Animation file you just saved. Click on Animation button to see if the animation is what you want.
51. Edit/Select All. Copy/Paste as New Animation in a blank spot in working space. Or you may use small butterfly furnished in materials and skip steps #51 through #55.
52. Using this new image of the butterfly, Edit/Select All/Animation/Mirror.
53. Edit/Select All. Animation/Rotate/Rotate right by 14 degrees, Selected frames only checked, Expand canvas as need unchecked.
54. Edit/Select All. Animation/Resize, resize by 45 percent, Maintain aspect ratio of checked.
55. Click on Animation button to check animation and if all is well, minimize small butterfly for later use. HINT: You might want to save the image for your files and recolor it and use it again some time.
56. File/Open the Butterfly background .jpg image.
57. Edit/Duplicate till you have 6 images total of background.
58. Click on the large butterfly. Edit/Select All. Copy.
59. Click on first frame of main background. Edit/Select All.
60. Right click INSIDE first frame of main background image and Paste/Into Selected Frame, placing butterfly in upper left corner. Left click to place butterfly.
61. Animation/Frame Properties/set to 20. Check to see if the animation works properly.
62. Minimize the large butterfly. Maximize the small butterfly you created earlier.
63. Using small butterfly, Edit/Select All. Copy.
64. Activate the main background/butterfly image. Click first frame and Edit/Select All.
65. Right click INSIDE first frame of main background image and Paste/Into Selected Frame, placing small butterfly in lower right corner, over stationary butterfly in a nice spot. See my finished image for placement. Left click to set in place.
66. File/SaveAs/give your creation a name and click Save. Then click Next three (3) times, then Finish and you are done.
67. Congratulations on completing a complicated animated tutorial. I hope you enjoyed it!
My tutorials are checked by Evatexas and PamelaD and for their work and friendship, I am always grateful. Hugs Ladies!
If you are going to use this tutorial for stationery, cards or place the tutorial/tag on another site, I would appreciate you contacting me for permission, giving Arasimages credit for the original tutorial and if possible, a link back to my site. Thank you.
Copyright © Arasimages All Rights Reserved