

Horse Power
For Danish and German translation, click on the flags.


For this tutorial you will need the materials in the zip file below.

Unzip the materials into a working folder. Place the font in your Font Folder. Open the materials in PSP, copy and close originals. You will need no plugins for this tutorial. I have used PSPX3 to create this tutorial but you may use an earlier version. It is assumed you have a working knowledge of PSP.
Thanks go to Sorensen_Designs for the handsome cowboy and the train image from deiterundmarian.de. The sky and horses are from Arasimages tubes which will soon be available on this site. Please visit the tuber sites listed on my Links page.
Use the bookmark below to mark your place along the way.

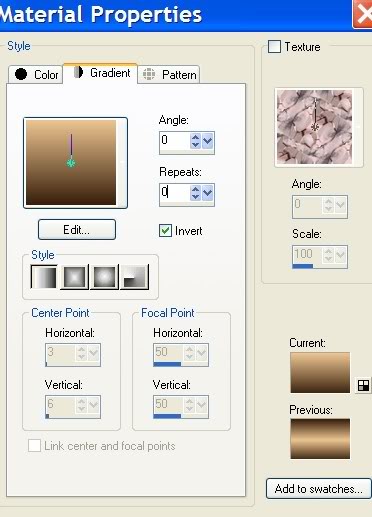
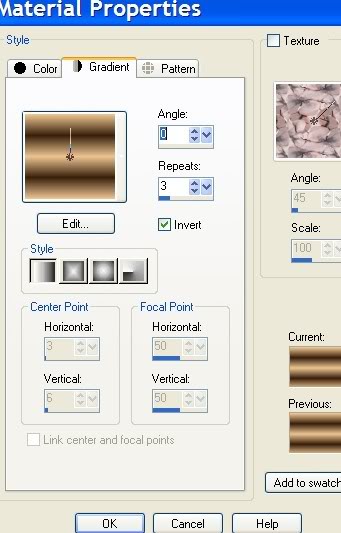
1. In Materials Palette, set the Foreground color to #ecc490 and the Background color to #381f0b. Set to Gradient Linear, Angle 0 and Repeats 0, Invert checked.
2. New/New Image of 700px by 500px. Flood fill with Gradient.
3. Open sun and clouds .pspimage. Copy/Paste as New Layer. Move a little to the left.
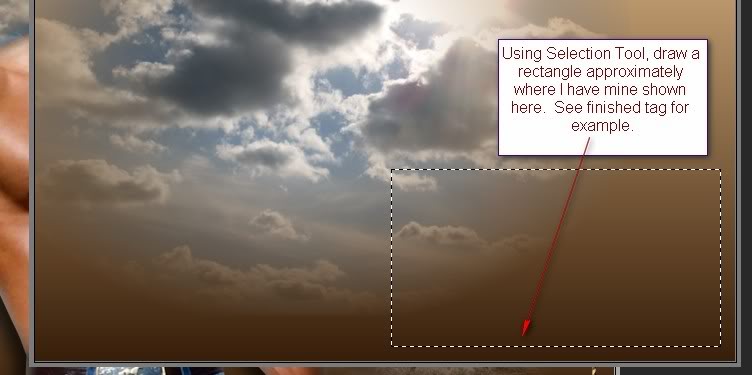
4. Using Selections tool, select a rectangle on your image like the example below.
5. Layers/New Raster Layer.
6. Open animals_beautiful_photos_390_14.pspimages. Copy misted layer/Paste into Selection.
7. Layers/New Raster Layer. Flood fill the selection with background color #381f0b.
8. Selections/Contract/Modify by 4px. Click the Delete key.
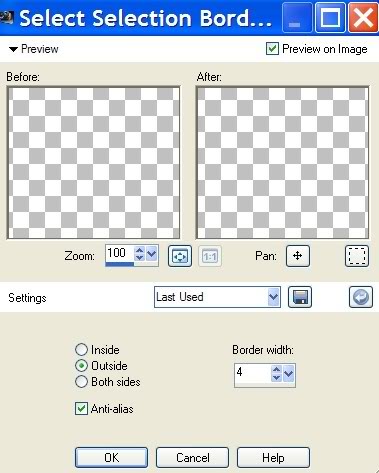
9. Selections/Modify/Select Selection borders. Use settings below.
10. In Materials Palette, click the curved arrow to change background to foreground position. Flood fill with Gradient.
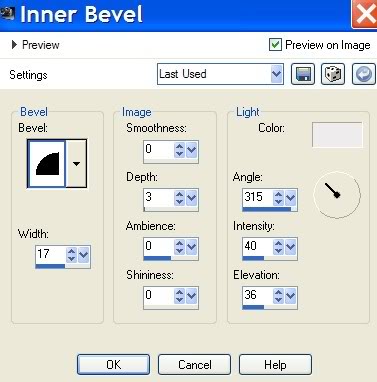
11. Effects/3-D Effects/Inner Bevel. See settings below.
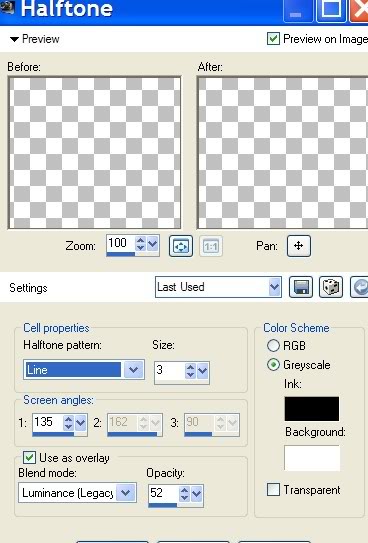
12. Effects/Artistic Effects/Halftone. See settings below.
13. Selections/Select None.
14. Duplicate/Image Flip.
15. Using Magic wand, click inside the empty rectangle to activate it.
16. Layers/New Raster Layer.
17. Open mds8286 Train.pspimage. Copy/Paste into Selection of upper rectangle.
18. Selections/Select None.
19. Change the foreground with background in Materials Palette again by clicking on the curved arrow so foreground is on top.
20. Layers/New Raster Layer.
21. Using Selections tool, select a rectangle on your image to place the text in. See my finished image.
22. Flood fill with Gradient.
23. Effects/3-D Effects/Inner Bevel, using these settings below.
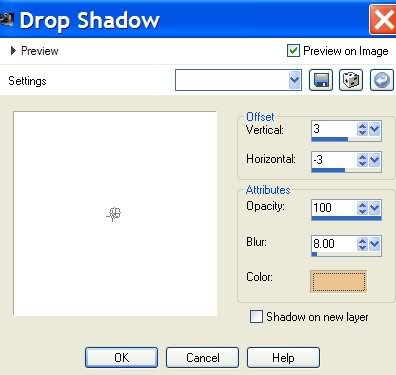
24. Effects/3-D Effects/Drop Shadow of Vertical 3, Horizontal -3, Opacity 70, Blur 9, color #000000 (black).
25. Repeat Effects/Drop Shadow using Vertical -3, Horizontal 3, all the rest the same. Selections/Select None.
26. From Text tool, open Font Edda, Size it by 30, using color #381f0b, write the words Horse Power.

27. Convert to Raster Layer. Duplicate, Merge/Merge Down.
28. Effects/3-D Effects/Drop Shadow, Vertical 3, Horizontal -3, Opacity 100, Blur 8, color #ecc490 (foreground color).
29. Open Sorensen_Designs_August 177-10.pspimage. Image/Mirror.
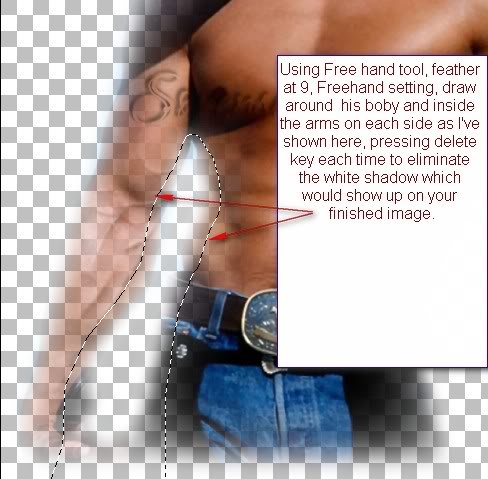
30. From tool bar, choose Freehand Selections. Feather set to 9, draw inside of arms and body, across bottom and connect. Click Delete key to eliminate the white shadow on cowboy image.

31. Selections/Select None.
32. Image/Resize/Resize by 76%, Resize all layers unchecked.
33. Copy/Paste cowboy image as New Layer on main image. Move him into position on left side of main image.
34. Effects/3-D Effects/Drop Shadow, Vertical 6, Horizontal -14, Opacity 70, Blur 20, color #000000, (black).
35. Highlight Raster 4. Using Eraser tool, erase excess roping of lower rectangle from cowboy's arm. Highlight top layer again.
36. In Materials Palette, change the Repeats under Gradients to 3.
37. Image/Add Borders/13px border, Symmetric checked, color #ffffff.
38. Activate border by clicking it with Magic Wand. Flood fill with Gradient.
39. Effects/3-D Effects/Inner bevel. Use same settings as in Step #11.
40. Effects/Artistic Effects/Halftone. Use same settings as in Step #12.
41. Effects/3-D Effects/Drop Shadow, Vertical 3, Horizontal -6, Opacity 70, Blur 6, color #000000, (black).
42. Repeat 3-D Effects with Vertical of -3, Horizontal 6, all remaining settings the same. Selections/Select None.
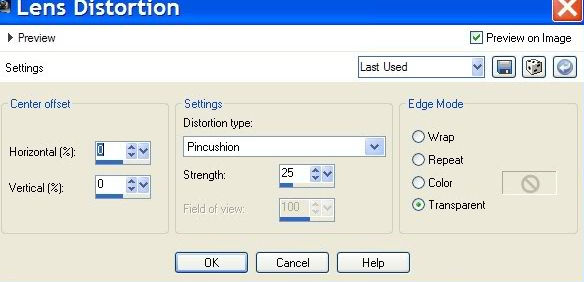
43. Effects/Distortion Effects/Lens Distortion, using settings below in example.
44. Image/Resize/Resize by 90%, Resize all layers unchecked.
45. Layers/New Raster Layer. Flood fill with Gradient, Repeats set to 3.
46. Pull Raster 2 below Raster 1. Highlight Raster 1.
47. Effects/3-D Effects/Drop Shadow, Vertical 3, Horizontal -9, Opacity 70, Blur 9, color #000000, (black).
48. Repeat Effects/3-D Effects with Vertical -3, Horizontal 9, all remaining settings the same.
49. Image/Add Borders/3px border, Symmetric checked, color #381f0b.
50. Image/Add Borders/3px border, Symmetric checked, color #ecc490.
51. Image/Add Borders/3px border, Symmetric checked, color #381f0b.
52. Image/Add Borders/13px border, Symmetric checked, color #ffffff.
53. Click inside 13px border with Magic Wand to activitate it.
54. Change the Gradient so the Background is on the top, Gradient is on the bottom and Repeats set to 3. Flood fill with Gradient.
55. Effects/3-D Effects/Inner bevel. Use same settings as in Step #11.
56. Effects/Artistic Effects/Halftone. Use same settings as in Step #12.
57. Selections/Select None.
58. Image/Add Borders/3px border, Symmetric checked, color #381f0b.
59. Image/Add Borders/3px border, Symmetric checked, color #ecc490.
60. Image/Add Borders/3px border, Symmetric checked, color #381f0b.
61. Sign your name in a color, size and font that pleases you. Save as .jpg file.
My tutorials are checked by Evatexas and PamelaD. Thanks and big hugs Ladies!
If you are going to use this tutorial for stationery, cards or place the tutorial/tag on another site, I would appreciate you contacting me for permission, giving Arasimages credit for the original tutorial and if possible, a link back to my site. Thank you.
Copyright © Arasimages All Rights Reserved