

Wedding Day
For Italian and Danish translation, click on the flags.


For this tutorial you will need the materials in the zip file below.

Unzip the materials into a working folder. Open the materials in PSP, copy and close originals. Place the Selection in Selections Folder and the Pattern Gold Beads in your Pattern Folder. You will need the plugins AlienSkin Xenofex2 and Graphics Plus for this tutorial. I have used PSPX3 to create this tutorial but you may use an earlier version. It is assumed you have a working knowledge of PSP.
Thanks go to FAndM for the bride image and LenyDesign for the shoes, both of which are lovely. Please visit tuber sites listed on my Links page.
Use the bookmark below to mark your place along the way.

1. In Materials Palette, set the Foreground color to #edf0f7, Background to #f1b8a9.
2. Set Materials Palette to Gradient Linear, Angle 45 and Repeats 1. Invert checked.
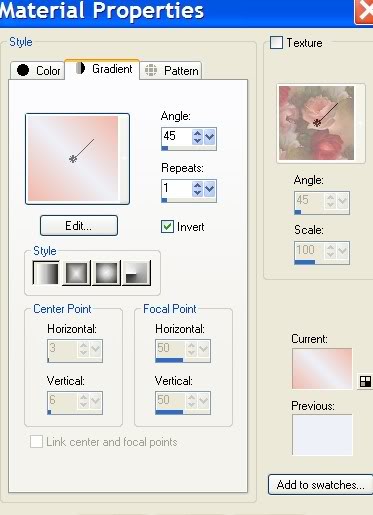
3. New/New Image, 762px by 562px. Flood fill with Gradient.
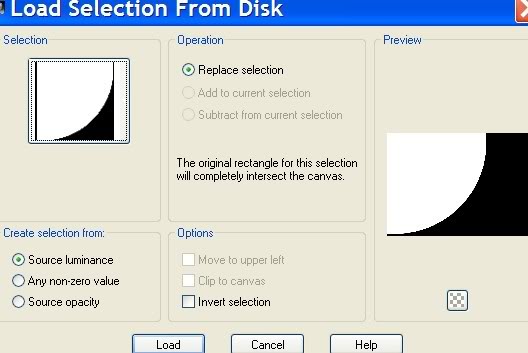
4. Layers/New Raster Layer. Selections/Load Save Selection/Load Selection from disk. Choose Cathy_selectie-001. Load.
5. Using Background color #f1b8a9, flood fill the Selection.
6. Selections/Select None.
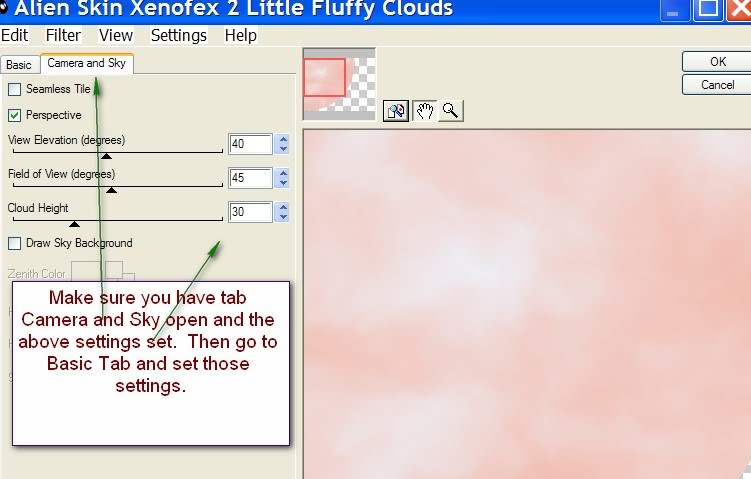
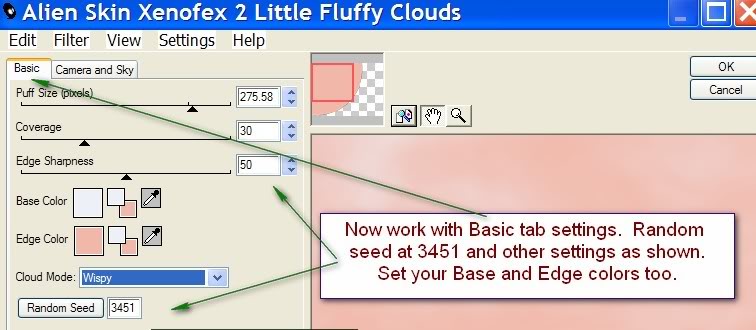
7. Effects/AlienSkin Xenofex2/Little Fluffy Clouds. See examples below for the settings. After you set each one, click OK.
8. Effects/3-D Effects/Drop Shadow. Vertical 9, Horizontal 9, Opacity 30, Blur 34, color #000000.
9. Open LD-Shoes.pspimage. Copy/Paste as New Layer.
10. Image/Resize/Resize by 80%, Resize all layers unchecked.
11. Image/Mirror. Pull shoes to center right side of page.
12. Using Selections Tool, select around the left and bottom shoes and click delete key. See example for erasing this way or use the Eraser tool carefully to eliminate the left side and bottom shoes.

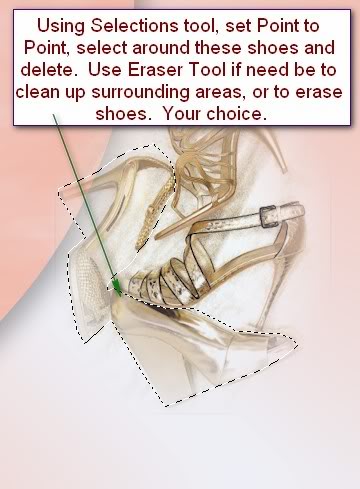
13. Use Eraser Tool to clean up around shoes. You may also use the Soften Tool to blend if necessary.
14. Open christmist_rvhcc016.pspimage of pillow. Copy/Paste as New Layer.
15. Image/Resize/Resize by 80%, Resize all layers unchecked.
16. Pull pillow to bottom right corner. Adjust your shoes to fit nicely over the edge of pillow as I have in my finished image.
17. Make sure the pillow layer is highlighted. Layers/Duplicate. Image Mirror. Image/Flip.
18. Move pillow to bottom left corner.
19. Open FAndM436.pspimage of woman. Copy/Paste as New Layer.
20. Move a little to left of center.
21. Effects/3-D Effects/Drop Shadow, Vertical 9, Horizontal 14, Opacity 50, Blur 24, color #000000.
22. Layers/Duplicate. Close off Copy of Raster 5. Highlight Raster 5.
23. Set Opacity to 27.
24. Image/Resize/Resize by 80%, Resize all layers unchecked.
25. Move the lady to the upper left corner.
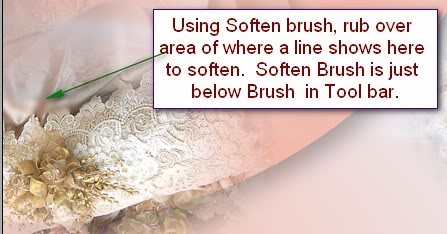
26. If you see a line where her dress and pillow meet, use the Soften Brush (below the Paint Brush) and go over the area to eliminate sharpness of the edge.
27. Open and highlight Copy of Raster 5 to continue.
28. In Materials Palette, click the double arrows so the Gradient is now on the bottom, uncheck Invert.
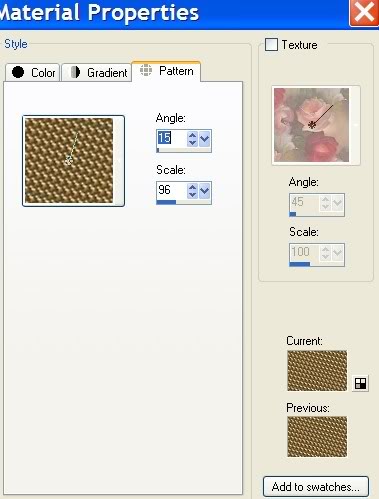
29. Set the Foreground to Pattern, Gold Beads, Scale 96 and Angle to 15.
30. Image/Add Borders 4px, Symmetric checked, color #000000.
31. Using Magic Wand, click within the black 4px border to activate.
32. Flood fill with Gold Beads Pattern. Selections/Select None.
33. Image/Add Borders of 33px, Symmetric checked, color #000000.
34. Using Magic Wand, click within the black 33px border to activate.
35. Flood fill 33px black border with Background Gradient.
36. Effects/Graphics Plus/Cross Shadow. Have settings all set to 50 except the bottom one at 128.
37. Selections/Select None.
38. Image/Add Borders 4px, Symmetric checked, color #000000.
39. Using Magic Wand, click within the black 4px border to activate.
40. Flood fill with Gold Beads Pattern. Selections/Select None.
41. Click the double arrows again to place the Pattern Gold Beads on the bottom (Background).
42. Select the Text tool (A), BickhamScriptFancy font, set Size to 60 and type Wedding Day.

43. Convert to Raster Layer.
44. Layers/Duplicate. Merge/Merge Down.
45. Effects/3-D Effects/Drop Shadow. Vertical 5, Horizontal 5, Opacity 100, Blur 21, color #white.
46. Sign your name or leave watermark. Merge/Merge Visible.
Big hugs and thanks to my testers, Evatexas and PamelaD who so faithfully test my tutorials for me.
If you are going to use this tutorial for stationery, cards or place the tutorial/tag on another site, I would appreciate you contacting me for permission, giving Arasimages credit for the original tutorial and if possible, a link back to my site. Thank you.
Copyright © Arasimages All Rights Reserved