
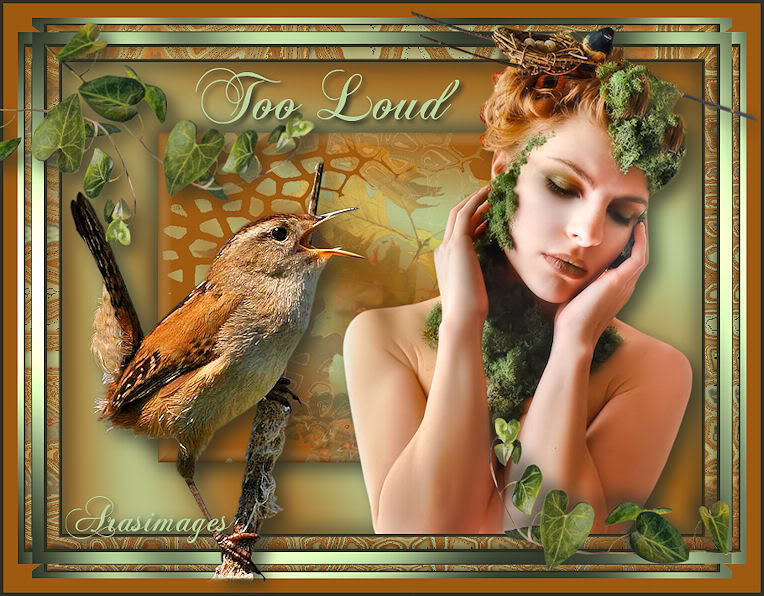
Too Loud
For Italian and Danish translation, click on the flags.
For this tutorial you will need the materials in the zip file below.
Unzip the materials into a working folder. Open the materials in PSP, copy and close originals. Place the Font in your Fonts folder and MaskBJ3 in your Mask folder. You will need the plugins Graphics Plus and Filters Unlimited for this tutorial. I have used PSPX3 to create this tutorial but you may use an earlier version. It is assumed you have a working knowledge of PSP.
Thanks go to Karine_Dreams and Nikita of Reveries for the beautiful tubes used. GoldOfFall comes from this website, Arasimages under Tubes/Nature. Please visit the tuber sites listed on my Links page.
Use the leaf below to mark your place along the way.

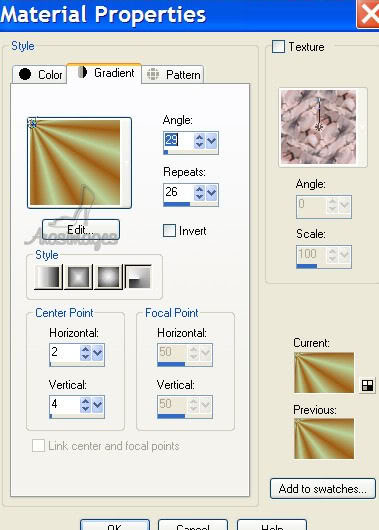
1. In Materials Palette, set the Foreground color to #bbd59e, Background to #9f5a11.
2. Set to Gradient Radial, Angle 29, Repeats 26, Invert unchecked.
3. New/New Image 762px by 562px. Flood fill with Gradient.
4. Adjust/Blur/Gaussian Blur, Radius 26.
5. Selections/Select All.
6. Layers/New Raster Layer.
7. Open GoldOfFall.pspimage half-mist layer. Copy/Paste into Selection.
8. Set Opacity to 39. Selections/Select None.
9. Layers/New Raster Layer.
10. Flood fill with Background color #9f5a11.
11. Layers/Load/Save Mask/Load Mask from Disk (MaskBJ3). Load.
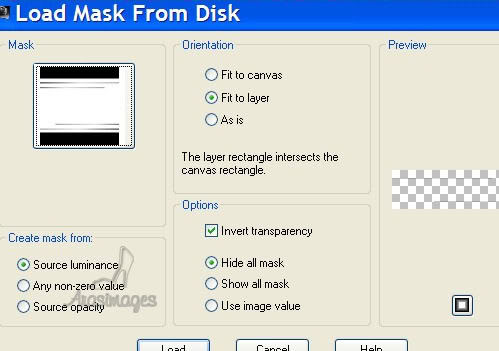
12. Merge/Merge Group.
13. Effects/Geometric Effects/Circle. Dot in circle by Color, use Background color #9f5a11.
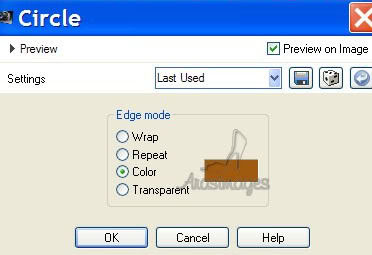
14. Effects/Filters Unlimited/Distortion Filters/Cracked, set to 64. Apply.
15. Merge/Merge Visible.
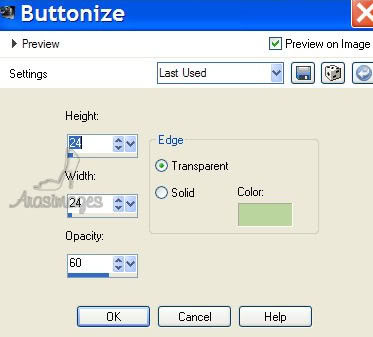
16. Effects/3-D Effects/Buttonize, using Foreground color #bbd59e.
17. Image/Resize/Resize by 70%, All Layers checked.
18. Copy/Minimize resized image.
19. New/New Image 762px by 562px.
20. Flood fill with Gradient.
21. Adjust/Blur/Gaussian blur/Radius 26.
22. Paste resized minimized image on New Image as New Layer.
23. Effects/3-D Effects/Drop Shadow Vertical 7, Horizontal 7, Opacity 75, Blur 32, color #2f3124.
24. Repeat Drop Shadow using Vertical -7 and Horizontal -7, all the rest the same.
25. Image/Add Borders 4px, Symmetric checked, color #2f3124.
26. Image/Add Borders 14px, Symmetric checked, color #9f5a11.
27. Activate with Magic Wand by clicking inside 14px border.
28. Flood fill activated border with Gradient.
29. Effects/Filters Unlimited/Distortion Filters/Cracked set to 255.
30. Effects/3-D Effects/Drop Shadow Vertical 11, Horizontal 11, Opacity 75, Blur 30, color #2f3124.
31. Repeat Step 30 with Vertical -11, Horizontal -11, all the rest the same.
32. Effects/3-D Effects/Buttonize using color #9f5a11.
33. Selections/Select None.
34. Image/Add Borders 4 px, Symmetric checked, color #2f3124.
35. Image/Add Borders 14px, Symmetric checked, color #bbd59e.
36. Activate with Magic Wand by clicking inside 14px border.
37. Effects/Graphics Plus/Cross Shadow, default settings. Selections/Select None.
38. Image/Add Borders 34px, Symmetric checked, color #9f5a11.
39. Activate with Magic Wand by clicking inside 34px border.
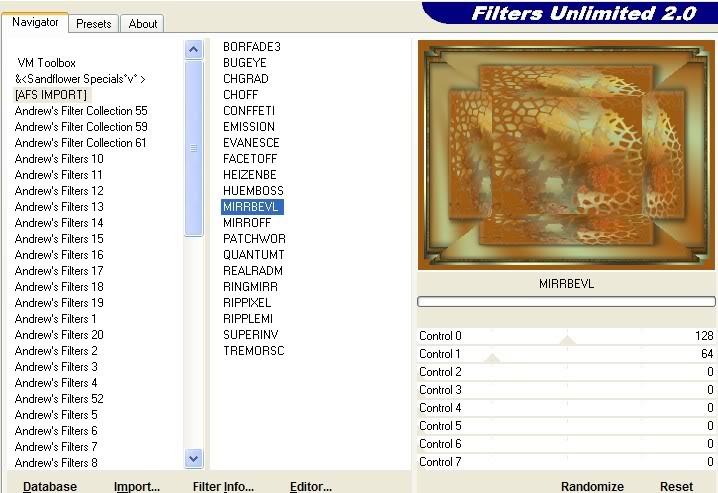
40. Effects/Filters Unlimited/AFS IMPORT/MIRRBEVL, default settings of 128, 64 all the rest 0's.
41. Selections/Select None.
42. Image/Add Borders 4px, Symmetric checked, color #2f3124.
43. Open K@rine_dreams_Pretty_Woman1246_septembre2010.pspimage. Copy/Paste as New Layer.
44. Image/Resize/Resize by 90%, Resize all layers unchecked.
45. Move woman to right side of image.
46. Effects/3-D Effects/Drop Shadow of Vertical 11, Horizontal 11, Opacity 75, Blur 30, color #2f3124.
47. Adjust/Sharpness/Sharpen.
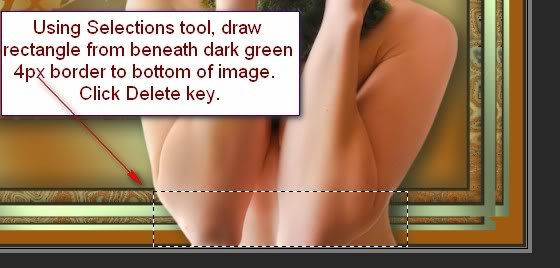
48. Using Selection Tool, draw a rectangle across bottom of woman below and even with 4px border to bottom of image.
49. Click Delete key. Selections/Select None.
50. Open images_animaux_1228668994_animaux .pspimage of bird. Copy/Paste as New Layer.
51. Image/Resize/Resize by 85%, Resize all layers unchecked.
52. Image/Mirror. Move into place on left side of woman. (See my image for placement).
53. Effects/3-D Effects/Drop Shadow of Vertical 11, Horizontal 11, Opacity 75, Blur 30, color #2f3124.
54. Image/Adjust/Sharpness/Sharpen.
55. Open flower169.tub. Copy/Paste as New Layer.
56. Image/Flip.
57. Image/Free Rotate, Right by 45 degrees. Place in upper left corner. See my image for placement.
58. Effects/3-D Effects/Drop Shadow of Vertical 11, Horizontal 11, Opacity 75, Blur 30, color #2f3124.
59. Copy/Paste leaves as New Layer again.
60. Move leaves to left side just below first set of leaves.
61. Effects/3-D Effects/Drop Shadow of Vertical 11, Horizontal 11, Opacity 75, Blur 30, color #2f3124.
62. In Layers Palette, Duplicate Raster 4 of leaves.
63. Image/Mirror. Image/Flip. Move to bottom right corner. See my image for placement.
64. Using the text tool A, choose Chase CallasSH, Size 72, color Foreground #bbd59e, type Too Loud in upper area of image. Convert to Raster Layer.
65. Effects/3-D Effects/Drop Shadow Vertical 4, Horizontal 4, Opacity 75, Blur 9, color #2f3124. Duplicate.
66. Merge/Merge visible. Sign your work or place your watermark.
Thank you for working this tutorial I have written for you. I hope you have enjoyed it.

Big hugs and thanks to my lovely testers, Evatexas and PamelaD who so faithfully test my tutorials for me.
If you are going to use this tutorial for stationery, cards or place the tutorial/tag on another site, I would appreciate you contacting me for permission, giving Arasimages credit for the original tutorial and if possible, a link back to my site. Thank you.
Copyright © Arasimages All Rights Reserved

