
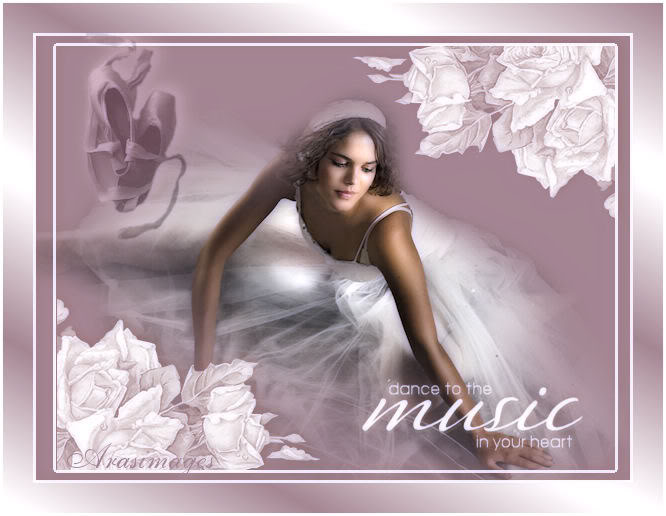
Dance to the Music
For Danish and German translation, click on the flags.


For this tutorial you will need the materials in the zip file below.

Unzip the materials into a working folder. Open the materials in PSP, copy and close originals. You will need the plugin Xero for this tutorial. I have used PSPX3 to create this tutorial but you may use an earlier version. It is assumed you have a working knowledge of PSP.
Thanks go to Kat for the beautiful dancer tube used. The Floral Mask comes from this website, Arasimages under Masks. Please visit the tuber sites listed on my Links page and check out the many tubes I have for you to choose from under Tubes.
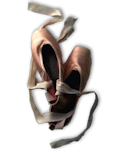
Use the dancing shoes below to mark your place along the way.
1. In Materials Palette, set the Foreground color to #ffffff, Background to #9d808b.
2. New/New Image, 600px by 450px. Flood fill image with Background color #9d808b.
3. Layers/New Raster Layer. Flood fill with Foreground color #ffffff.
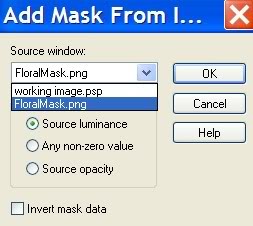
4. Open the FloralMask. Just leave on the desktop workspace.
5. Layers/New Mask Layer/From Image. Choose the FloralMask listed. Click OK.
6. Layers/Merge/Merge Group.
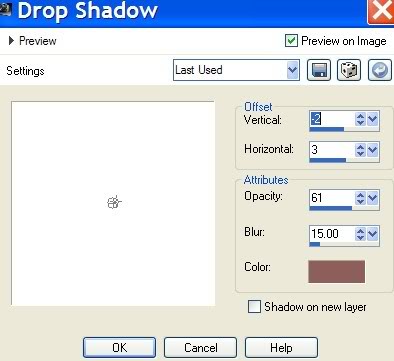
7. Effects/3-D Effects/Drop Shadow, Vertical -2, Horizontal 3, Opacity 61, Blur 15, color #9d808b.
8. Open Dancing Shoes.pspimage. Copy/Paste as New Layer.
9. Image/Resize/Resize by 70%, Resize all layers unchecked.
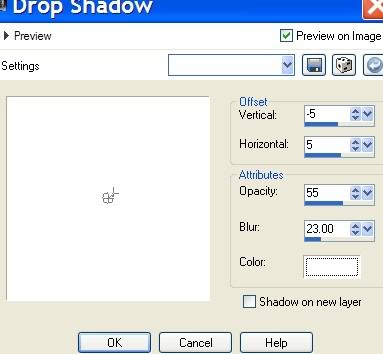
10. Effects/3-D Effects/Drop Shadow, Vertical -5, Horizontal 5, Opacity 55, Blur 23, color #ffffff.
11. Set Blend Mode to Luminance (Legacy), Opacity to 42.
12. Open Kat_0587.pspimage of woman. Copy/Paste as New Layer.
13. Image/Resize/Resize by 70%, Resize all layers unchecked.
14. Move dancer woman layer beneath Group-Raster 2 layer.
15. Highlight Raster 2 layer of shoes.
16. Image/Add Borders/30px, Symmetric checked, color #000000.
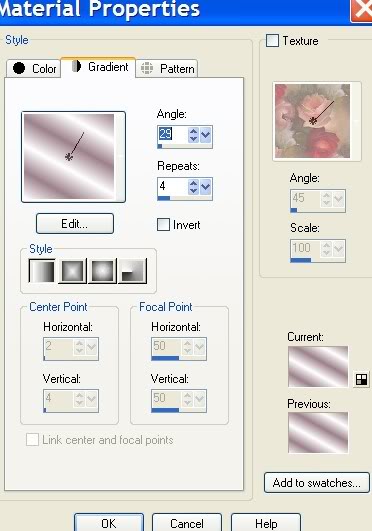
17. In Materials Palette, set on Gradient, Linear, Angle 29, Repeats 4, Invert unchecked.
18. Using Magic Wand, click within the 30px border to activate it.
19. Flood fill with Gradient. Selections/Select None.
20. Image/Add Borders/3px, Symmetric checked, color #ffffff.
21. Place your name or watermark in the font and color of your choice. Merge/Merge Visible.
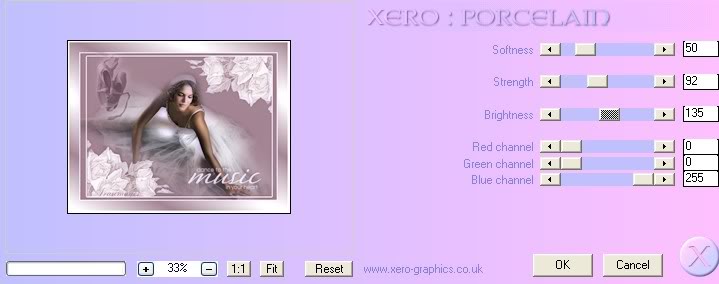
22. Effects/Xero/Porcelain. Use settings as below.
Thank you for working this tutorial I have written for you. I hope you have enjoyed it.
Big hugs and thanks to my lovely testers, Evatexas and PamelaD who so faithfully test my tutorials for me.
If you are going to use this tutorial for stationery, cards or place the tutorial/tag on another site, I would appreciate you contacting me for permission, giving Arasimages credit for the original tutorial and if possible, a link back to my site. Thank you.
Copyright © Arasimages All Rights Reserved