

Tropical Heartbreaker
For Italian, Danish and French translation, click on the flags.


For this tutorial you will need the materials in the zip file below.

Unzip the materials into a working folder. Place Texture in the Texture files folder. Open the materials in PSP, copy and close originals. You will need Eye Candy 4000, Animation Shop and Sqirlz Reflect for this tutorial. For a free Squirlz program click HERE. For a free Animation Shop program click Here. I have used PSPX3 to create this tutorial but you may use an earlier version. It is assumed you have a working knowledge of PSP to follow these directions.
Thanks go to Suzi Sgai and Willeke Tbm for the beautiful tubes used. For more lovely tubes, please visit the tuber sites listed on my Links page and on my Tubes pages.
Use the teardrops below to mark your place along the way.

1. In Materials Palette, set the Foreground color to #ffffff, Background to #354735.
2. Set Materials Palette to Gradient Linear, Angle 0, Repeats 0 and Invert checked.
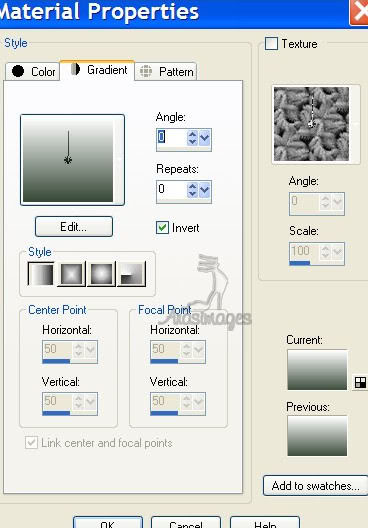
3. New/New Image 760px by 632px. Flood fill with Gradient.
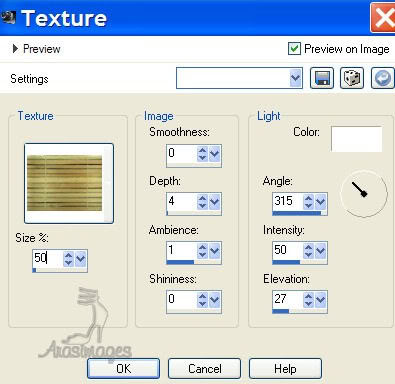
4. Effects/Texture Effects/Texture. Choose the S_S_Bamboo_t texture using the settings below, color #ffffff.
5. Open 796460460.psp image of tropical rain scene.
6. Image/Resize/Resize by 50%/Resize all layers checked.
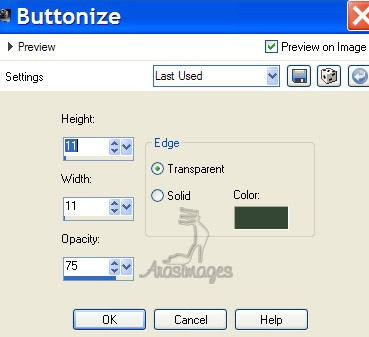
7. Effects/3-D Effects/Buttonize using settings as seen below, color #354735.
8. Copy/Paste as New Layer on main image with bamboo.
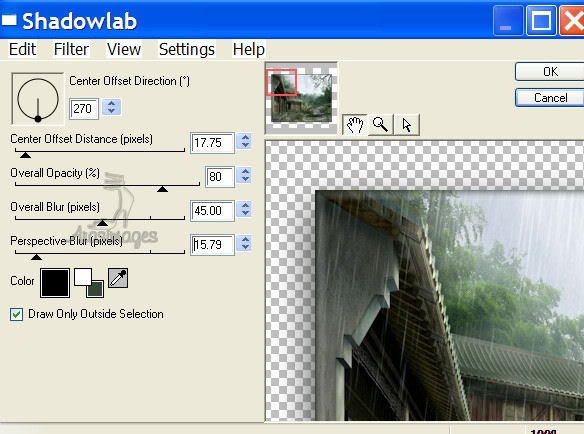
9. Effects/Eye Candy 4000/Shadowlab. Use settings as seen below.
10. Open SS_736_Misted.pspimage of woman. Copy/Paste as New Layer.
11. Image/Resize/Resize by 90%, Resize all layers unchecked.
12. Move woman up and over to right top corner.
13. Merge/Merge Visible. Save as Main Image, .jpg file in your working folder. Leave Main Image in your workspace as you will be coming back to it.
14. Open the Sqirlz Program. File/Open Main Image.
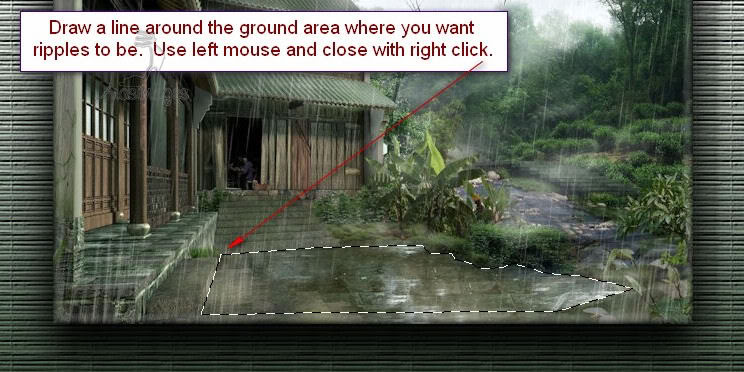
15. Click on the large Y and tick the far right selection of Rain/Snow/and Ring Ripples.
16. Click on Outline/Begin and using mouse/cursor, clicking around areas, draw a line around area where you want the puddles to be. Right click to connect your "circle". See example below.
NOTE: The following settings are some I chose, but you may play with the settings to get the results you want.
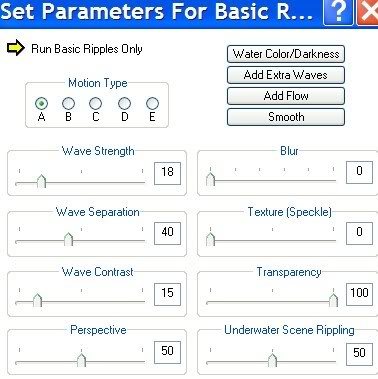
17. Click on Reflect Options/Customize/Set Parameters for Basic ripples. (See my example below for settings). Click on Water Color/Darkness. Set to No Coloring/OK.
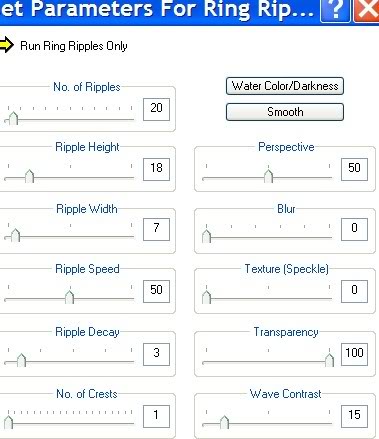
18. Click on Reflect Options/Customize/Set Parameters for Ring ripples. (See my example below for settings). Click on Water Color/Darkness. Set to No Coloring/OK.
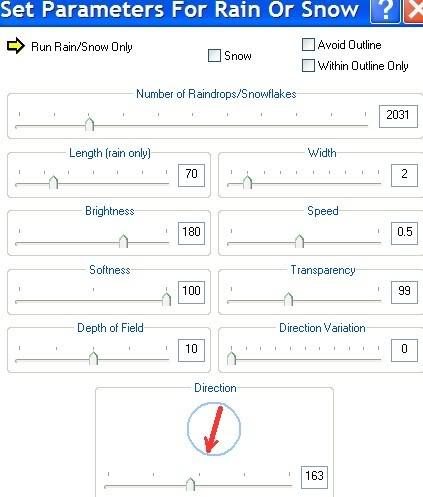
19. Click on Reflect Options/Customize/Set Parameters for Rain or Snow. (See my example below for settings).
20. Click on the Large yellow arrow to check your rain and puddles movement.
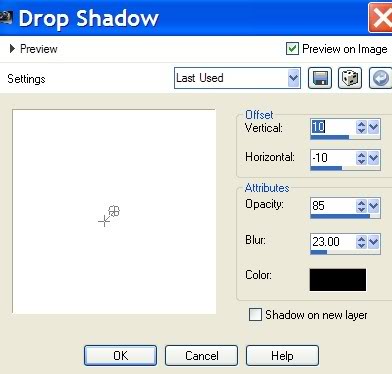
21. If you are satisfied with the direction of the rain and how it all looks, then click on the red GIF to save your work. Name your work Main Background w/Rain and save in your working folder. (Or a name of your choice).
22. A box will come up with a frame rate setting of 15; set it to 20.
23. Go back to PSP to finish your image.
24. Open WS1-FL_FonsG_Leaves040710.pspimage of leaves.
25. Copy/Paste as New Layer.
26. Image/Mirror. Image/Flip. Move into upper left top corner.
27. Effects/3-D Effects/Drop Shadow of Vertical 10, Horizontal -10, Opacity 85, Blur 23, Color #000000.
28. Adjust/Sharpness/Sharpen.
29. Layers/Duplicate. Image/Mirror. Image/Flip.
30. Image/Resize/Resize by 80%/Resize all layers unchecked.
31. Move down to bottom right corner.
32. In Materials Palette, click the small far right arrow to switch background to white (#ffffff).

33. Select the A (text tool). Use settings as seen below (Font Desdemona, Size 36, color #ffffff) type the words "Tropical Heartbreaker".

34. Convert to Raster Layer. Move the words into position as I have mine.
35. Sign your work or leave your watermark.
36. Close off the bottom Merged Layer by clicking on the eye.
37. Effects/3-D Effects/Buttonize using same Buttonize settings as in Step 6.
38. Merge/Merge Visible.
39. Copy this Merged image.
40. OPEN ANIMATION SHOP.
41. In workspace of AS, Paste as New Animation. Leave in workspace for now...we will get to it in a minute.
42. File/Open the saved .gif file named Main Background w/Rain.
43. Click on first frame/Edit/Select All.
44. Click on Animation/Cull Animation. A box will come up and choose to Remove 1 Frame every 2 Frames. You will end up with 10 frames which makes your image much smaller in MB size. Culling is optional if size is not an issue.
45. Click on Animation/Frame Properties and change the speed to 12 so your rain looks more natural.
46. Go back to the New Animation of the leaves and the words in your workspace.
47. Duplicate until you have 10 frames in all.
48. Click in first frame/Edit/Select All. COPY.
49. Right click inside first frame of Main image and Paste into Selected Frame. Left click to set in place. (This will place the leaves on all 10 frames at once.)
50. Click on the Animation button to check your animation and make sure it all is the way you want it.
51. Now we will save your work. File/Save As. When the box comes up, give your work a name and a place to save it. Click Save. Then keep clicking Next 3 times as it goes through the steps, then Finish and you are all done!
52. Congratulations on doing a complicated animated tutorial!
A big thank you to my testers, Evatexas and PamelaD who so faithfully test my tutorials for me.
If you are going to use this tutorial for stationery, cards or place the tutorial/tag on another site, I would appreciate you contacting me for permission, giving Arasimages credit for the original tutorial and if possible, a link back to my site. Thank you.
Copyright © Arasimages All Rights Reserved