
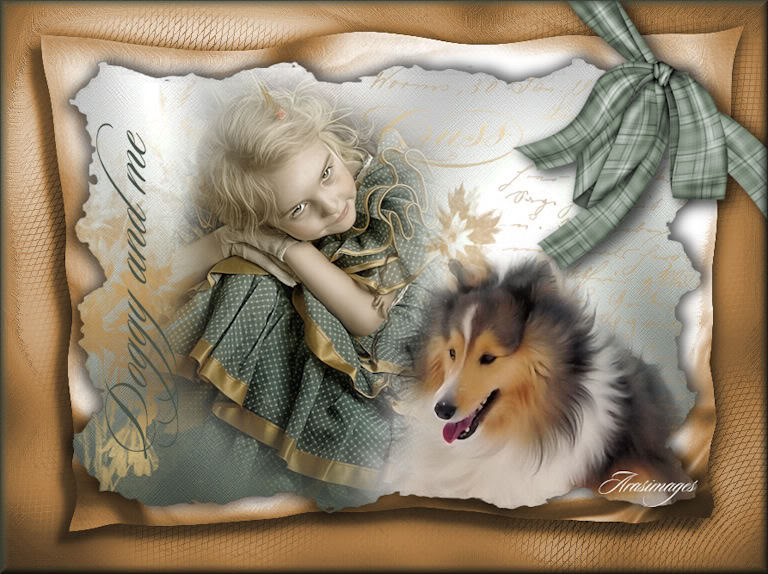
Doggy and Me
For Danish translation, click on the flags.

For this tutorial you will need the materials in the zip file below.

Unzip the materials into a working folder. Open the materials in PSP, copy and close originals. Place the Font in your Fonts folder, and place Sg_Coppergold Gradient into your PSP Gradient folder. Resize the klien_postcards_7.png file by 81%. Export klien_postcards_7.png resized file into your PSP Brushes folder. You will need the plugins Graphics Plus, Brush Strokes and Filters Unlimited for this tutorial. I have used PSPX3 to create this tutorial but you may use an earlier version. It is assumed you have a working knowledge of PSP.
Thanks go to Angie, Sabre and Nikita of Reveries for the beautiful tubes used. Sabre has requested her tubes not be included in the 4Shared download but rather you go to her site to download her Scrapkit. Look on right side of page under her bio, under freebies. To get the ribbon tube from Sabre's free scrapkit called Morning Glory, click Here
For more lovely tubes, please visit the tuber sites listed on my Links page, and be sure to visit the Tubes section of Arasimages.com.
Use the butterfly below to mark your place along the way.

1. In Materials Palette, set the Foreground color to #ffffff, Background to #485247.
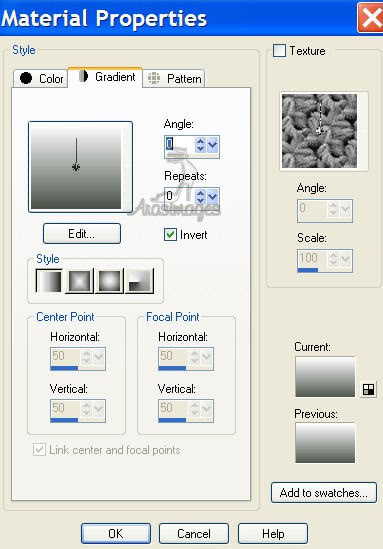
2. Set Materials Palette to Gradient, Style Linear, Angle 0, Repeats 0, Invert checked.
3. New/New Image 752px by 542px. Flood fill with Gradient.
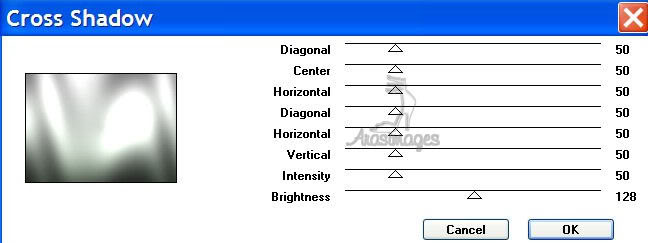
4. Effects/Graphics Plus/Cross Shadow, all settings at 50 except for last at 128.
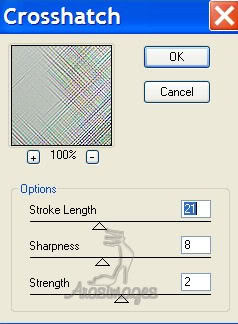
5. Effects/Brush Strokes/Cross Hatch. Use settings as seen below.
6. Adjust/Sharpness/Sharpen.
7. Layer/New Raster Layer.
8. Set your Materials Palette foreground to Gradient Sg_Coppergold Gradient. Angle 0, Repeats 0, Invert checked.
9. From Tool bar, find the Brush klien_postcards_7 in your Paint Brush/Brushes. Left click approximately in the center of the image, using default settings.
10. Layers Palette/set Opacity to 70.
11. Open 201016.pspimage of little girl. Copy/Paste as New Layer.
12. Move her just left of center of image. Duplicate/Merge Down.
13. Open 12286689947_animaux.psp image of dog.
14. Copy/Paste as New Layer. Move to bottom right corner of image.
15. Merge/Merge Visible.
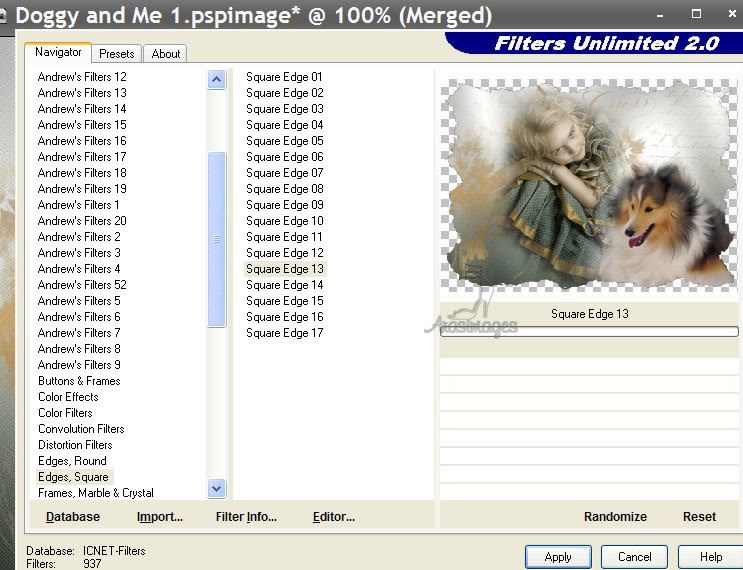
16. Effects/Filters Unlimited/Edges,Square, Square Edge 13. Apply.
17. Copy image and minimize; we will be pasting it on the background in a moment.
18. Open JHanna_264 background.png file.
19. Adjust/Hue and Saturation/Colorize/Hue and Saturation. Set Hue to 23, Saturation to 105. Click OK.
20. Paste as New Layer the image you just made and copied.
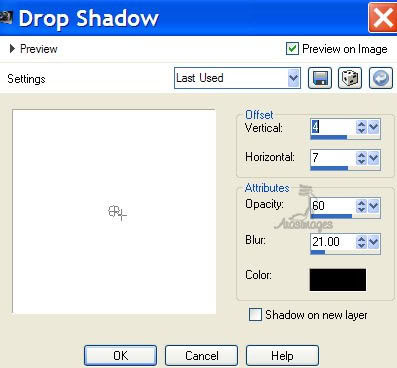
21. Effects/3-D Effects/Drop Shadow Vertical -4, Horizontal 7, Opacity 60, Blur 21, color #000000.
22. Effects/3-D Effects/Drop Shadow Vertical 4, Horizontal -7, Opacity 60, Blur 21, color #000000.
23. Open SL-MGBowSabre5.pspimage. Copy/Paste as New Layer.
24. Adjust/Hue and Saturation/Colorize. Set Hue to 80, Saturation to 18.
25. Image/Miror. Image/Free Rotate, 45 degrees, Right.
26. Image/Resize/Resize by 70%, Resize all layers unchecked.
27. Effects/3-D Effects/Drop Shadow Vertical 4, Horizontal 7, Opacity 60, Blur 21, color #000000. Repeat.
28. Move ribbon into upper right corner.
29. From Tool bar, select the Font Sloop-Script Three, Size 72, color #485247. (See settings below) Type Doggy and me. Using the nodes around the words, rotate it to vertical position. Grab top and bottom nodes and pull out the writing to make it longer. Place as I have mine.

30. Layers/Convert to Raster Layer.
31. Sign your name or leave your watermark.
32. Image/Add Borders/1px Symmetric, color #485247
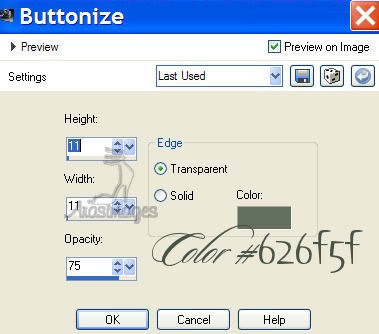
33. Effects/3-3 Effects/Buttonize with settings as shown below. Use color #626f5f.
34. Image/Resize/Resize by 86%, Resize all layers checked. You are now finished.
A loving thanks to my testers, Evatexas and PamelaD who so faithfully test my tutorials for me.
If you are going to use this tutorial for stationery, cards or place the tutorial/tag on another site, I would appreciate you contacting me for permission, giving Arasimages credit for the original tutorial and if possible, a link back to my site. Thank you.
Copyright © Arasimages All Rights Reserved