
Snow Dust
For Italian, Danish and German translation, click on the flags.


For this tutorial you will need the materials in the zip file below.

Unzip the materials into a working folder. Open the materials in PSP, copy and close originals. Place the Font in your Fonts folder or open it from your working folder and keep it minimized while using it. It will show up in your PSP Font selection. Open the 143.png file in PSP and resize by 60%. File/Export the 143.png file as a brush and name it fog143. Open in PSP the H Sparkle-White tub image. File/Export it to Picture Tubes. You will need Animation Shop for this tutorial.
You can find a free Animation Shop program HERE
I have used PSPX3 to create this tutorial but you may use an earlier version. It is assumed you have a working knowledge of PSP.
The tubes are from Arasimages, Migui and those whose origin is unknown. Please visit Arasimages Tubes for other beautiful tubes.
Use the gift box below to mark your place along the way.

1. In Materials Palette, set the Foreground color to #c71008, Background to #000000.
2. Set Materials Palette to Gradient, Style Linear, Angle 0, Repeats 0, Invert checked.
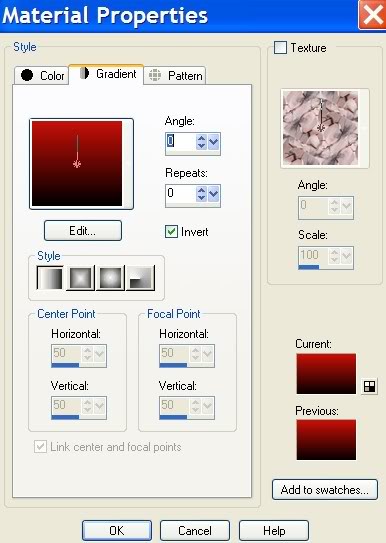
3. New/New Image 762px by 562px. Flood fill with Gradient.
4. Layers/New Raster Layer. Selections/Select All.
5. Open BrightBalls.jpg. Copy/Paste into Selection.
6. Selections/Select None.
7. Blend Mode set to Luminance. Opacity to 44.
8. Open Christmasgifts1E.pspimage. Copy/Paste as New Layer.
9. Image/Resize/Resize by 70%, Resize all layers unchecked.
10. Move to bottom right corner.
11. Effects/3-D Effects/Drop Shadow, Vertical -3, Horizontal 14, Opacity 60, Blur 34, color #000000. Apply 2X.
12. Open Santashelper.psp image. Copy/Paste as New layer.
13. Move her to bottom left corner.
14. Change background color in Materials Palette from #000000 to #ffffff.
15. Layers/New Raster Layer.
16. From Tool bar, choose your Paint Brush and find the brush Fog143.png which you resized, exported and named earlier.
17. Using the settings shown below, right click stamping the fog 8-12 times from the snow in her hands outward and upward.

18. Duplicate the fog layer 1 time. Merge/Merge down. (If this step makes too much fog to suit you, skip this step.)
19. Open the small .psp stars. Use this example below and Copy/Paste 3 times .
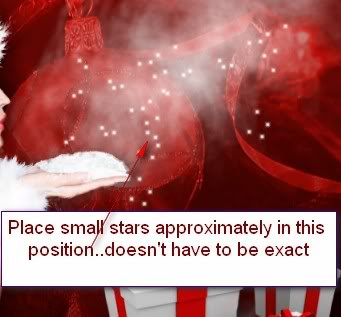
20. There will be a couple of stars on her face...use Eraser tool and erase them.
21. Open the Sterrentube.pspimage. Image/Rotate Right.
22. Copy/Paste 2X and pull into position each time as I have mine.

23. From Tool bar, select Text Almonte Snow, Size 72, color #ffffff. (The file is named almosnow.ttf but it will show up in PSP as Almonte Snow.)

24. Type "Snow Dust". Convert to Raster Layer.
25. Set into place as I have mine.
26. Sign your name or place your watermark.
27. Image/Add Borders/2px Symmetric checked, color #ffffff.
28. Promote Background image to Raster Layer.
29. Duplicate image 4 times, having 5 images in all.
30. Close off all layers but top one. Highlight it.
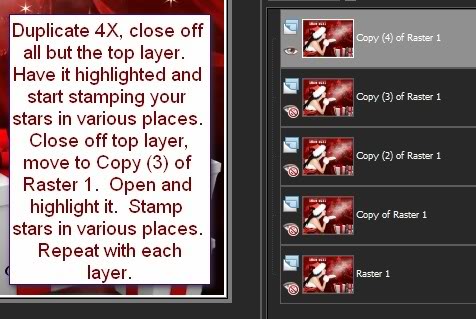
31. From Tool bar, select the Tube tool and find the H Sparkle-White tub star. Set Scale to 35 and stamp on larger stars of your image.

32. Close off top layer. Move down to next layer, open and highlight it. Set Scale to 30 and stamp on smaller stars here and there but not on all of them. You still have 3 layers to stamp stars on.
33. Close off this layer. Move down to next layer, open and highlight it. Set Scale to 25 and stamp on various stars as before.
34. Close off this layer. Move down to next layer, open and highlight it. Set Scale to 20 and stamp on various stars as before.
35. Close off this layer. Move down to last layer, open and highlight it. Set Scale to 15 and stamp on various stars as before.
36. Open all layers. File/Save As/PSP Animation Shop (*psp) giving your file a name.
37. Open Animation Shop. File/Open, find your Animation Shop file you just saved.
38. Click the animation button to see if your stars are twinkling as they should be.
39. If all is good, then File/Save As/. A box will come up and you will give your animation a name, name where to save it and click Save. Then click Next 4X, then Finish.
40. You are now finished. I hope you have enjoyed doing a sparkling Christmas image!
A loving thanks to my testers, Evatexas and PamelaD who so faithfully test my tutorials for me.
If you are going to use this tutorial for stationery, cards or place the tutorial/tag on another site, I would appreciate you contacting me for permission, giving Arasimages credit for the original tutorial and if possible, a link back to my site. Thank you.
Copyright © Arasimages All Rights Reserved