
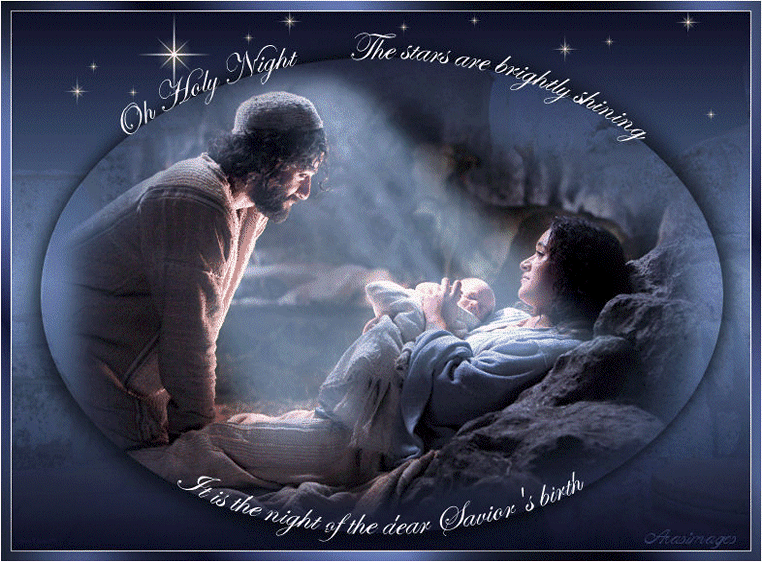
Nativity
For Italian, Danish and German translation, click on the flags.


For this tutorial you will need the materials in the zip file below.

Unzip the materials into a working folder. Open the materials in PSP, copy and close originals. Place the Font in your Fonts folder or open it from your working folder and keep it minimized while using it. It will show up in your PSP Font selection. Open in PSP the H Sparkle-White tub image. File/Export it to Picture Tubes. You will need Animation Shop for this tutorial.
You can find a free Animation Shop program HERE
I have used PSPX3 to create this tutorial but you may use an earlier version. It is assumed you have a working knowledge of PSP.
The tubes are from Arasimages, Photos8.com and anna.br. Please visit Arasimages Tubes and other tuber sites on the Links page for other beautiful tubes.
Use the star below to mark your place along the way.

1. In Materials Palette, set the Foreground color to #7088c8, Background to #0e1026.
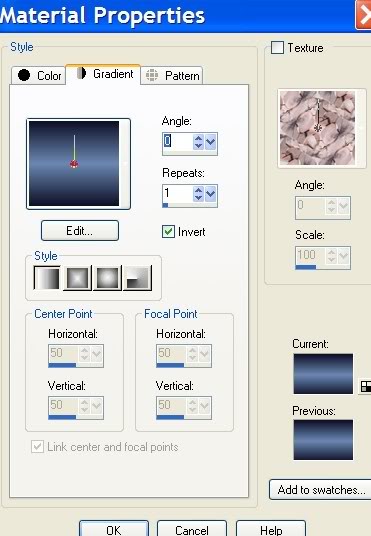
2. Set Materials Palette to Gradient, Style Linear, Angle 0, Repeats 1, Invert checked.
3. New/New Image 762px by 562px. Flood fill with Gradient.
4. Layers/New Raster Layer. Selections/Select All.
5. Open the_door_of_humility_nativity_bethlehem_other.pspimage from Photos8.com. Copy/Paste into Selection. Selections/Select None.
6. Layers/Blend Mode/Overlay. Set Opacity to 30.
7. Image/Mirror.
8. Layers/New Raster Layer.
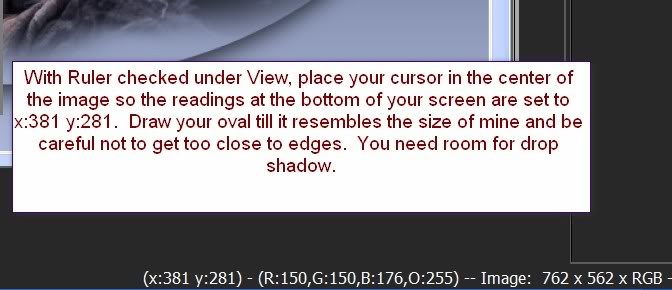
9. View/Ruler checked so you can find the center of image.
10. From Tool bar, Selections/Ellipse, using settings as below.

11. Place your cursor in the center of the page, (try to find the spot where it reads x:381 y:281 at the bottom of your workspace).
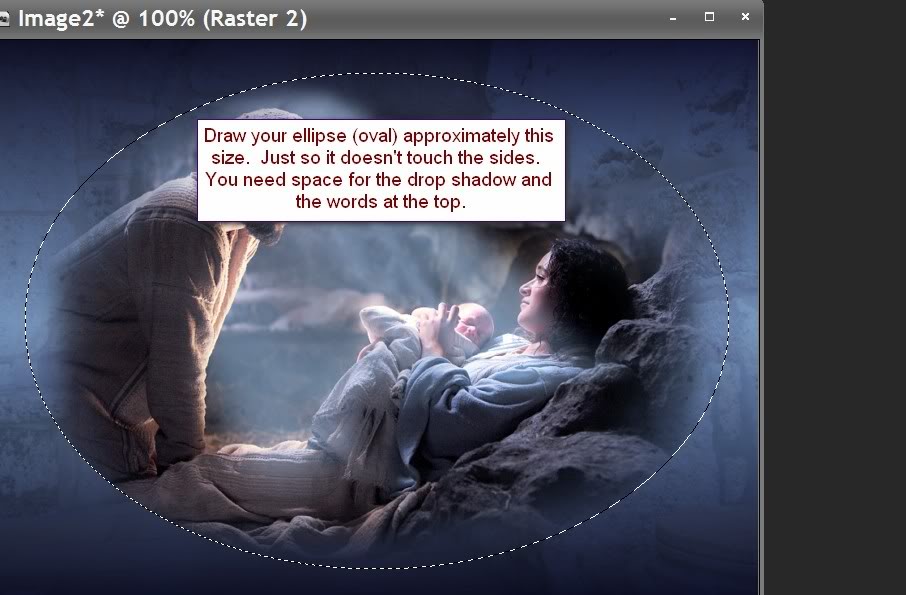
12. Draw out an Ellipse (oval) shape approximately as large as I have mine. Do not go to edges or there will be no room for your drop shadow or words. See example below.
13. Open anna.br_the-nativity_09-08-10.psp misted image. Copy/Paste into Selection.
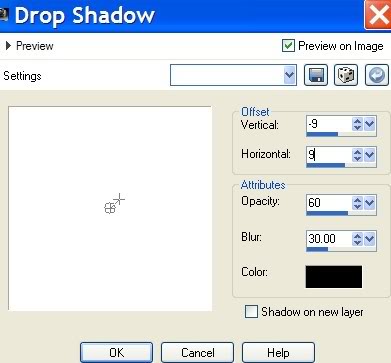
14. Effects/3-D Effects/Drop Shadow, Vertical -9, Horizontal 9, Opacity 60, Blur 30, color #000000.
15. Effects/3-D Effects/Drop Shadow, Vertical 9, Horizontal -9, Opacity 60, Blur 30, Color #000000.
16. Selections/Select None. If your oval isn't exactly where you would like it, use your move tool to move it and resize if necessary.
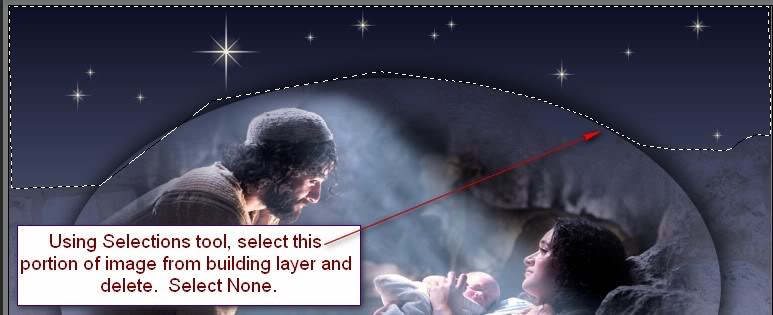
17. Highlight Raster 2 layer of background. Using Freehand Selection Tool/Freehand Selection/Point to Point/Replace/Feather 0, select around the top part of oval as I have in my example. Click Delete key. Draw inside of oval over Joseph's backside to get rid of any of the building on him as well.
18. Selections/Select None.
19. Go back to the top layer and highlight it to continue.
20. Layers/New Raster Layer.
21. From your Tool bar, select the Tube tool and find the H Sparkle-White Tub.
22. Stamp a large star near Joseph's head using size 65. Change size to 25 and stamp 4 times. Change size to 15 and stamp 7 times. See my finished image of where you might want to stamp stars. This is a personal choice so put them where you wish.
23. In Materials Palette, set your foreground color to color #ffffff and close off background color.
24. From Tool bar, select the Pen tool. Using the settings as in example below, begin to left click on the top border of the oval, left to right, clicking in small increments where you will place your words. You will end up with a row of nodes. Apply.

25. Layers/New Vector Layer.
26. From Tool bar, select the Text tool. Choose Font ITCEdscr.TTF (Edwardian Script BT), size 40.
27. Hover your mouse over the line where you started the nodes and when you see an A with a curved line under it, begin to type your words.
28. Type "Oh Holy Night", then space over 8 spaces and continue to type "The stars are brightly shining". Apply.
29. Convert to Raster Layer. Drop down to Vector layer below and delete this layer to get rid of your line.
30. Go back to top layer.
31. In Materials Palette, swap background with foreground and X off the background layer to null.
32. Grab the pen tool once more and left click, making nodes along the bottom oval on the line. Apply.
33. Layers/New Vector Layer.
34. In Materials Palette, swap background with foreground so color #ffffff is background color.
35. From Tool bar, select the Text tool. Choose Font ITCEdscr.TTF (it will show as Edwardian Script ITC), size 40. Align Text to center.
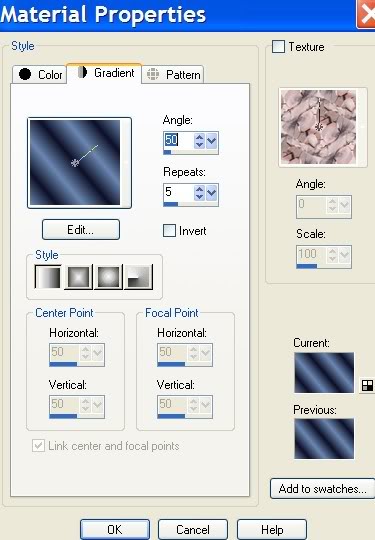
36. Hover the mouse at the beginning of the nodes until A with a curved line under it shows and begin to type "It is the night of our dear Savior's birth".
37. Convert to Raster Layer.
38. Drop down to Vector layer below and delete the layer. Go back to top layer to continue.
39. Sign your name or leave your watermark.
40. Image/Add Borders/1px, Symmetric checked, color #ffffff.
41. Image/Add Borders/10px, Symmetric checked, color #000000.
42. Select the Magic Wand and activate the 10px border.
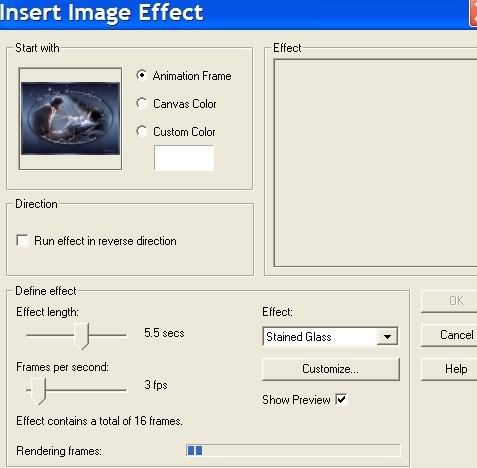
43. In Materials Palette, set the foreground color to #7088c8 and background to #0e1026. Set to Gradient Linear, Angle 50, Repeats 5, Invert checked.
44. Flood fill the 10px border with the Gradient. Selections/Select None.
45. Image/Add Borders/1px, Symmetric checked, color #ffffff.
46. Save your image as a .jpg file in your working folder, naming it Nativity.
47. If you like the image the way it is without animation, you are now finished.
48. The following directions are for the animation you see in the tutorial image.
49. Open Animation Shop. File/Open/Nativity.jpg file.
50. Effects/Insert Image Effect/Customize. Use these settings below.
51. Wait for the animation to finish and go up to the Animation button and test it to see if it is what you like.
52. If all is okay, then save your work. File/Save As/. A box will come up where you will name your work Nativity, where you will save it, click Save. Then click Next 3 times and finally Finish. You are done.
53. Thank you for working this tutorial and have a blessed Christmas season!
Heartfelt thanks to my testers, Evatexas and PamelaD who so faithfully test my tutorials for me.
If you are going to use this tutorial for stationery, cards or place the tutorial/tag on another site, I would appreciate you contacting me for permission, giving Arasimages credit for the original tutorial and if possible, a link back to my site. Thank you.
Copyright © Arasimages All Rights Reserved