
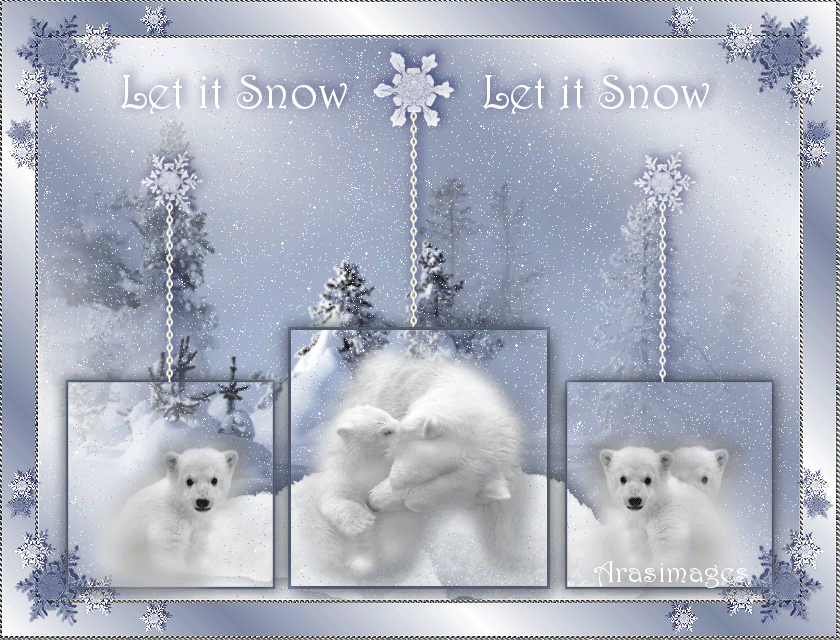
Let it Snow
For Italian and Danish translation, click on the flags.


For this tutorial you will need the materials in the zip file below.

Unzip the materials into a working folder. Open the materials in PSP, copy and close originals. Place the Pattern silverpunk into PSP Patterns. Place the Font Harrington .TTF in your Fonts folder or open it from your working folder and keep it minimized while using it. It will show up in your PSP Font selection. Open the Brush Snow and Export it to your PSP Brushes folder. You will need the plugins VDL Adrenaline/Snowflakes and Simple/Top Left Mirror. You will need Animation Shop for this tutorial.
You can find a free Animation Shop program HERE
I have used PSPX3 to create this tutorial but you may use an earlier version. It is assumed you have a working knowledge of PSP.
The tubes are from Arasimages, Angie and Sorensen. Please visit Arasimages Tubes and other tuber sites on the Links page for other beautiful tubes.
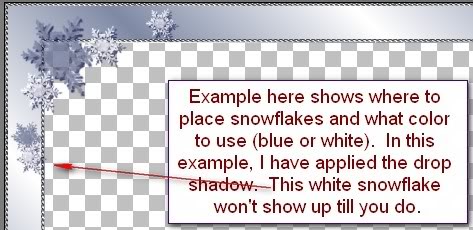
Use the snowflake below to mark your place along the way.

1. In Materials Palette, set the Foreground color to #ffffff, Background to #7e89a5.
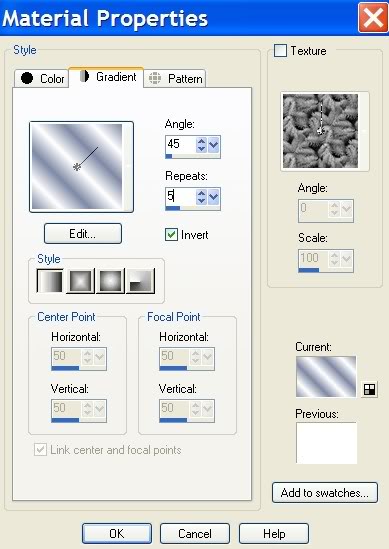
2. Set Materials Palette to Gradient, Style Linear, Angle 45, Repeats 5, Invert checked.
3. New/New Image 762px by 562px. Flood fill with Gradient.
4. Adjust/Blur/Gaussian Blur, Radius of 30.
5. Selections/Select All.
6. Open the Mysticwinter.pspimage of trees. Copy/Paste into Selection. Selections/Select None.
7. Set the Foreground color in the Materials Palette to color #ffffff.
8. Layers/New Raster Layer.
9. From Tool bar, select the Paint Brush tool. From the drop down selection, choose the Snow brush. See example for settings.

10. Stamp the clump of snow at the bottom center of image. Some of the snow will disappear below the bottom edge.
11. Effects/3-D Effects/Drop Shadow, Vertical -6, Horizontal 4, Opacity 65, Blur 24, color #32373f.
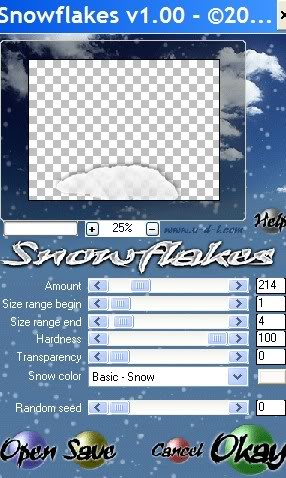
12. Effects/VDL Adrenaline/Snowflakes. Apply snowflakes on clump of snow layer (background) using the settings below.
13. Image/Add Borders/3px border, Symmetric checked, Color #ffffff.
14. Select 3px border with Magic Wand.
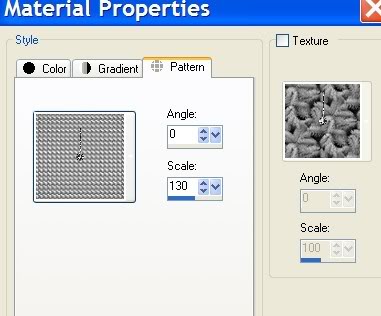
15. Change Foreground color in Materials Palette to Pattern silverpunk. Use settings below, fill 3px border with silverpunk.
16. Adjust/Sharpness/Sharpen. Selections/Select None.
17. Image/Add Borders/33px border, Symmetric checked, Color #000000.
18. Using Magic Wand, select 33px border.
19. Change Foreground of Materials Palette back to Gradient, uncheck Invert.
20. Flood fill with Gradient. Selections/Select None.
21. Image/Add Borders/3px border, Symmetric checked, Color #000000.
22. Change Foreground color in Materials Palette to silverpunk Pattern.
23. Select 3px border with Magic Wand. Flood fill 3px border with silverpunk.
24. Adjust/Sharpness/Sharpen. Selections/Select None.
25. Save background image in your working folder. Leave background image on workspace.
26. Selections/Select All. Modify/Contract by 40. Invert. Copy/Paste as New Image. This is your frame beginning.
27. Using the frame image, we will now work our snowflake corners.
28. Change Foreground color in Material Palette to #ffffff. Layers/New Raster Layer.
29. From Tool bar, select the Paint Brush tool. Find Snowflake 31. Settings Size 88 as in example below.

30. Stamp once in top left corner using Background color #7e89a5.
31. Change setting to Size 44 and stamp with Foreground color #ffffff on each side as I have mine.
32. Change setting to Size 34 and stamp top and side with Foreground and Background colors as I have done in example below.

33. Effects/3-D Effects/Drop Shadow, Vertical 3, Horizontal 3, Opacity 75, Blur 1, Color #000040.
34. Adjust/Sharpness/Sharpen.
35. Effects/Simple/Top Left Mirror. Merge/Merge Down.
36. Copy/Paste as New layer on your Background image.
37. From your Tool bar, Selections/Selection/Square. See example for settings.

38. Layers/New Raster Layer. Draw a square about the size that I have used for center square.
39. Flood fill with Background color #7e89a5
40. Selections/Modify/Contract by 3px, Press Delete key.
41. Effects/3-D Effects/Drop Shadow, Vertical -6, Horizontal -6, Opacity 65, Blur 23, color #32373f. Repeat shadow, changing Vertical and Horizontal to 6.
42. Layers/New Raster Layer.
43. Open Misted by Sorenson_Designs Mom and Baby Polar Bears.pspimage. Copy/Paste into Selection.
44. Using Freehand Selections Tool/Freehand Selection, click on the bear. The marching ants will now be around them.
45. Effects/3-D Effects/Drop Shadow, Vertical -6, Horizontal -6, Opacity 65, Blur 23, color #32373f.
46. Selections/Select None.
47. Highlight Raster 2. Copy/Paste as New Layer.
48. Image/Resize/Resize by 80%, Resize all layers unchecked.
49. Move into position on left side of center square.
50. Layers/Duplicate. Image/Mirror. You may have to reposition the squares and center bear to make it all symmetric.
51. Highlight Raster 4 (smaller right side square). Layers/New Raster Layer.
52. Using Selection/Selection/Square tool, draw a square inside the border.
53. Open ANI-M2008-04.pspimage of small bear. Image/Mirror. Copy/Paste into Selection.
54. Using a color changer of your choice, change the color of the little bear to #ffffff.
55. Image/Mirror. You will now have TWO little bear! with marching ants around them.
56. Selections/Select None. Pull little bear down a bit.
57. Highlight Raster Layer 4 (the left side smaller square).
58. Using Selection/Selection/Square tool, draw a square inside the left small border. Raster/New Raster Layer.
59. Paste into Selection. Recolor little bear with color #ffffff.
60. Selections/Select None. Pull little bear down toward bottom of square.
61. Highlight top layer. Layers/New Raster Layer. Open the Chain.pspimage. Copy/Paste as New Layer.
62. Paste twice more and move the chains into position to hold the frames. Merge/Merge Down, twice.(All chains together).
63. From Tool bar, select the Paint Brush tool and from drop down, select Snowflake Brush 33.
64. Using the example of settings below, stamp the Snowflake at the top of the center chain. Use color #ffffff.

65. Find Snowflake 31 in dropdown like you did the one above and using settings below, stamp at the top of each remaining chain.
66. Effects/3-D Effects/Drop Shadow, Vertical -3, Horizontal 3, Opacity 75, Blur 17, color #000040.
67. Erase excess chains from inside the two small frames, using Eraser tool or Select/Delete method.
68. From Tool Bar, select the Text tool. Find Harrington.TTF font, using Size 48, color #ffffff, type Let it Snow. Convert to Raster Layer.

69. Effects/3-D Effects/Drop Shadow, Vertical -3, Horizontal 3, Opacity 75, Blur 17, color 000040.
70. Duplicate text and place each set of words in place on either side of center snowflake.
71. Sign your name or leave your watermark.
72. Close off bottom layer. (Background). Merge/Merge Visible. Save frame/bear/snowflake layer as PSP Animation Shop (*psp) file called Let it Snow Foreground in your working folder.
73. Close top Layer. Open and highlight bottom (Background) layer. Save as PSP Animation Shop (*psp) file called Let it Snow Background in your working folder.
74. Open Animation Shop. File/Open/BigSnowAra1fallingsnow.gif file. With first frame highlighted, Edit/Select All. Left click on top blue bar/Copy.
75. File/Open/Let it Snow Background PSP Animation Shop (*psp) file. Highlight first frame. Edit/Duplicate so you end up with 20 frames.
76. Having first frame highlighted on Background, Edit/Select All. Right click INSIDE first frame and Paste/Paste into Selected Frame by left clicking in place as directed in Step 77.
77. To do this, place the snow on the left upper quadrant of Background, left click mouse and your snowfall will be positioned. Right click inside first frame again and Paste/Paste into Selected Frame again, only this time hover and left click on right upper quadrant. Repeat on lower left and lower right quadrant. This will fill your whole page with falling snow.
78. Go up to the Animation button and test it to see if it is what you like.
79. File/Open/Let it Snow Foreground Animation Shop (*psp) file. Left click the top border/Copy. Edit/Propagate Paste.
80. Make sure all the frames of your Background with falling snow are highlighted (activated). If they are not, then click on first frame, Edit/Select All.
81. Right click to Paste/Paste into Selected Frame. Left click to place. All the frames will now have the Foreground on them. The border of the Foreground file will go right over the border of the Background file, thus eliminating snowfall on borders.
82. Test your work by clicking the Animation button at the top of AS. If all is as you want it, then save your work. File/Save As/. A box will come up where you will name your work Let it Snow, and where you will save it, click Save. Then click Next 3 times and finally Finish. You are done.
This was a long and detailed tutorial and I hope you have enjoyed the journey! Thanks for sharing my work with me.
Heartfelt thanks to my testers, Evatexas and PamelaD who so faithfully test my tutorials for me.
If you are going to use this tutorial for stationery, cards or place the tutorial/tag on another site, I would appreciate you contacting me for permission, giving Arasimages credit for the original tutorial and if possible, a link back to my site. Thank you.
Copyright © Arasimages All Rights Reserved