

Happy New Year 2013
For Italian and Danish translation, click on the flags.


For this tutorial you will need the materials in the zip file below.

Unzip the materials into a working folder. Open the materials in PSP, copy and close originals. Place the Fonts Chopin Script and Cheltenhn BT in your Fonts folder or open it from your working folder and keep it minimized while using it. It will show up in your PSP Font selection. You will need no plugins for this tutorial.
I have used PSPX3 to create this tutorial but you may use an earlier version. It is assumed you have a working knowledge of PSP.
The tubes used in this creation are from Arasimages, Sorensen_Designs, Patry Mists and dragonblu. Please visit Arasimages Tubes and other tuber sites on the Links page for other beautiful tubes.
Use the arrow below to mark your place along the way.

1. In Materials Palette, set the Foreground color to #9b0d08, Background to #000000.
2. New/New Image 760px by 560px. Flood fill with Background color #000000.
3. Open tubed Pocketwatch_freeimages.co.uk.pspimage.
4. Copy/Paste as New Layer.
5. Image/Mirror. Lower Opacity to 76.
6. Image/Resize/Resize by 60%, Resize all layers unchecked.
7. Move into position in upper left corner.
8. Open Christmaslights.pspimage. Copy/Paste as New Layer.
9. Move to top left side of image and upward. It will extend beyond the center on the right.
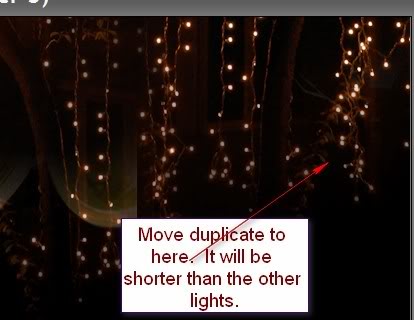
10. Duplicate. Image/Mirror.
11. Move to the right till it covers the upper right side. See example.
12. Open DropBauble misted .pspimage. Copy/Paste as New Layer.
13. Move to upper right side of image. Lower Opacity to 76%.
14. Open Sorensen_Designs Mist June167-10.pspimage. Copy/Paste as New Layer.
15. Pull couple down a little.
16. Highlight the lights and clock layers, one by one, and erase anything off the couple that shows through. For instance, the clock on their hands and lights in his hair.
17. Highlight top layer to continue.
18. OPTIONAL: I have included my text psp file for the tutorial but you may write any New Years greeting you wish here. I have used font Chopin Script, Size 72 for the word "Together", and I have used font Cheltenhn BT Size 30 for the other words. Please feel free to make it your own, using any font and words you wish here. Be sure to Convert to Raster Layer if you write your own words.
19. Open Happy New Year text.pspimage. Copy/Paste as New Layer.
20. Pull into place on right corner.
21. Open PatryMist_NewYear03.pspimage. Copy/Paste as New Layer.
22. Image/Mirror.
23. Image/Resize/Resize by 76%, Resize all layers unchecked.
24. Place in bottom left corner. Lower Opacity to 50.
25. Image/Add Borders, 2px, Symmetric checked, color #9b0d08.
26. Image/Add Borders, 28px, Symmetric checked, color #000000.
27. Using Magic Wand, click in 28px border to activate it.
28. Open stillife04-misted by dragonblu260307.pspimage.
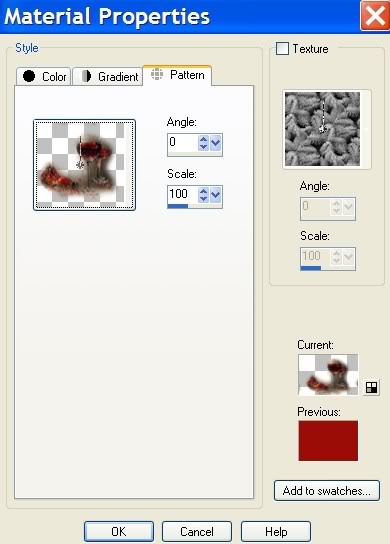
29. In Materials Palette, click on the Pattern tab. Choose stillife04-misted tube current pattern.
30. Layers/New Raster Layer.
31. Flood fill the 28px border with the current pattern.
32. Drop Opacity of border pattern to 66. Selections/Select None.
33. Image/Add Borders, 4px, Symmetric checked, color #9b0d08.
34. Using stillife04-misted by dragonblu wine glasses, Copy/Paste as New Layer.
35. Image/Resize/Resize by 76%, Resize all layers unchecked.
36. Pull down into left bottom corner.
37. Add your name or watermark. Merge/Visible.
HAPPY NEW YEAR!
Big hugs to my testers, PamelaD and Evatexas.
If you are going to use this tutorial for stationery, cards or place the tutorial/tag on another site, I would appreciate you contacting me for permission, giving Arasimages credit for the original tutorial and if possible, a link back to my site. Thank you.
Copyright © Arasimages All Rights Reserved