
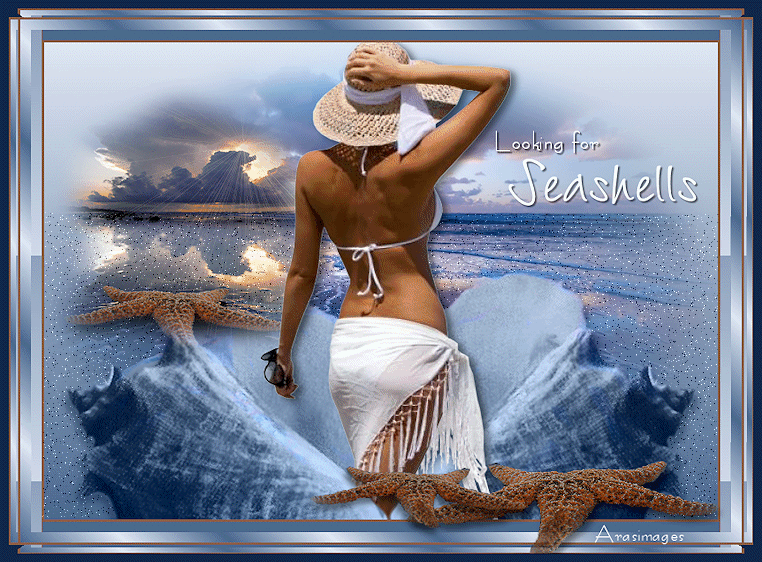
Looking for Seashells
For Italian, Danish and French translations, click on the flags.


For this tutorial you will need the materials in the zip file below.

I would like to dedicate this tutorial to my beautiful Mother who spent time on the beach, searching for shells and other items that the waters would spew forth along the shoreline. Her artistic abilities allowed her to create items of art from her beach collections. I cherish the time I spent with her in one of her favorite places, doing what she so loved...looking for seashells. Thank you, Mom, for showing me how to appreciate nature and instilling in me the love of art.
Unzip the materials into a working folder. Open the materials in PSP, copy and close originals. Place the Fonts Barbara Hand and Berlin in your Fonts folder or open them from your working folder and keep them minimized while using it. Doing the later, they will show up in your PSP Font selection. You will need plugins Crescent Moon/Strip Tile and Filters Unlimited2/AFS Import/MIRRBEVL for this tutorial.
I have used PSPX3 to create this tutorial but you may use an earlier version. It is assumed you have a working knowledge of PSP to work this tutorial.
The tubes used in this tutorial are from anna, Cherokee and from Arasimages. Please visit the Links page and Arasimages Tubes for lots of beautiful tubes.
Use the shell below to mark your place along the way.

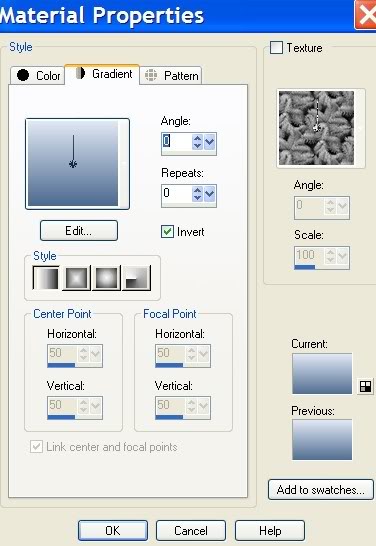
1. In Materials Palette, set the Foreground color to #dfe7f4, Background to #4b698e.
2. In Materials Palette, set to Gradient Linear, Angle 0, Repeats 0, Invert checked. See example:
3. New/New Image 762px by 562px. Flood fill with Gradient.
4. Open blue_beach_nature_1097.pspimage. Copy/Paste as New Layer.
5. Image/Resize/Resize by 80%, Resize all Layers unchecked.
6. Open Shell.pspimage. Copy/Paste as New Layer.
7. In Blend Mode, set to Luminance (Legacy).
8. Effects/3-D Effects/Drop Shadow of Vertical 7, Horizontal -3, Opacity 50, Blur 12, color #000000.
9. Layers/Duplicate. Image/Mirror. Move the shells into position as I have them in my finished image. One is overlapping the other.
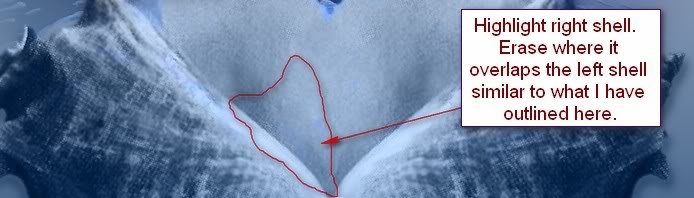
10. Using Eraser tool, erase the right shell where it overlaps the left shell. See example:
11. Highlight the blue_beach scene. Erase on both shells so that the layer beneath no longer shows through. Go back to top layer.
12. Open Cherokee~FBPO_Starfish Sunset.pspimage. Copy/Paste as New Layer.
13. Image/Resize/Resize by 71%, Resize all layers unchecked.
14. Move the starfish sunset image to upper left side, placing it so the horizon matches the blue beach image horizon.
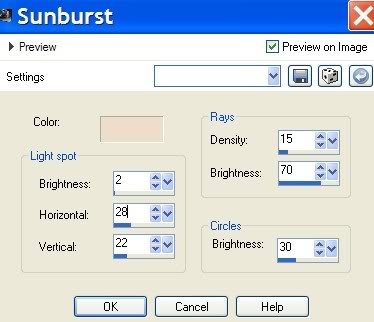
15. Effects/Illuminations/Sunburst, color #eddec9. See example:

16. Open anna.br_bela-da-praia_27_10_10.pspimage. Copy/Paste as New Image.
17. Image/Mirror. Place her down so she is standing in the middle of the shells.
18. Effects/3-D Effects/Drop Shadow of Vertical 3, Horizontal 6, Opacity 50, Blur 12, color #000000.
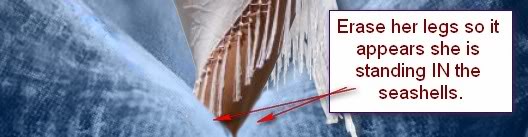
19. Using Eraser tool, erase on the bottom of the woman's legs so it appears she is standing IN the seashells.
20. Image/Add Borders, 3px border, color #8c5f4b.
21. Image/Add Borders, 12px border, color #ffffff.
22. Using Magic Wand, select the 12px border to activate it.
23. Flood fill with Gradient, Linear, Rotate 0, Repeats 0, Invert checked. Image/Flip.
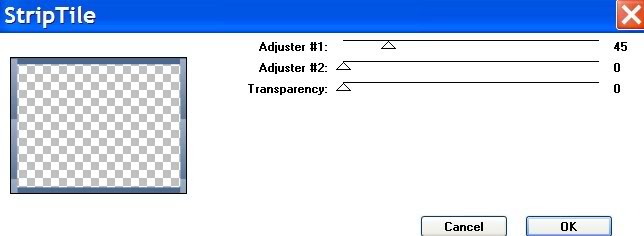
24. Effects/Crescent Moon/Strip Tile. See example:
25. Selections/Select None.
26. Image/Add Borders, 12px border, color #ffffff.
27. Using Magic Wand, select the 12px border to activate it.
28. In Materials Palette, change the gradient to be as shown below in example. (Angle 45/Repeats 11).
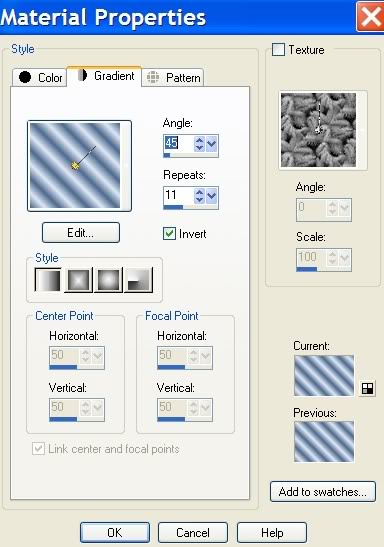
29. Flood the 12px border with the new Gradient.
30. Selections/Select None.
31. Image/Add Borders, 3px border, color #8c5f4b.
32. Image/Add Borders, 20px border, color #011c3d, (dark blue).
33. Using Magic Wand, select the 20px border to activate it.
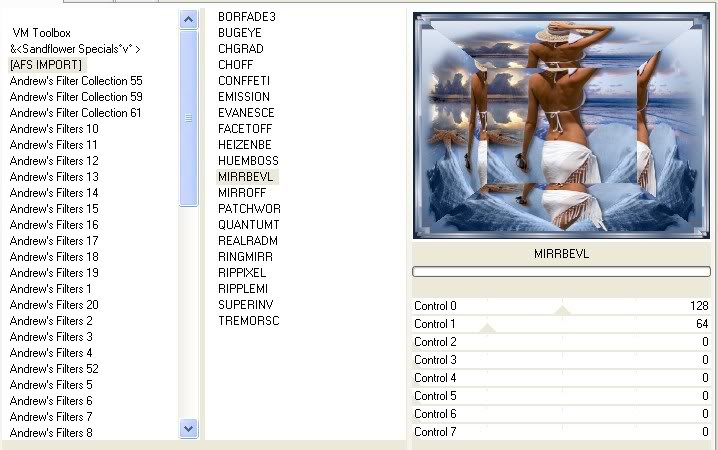
34. Effects/FiltersUnlimited2/AFS IMPORT/MIRRBEVL.
35. Selections/Select None.
36. Open DuoStarfish.pspimage. Copy/Paste as New Layer.
37. Move into position in bottom right corner, overlapping some of the border.
38. Highlight image layer with borders. Erase the border line from beneath the starfish arm. Go back to top layer.
39. Effects/3-D Effects/Drop Shadow, Vertical 7, Horizontal -3, Opacity 50, Blur 10, color #000000.
40. From Tool bar, select the Text tool. Choose Barbara Hand font, Size 100. See example:

41. Type "Seashells" using color #ffffff. Convert to Raster Layer. Place text in upper right area of image.
42. From Tool bar, select the Text tool. Choose Berlin font, Size 30. See example:

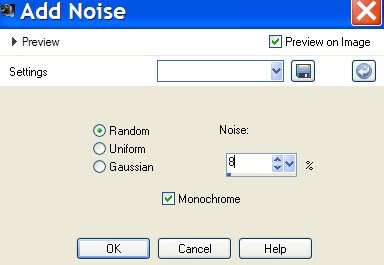
43. Using color #ffffff, type "Looking for" above "Seashells". Convert to Raster Layer.
44. Using the Move tool, move the texts so they are placed nicely. Merge/Merge Down. Add a drop shadow if you desire.
45. Sign your name in any font and color you wish. Convert to Raster Layer.
46. Merge/Visible.
47. You will now select the sections of the image which you want to sparkle, using the settings in example:

48. Select the areas of water on the right and left of the woman and between her arm and body.
49. Layers/Duplicate image twice so you have three (3) layers total. Close off the bottom and middle layer, highlight top layer.
50. Adjust/Add/Remove Noise/Add Noise. Have the first layer at 8%. See example:
51. Close off top layer. Move to middle layer, open and highlight it.
52. Adjust/Add/Remove Noise/Add Noise at 5%. Close off middle layer, go to bottom layer and highlight it.
53. Adjust/Add/Remove Noise/Add Noise at 2%. Open all layers.
54. Save As/Looking for Seashells as a PSP Animation Shop (*psp) file in your working folder.
55. Open Animation Shop. File/Open the file you just saved. Click the Animation button at the top to check to see if your sparkles are as you wish. If you want them to be slower, Edit/Select All. Go to Animation/Frame Properties and set to a higher number. I used 13.
56. When you are satisfied with your creation, File/Save As/Looking for Seashells when the box comes up asking for a name. Save it in your working folder as a .gif file.
57. Click Save, Next, Next, Next, Finish. You are done! I hope you enjoyed this journey with me.
Big hugs to my testers, PamelaD and Evatexas.
If you are going to use this tutorial for stationery, cards or place the tutorial/tag on another site, I would appreciate you contacting me for permission, giving Arasimages credit for the original tutorial and if possible, a link back to my site. Thank you.
Copyright © Arasimages All Rights Reserved