
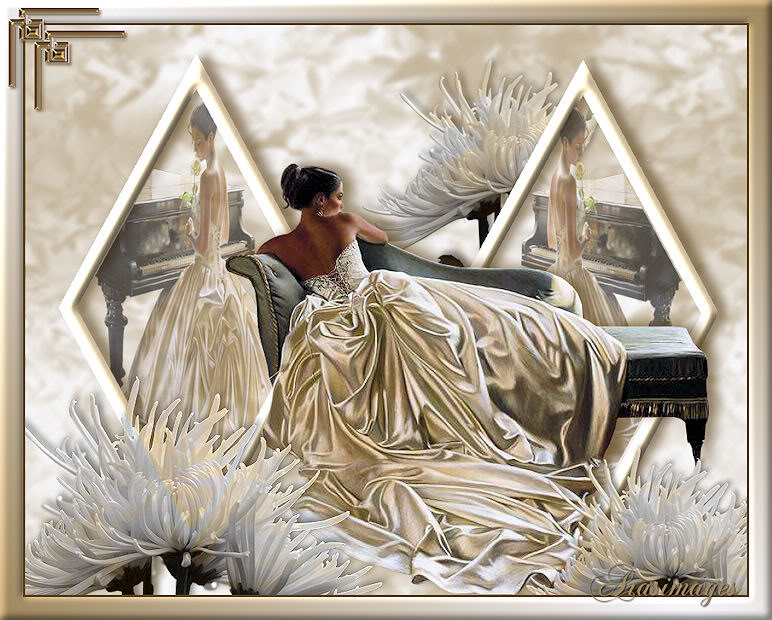
Held Captive
For Danish and German translation, click on the flag.


For this tutorial you will need the materials in the zip file below.

Unzip the materials into a working folder. Open the materials in PSP, copy and close originals. Place jd texture 23 in your PSP Texture folder, and place the Preset Diamond 2 (Objects.jsl) in your PSP Presets Shapes folder. (CHECK TO SEE IF THEY ARE IN YOUR PSP FILES FIRST.) No plugins necessary for this tutorial.
I have used PSPX3 to create this tutorial but you may use an earlier version. It is assumed you have a working knowledge of PSP.
The tubes used are from anna.br and Arasimages. Please visit the Links page and Arasimages Tubes for lots of beautiful tubes.
Use the arrow below to mark your place along the way.
1. In Materials Palette, set the Foreground color to #faf9fe, Background to #a1895e.
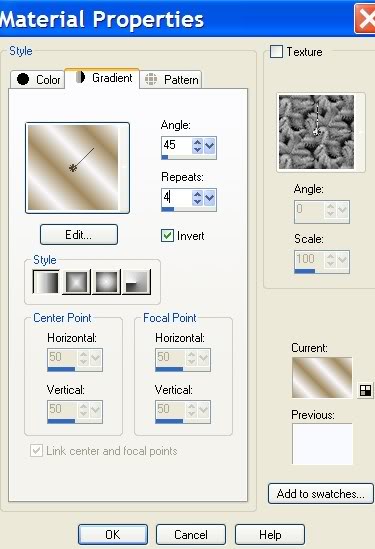
2. In Materials Palette, set to Gradient to Linear, Angle 45, Repeats 4, Invert checked.
3. New/New Image 950px by 650px. Flood fill with Gradient.
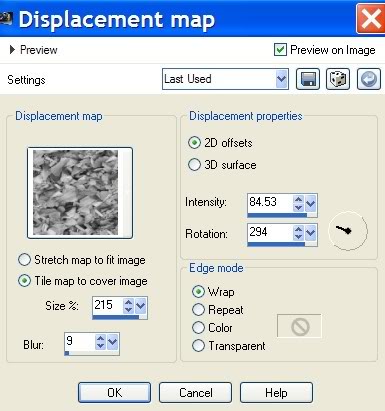
4. Effects/Distortion Effects/DisplacementMap. Use jd-texture 23 with settings in example.
5. Adjust/Blur/Gaussian Blur, Radius set to 3.
6. Layers/New Raster Layer. Flood fill with #ffffff, (white).
7. Layers Palette/Opacity drop to 37.
8. Using Preset Shape Tool from Tool bar, select Diamond 2. Use settings below:

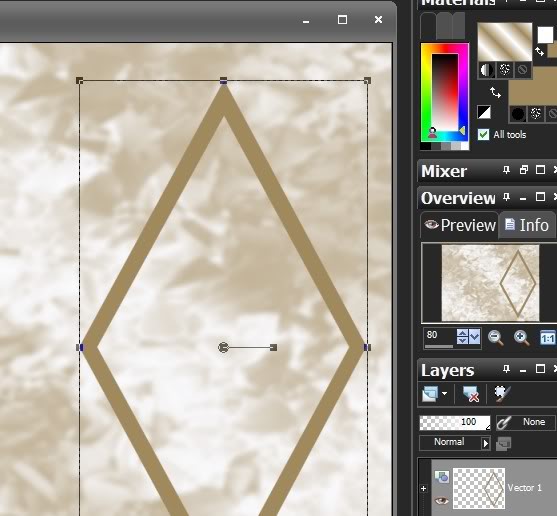
9. Stretch into shape using nodes. Layers/Convert to Raster Layer.
10. From Selections/select Magic Wand. Click on the preset border to activate it.
11. Change Foreground from Gradient to Foreground color #faf9fe.
12. Flood fill with Foreground color #faf9fe
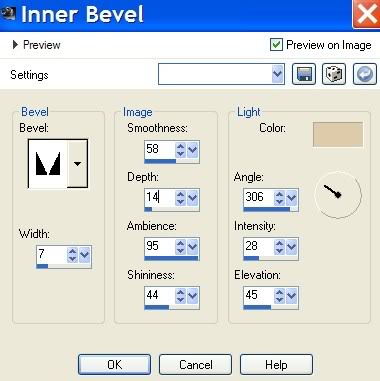
13. Effects/3-D Effects/Inner Bevel. Use color #ddcba9 and settings below. Selections/Select None.
14. Layers/Duplicate. Place first diamond on right side of image and the duplicated diamond on the left side of image as I have done.
15. Highlight Raster 3 Layer of diamond on right. From Selectins/select Magic Wand. Click INSIDE diamond to activate it.
16. Layers/New Raster Layer.
17. Open anna.br_piano.1055.pspimage. Copy/Paste into Selection.
18. Layers/Lower Opacity to 60. Selections/Select None.
19. Highlight Raster 3 layer of diamond on right.
20. Effects/3-D Effects/Drop Shadow, Vertical -4, Horizontal 13, Opacity 64, Blur 20, color #5d441a.
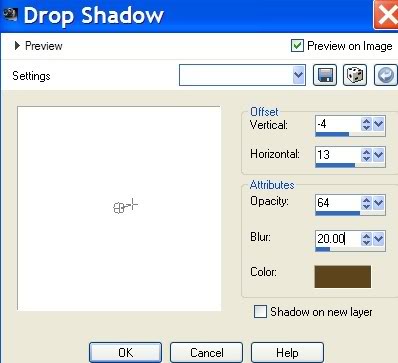
21. Highlight COPY of Raster 3 layer. Using Magic Wand, click within second diamond to activate it.
22. Layers/New Raster Layer.
23. Open anna.br_piano.1055.pspimage. Image/Mirror.
24. Copy/Paste into Selection. Selections/Select None.
25. Lower Opacity to 60.
26. Highlight COPY of Raster 3.
27. Effects/3-D Effects/Drop Shadow, Vertical -4, Horizontal 13, Opacity 64, Blur 20, color #5d441a.
28. Open WhiteCrysanthemum.pspimage. Copy/Paste as New Layer.
29. Image/Resize/Resize by 75%, Resize all layers unchecked.
30. Pull flower layer below Raster 3 Layer. Place flower to left side at the top of right diamond. Set Blend Mode to Luminance (Legacy).
31. Using Eraser tool, (or Freehand Selections and delete), eliminate flower showing through in diamond on lady.
32. Effects/3-D Effects/Drop Shadow, Vertical -5, Horizontal 5, Opacity 64, Blur 13, color #5d441a.
33. Highlight top layer to continue.
34. Open anna.br_1056.pspimage. Copy/Paste as New Layer.
35. Move lady into center of image, pulling down toward bottom and a little to the right.
36. Effects/3-D/Drop Shadow, Vertical -4, Horizontal 13, Opacity 64, Blur 23, color #5d441a.
37. Open WhiteCrysanthemum.pspimage. Copy/Paste as New Layer.
38. Layers/Set Blend Mode to Luminance (Legacy).
39. Image/Resize/Resize by 83%, Resize all layers unchecked. Move flower into left bottom corner.
40. Effects/3-D/Drop Shadow, Vertical -5, Horizontal 5, Opacity 64, Blur 13, color #5d441a.
41. Adjust/Sharpness/Sharpen.
42. Layers/Duplicate. Pull duplicate flower over to bottom right corner.
43. Image/Resize/Resize by 75%, Resize all layers unchecked.
44. Image/Add Borders/3px border, Symmetric checked, color #5d441a.
45. Image/Add Borders/30px border, Symmetric checked, color #faf9fe.
46. Using Magic Wand, select 30px border to activate it.
47. In Materials Palette, set Gradient to Linear, Radius 45, Repeats 1, Invert checked.
48. Flood fill 30px border with Gradient.
49. Effects/3-D Effects/Inner Bevel/color #ffffff as in example. You may try another light color if you wish. Selections/Select None.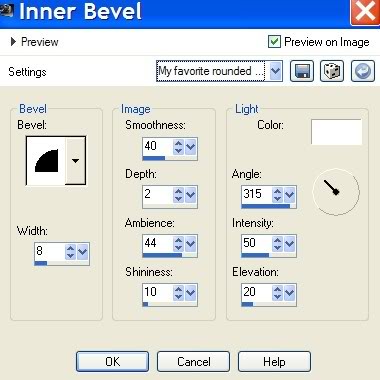
50. Open Corner_of_Gold.pspimage. Copy/Paste as New Layer.
51. Place on upper left corner of border. Paste as New Layer again and place inside first corner as I have in my image.
52. Merge/Merge Down.
53. Effects/3-D Effects/Drop Shadow, Vertical 3, Horizontal 3, Opacity 64, Blur 5, color #5d441a.
54. Sign your name or leave watermark. Merge/Merge Visible.
Thank you for working my tutorial and I hope you will try some of the others you find on Arasimages. Hugs!Big thanks to my testers, PamelaD and Evatexas.
If you are going to use this tutorial for stationery, cards or place the tutorial/tag on another site, I would appreciate you contacting me for permission, giving Arasimages credit for the original tutorial and if possible, a link back to my site. Thank you.
Copyright © Arasimages All Rights Reserved