
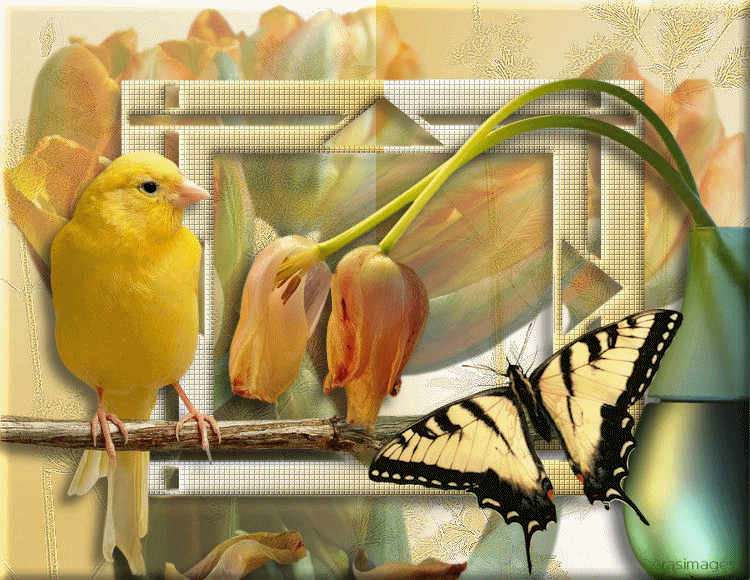
Springtime
For Danish and French translation, click on the flags.


For this tutorial you will need the materials in the zip file below.

Unzip the materials into a working folder. Open Colorel Garden brushes in PSP and Export them to your PSP/Brush folder. Place the Preset Shapes in your PSP/Preset Shapes if you do not already have them. Open the materials in PSP, copy and close originals. You will need Xero plugin to do this tutorial. I have used PSPX3 to create this tutorial but you may use an earlier version. It is assumed you have a working knowledge of PSP.
Thanks go to Colorel, Claudia Sterner, Mou, Alejandra Rosales and Arasimages for the tubes used. Please visit the tuber sites listed on my Links page. You will also find many lovely tubes in my Tubes section.
Use the butterfly below to mark your place along the way.

1. In Materials Palette, set Foreground to color #f7dfda, Background to color #e3c375.
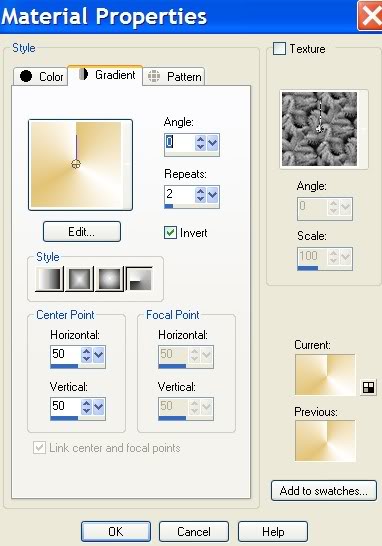
2. In Materials Palette, set to Gradient, Radial, Angle 0, Repeats 2, Invert checked.
3. New/New Image 750px by 580px. Flood fill with Gradient.
4. Layers/New Raster Layer.
5. Select the Paint Brush tool. Find the Colorel Garden brushes.
6. Stamp each brush a few times using Background color #e3c375 so image is covered nicely with flowers.
7. Effects/Edge Effects/Enhance.
8. Layers/New Raster Layer. Selection/Select All.
9. Open 2879-tulip11-rAlejandraRosalesUT-24-09-07.pspimage. Copy/Paste into Selection.
10. Layers/lower Opacity to 59. Selections/Select None.
11. In Materials Palette, switch Foreground Gradient with Background color using the double arrow next to the boxes.
12. From Tool bar, select the Presets Shape Tool. Select Preset Shape S.
13. Using Presets Shape tool, draw a rectangle in center of image similar to mine. Have settings to Retain Style, unchecked and width at 0.
14. Layers/Convert to Raster Layer.
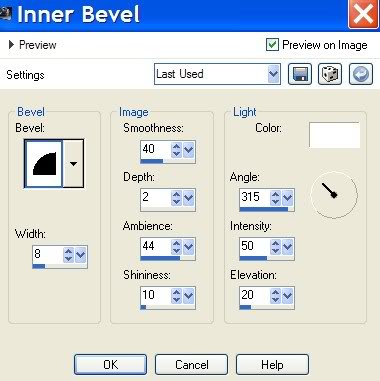
15. Effects/Inner Bevel. Use settings below.
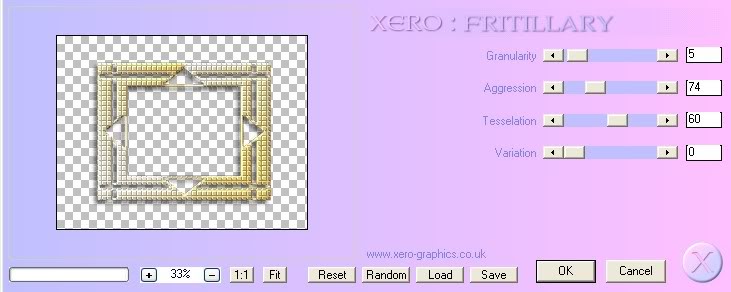
16. Effects/Xero/Fritillary. Use settings below.
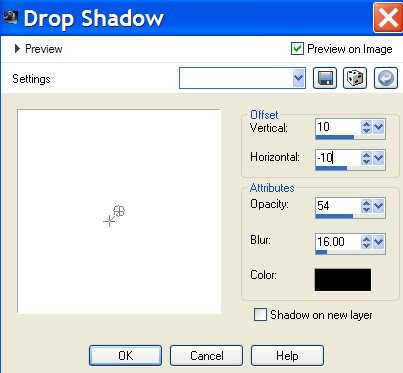
17. Effects/3-D Effects/Drop Shadow, Vertical 10, Horizontal -10, Opacity 54, Blur 16, color #000000.
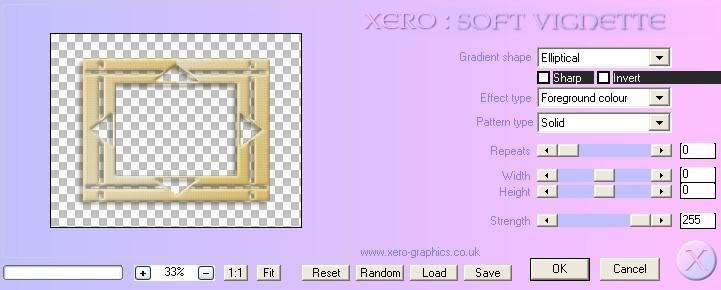
18. Effects/Xero/Soft Vignette. Use settings below.
19. Adjust/Sharpeness/Sharpen.
20. Open by_stirner_canario.pspimage. Copy/Paste as New Layer.
21. Move to left so end of branch touches left side of image.
22. Effects/3-D Effects/Drop Shadow, Vertical 10, Horizontal -10, Opacity 54, Blur 16, color #000000.
23. Open mou_RinaStills_tulips.pspimage. Copy/Paste as New Layer.
24. Image/Mirror. Pull tulips into bottom right corner.
25. Effects/3-D Effects/Drop Shadow, Vertical 10, Horizontal -10, Opacity 54, Blur 16, color #000000.
26. Open Butterfly163.HQImages.com.pspimage. Copy/Paste as New Layer.
27. Image/Resize/Resize by 80%, Resize all Layers unchecked.
28. Move butterfly to bottom right corner area.
29. Effects/3-D Effects/Drop Shadow, Vertical 10, Horizontal -10, Opacity 54, Blur 16, color #000000.
30. Using font and color of your choice, sign your name or leave watermark. Convert to Raster Layer.
31. Merge/Merge Visible.
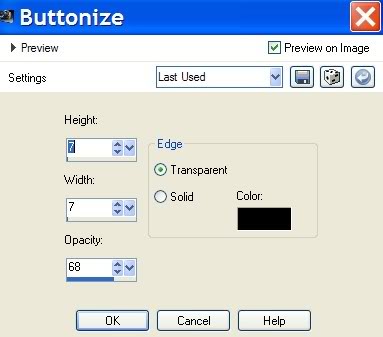
32. Effects/Buttonize using example below.
33. Save as .jpg file in your working folder. Copy.
34. Open Animation Shop. Paste as New Animation.
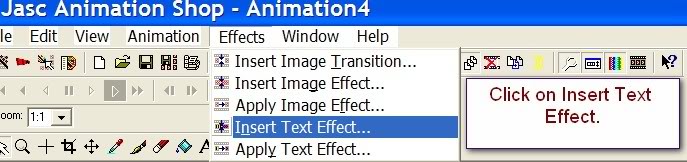
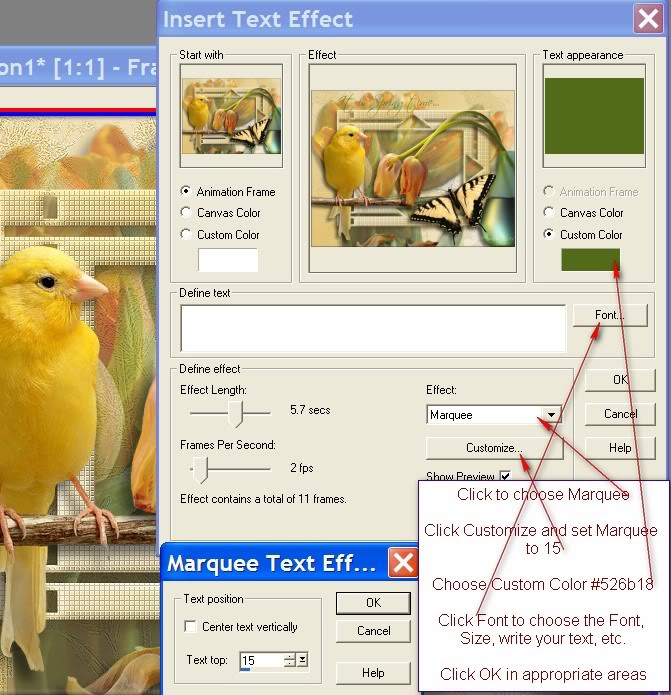
35. Effects/Insert Text Effect.
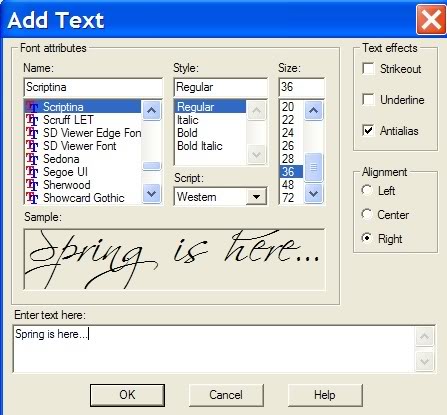
36. Choose Marquee, color #526b18. Click Customize and set to 15. Click on Font to set your Font, Size and to type the text of your choice. Click OK where indicated in each area. NOTE: You may use whatever text you wish for this Springtime image.
37. If your marquee seems to be scrolling too fast, go to Animation/Frame Properties and set to 50.
38. Check your animation to see if it pleases you. If so, go to File/Save As.
39. When the box comes up, name a place to save your file and give it a name. Click Save, then Next three (3) times and Finish.
Congratulations! You have now completed an animated image using Animation Shop.
Thanks to Evatexas and PamelaD who so faithfully test my tutorials for me.
If you are going to use this tutorial for stationery, cards or place the tutorial/tag on another site, I would appreciate you contacting me for permission, giving Arasimages credit for the original tutorial and if possible, a link back to my site. Thank you.
Copyright © Arasimages All Rights Reserved