
Mesmerized
For Italian, Danish and French translation, click on the flags.


For this tutorial you will need the materials in the zip file below.

Unzip the materials into a working folder. Open the materials in PSP, copy and close originals. Open the sparkle tub in PSP and export it to your PSP Picture Tube folder. You will need Mura's Meister and FunHouse plugins to do this tutorial. I have used PSPX3 to create this tutorial but you may use an earlier version. It is assumed you have a working knowledge of PSP.
Thanks go to Karen and Colombe for the tubes used in this tutorial. Please visit the tuber sites listed on my Links page. You will also find many lovely tubes in my Tubes section.
Use the diamond below to mark your place along the way.

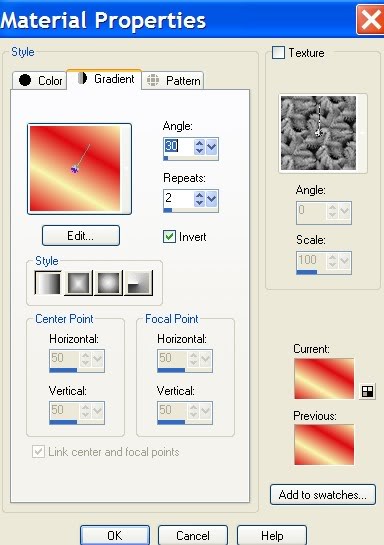
1. In Materials Palette, set Foreground to color #f7f7af, Background to color #dc0910.
2. Set to Gradient Linear, Angle to 30, Repeats to 2, Invert checked.
3. New/New Image 662px by 562px. Flood fill with Gradient.
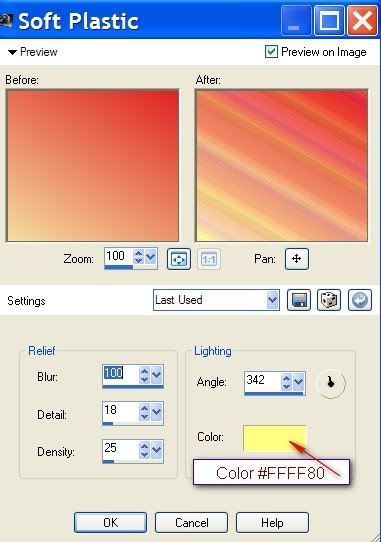
4. Effects/Texture Effects/Soft Plastic. Use settings as shown below.
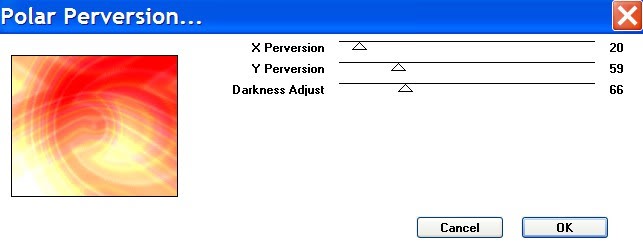
5. Effects/FunHouse/Polar Perversion. Use settings as shown below.
6. Image/Mirror.
7. Open psp3AF.pspimage of woman. Copy/Paste as New Layer. Image/Mirror.
8. Image/Resize/Resize by 85%, Resize all layers unchecked.
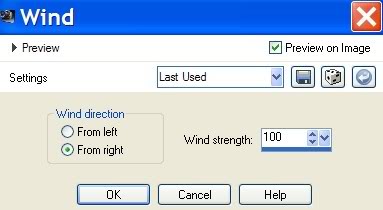
9. Effects/Distortion Effects/Wind. Use settings as shown below.
10. Move a little to the left. Drop Opacity to 68.
11. Paste psp3AF.pspimage of woman again. Image/Mirror.
12. Move image till she fits nicely in right side of image and blurred image shows behind her.
13. Effects/3-D Effects/Drop Shadow of Vertical -7, Horizontal -12, Opacity 54, Blur 22, Color #000000.
14. Image/Add Borders/2px, Symmetric checked, color #000000.
15. Image/Add Borders/3px, Symmetric checked, color #e9d39d.
16. Image/Add Borders/2px, Symmetric checked, color #000000.
17. Image/Resize/Resize by 80%, Resize all layers checked. Leave on workspace or minimize for use in a few moments.
18. New Image/762px by 562px. Flood fill with Gradient.
19. Effects/Texture Effects/Soft Plastic. Use settings as before in Step 4.
20. Effects/FunHouse/Polar Perversion. Use settings as before in Step 5.
21. Image/Mirror.
22. Open FanetteDesign_Elem008.pspimage. Copy/Paste as New Layer. Move a little to left.
23. Open psp3AF.pspimage of woman again. Copy/Paste as New Layer.
24. Image/Mirror. Image/Resize/Resize by 90%, Resize all layers unchecked.
25. Move image to right side of image to edge.
26. Effects/3-D Effects/Drop Shadow, Vertical -7, Horizontal -12, Opacity 54, Blur 22, color #000000.
27. Highlight the minimized image, Copy/Paste as New Layer on the 762px by 562px image.
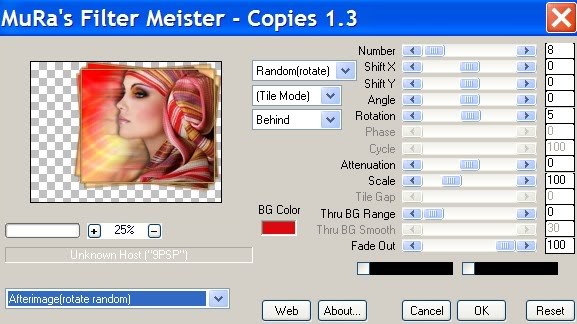
28. Effects/Mura's Meister/Copies. Use example as shown below.
29. Move a little to right side of image, lining up top of her head with her head in layer below.
30. Effects/3-D Effects/Drop Shadow, Vertical -7, Horizontal -12, Opacity 54, Blur 22, color #000000.
31. Open ss44-tube-Colombe.pspimage. Copy/Paste as New Layer.
32. Place in lower left corner.
33. Using Freehand Selection tool or Eraser Tool, erase the purple off the woman's face. Eraser settings shown below.

34. Open bijoux_1.pspimage. Copy/Paste as New Layer.
35. Move hanging diamond so it hangs in circle of purple.
36. From Tool bar, select Font Stonehenge, Size 80, color #3c173d. See settings below. Type out Mesmerized. Using nodes, turn the word Mesmerized till it is vertical and place centered on left.

37. Layers/Convert to Raster Layer.
38. Image/Add Borders/2px, Symmetric checked, color #000000.
39. Image/Add Borders/3px, Symmetric checked, color #e9d39d.
40. Image/Add Borders/2px, Symmetric checked, color #000000.
41. Sign your name or leave your watermark. Convert to Raster Layer. Merge/Merge Visible and save as .jpg file.
ANIMATION OF DIAMOND PENDANT IS OPTIONAL...IF YOU WISH TO HAVE IT ANIMATED, PLEASE FOLLOW THE INSTRUCTIONS BELOW.
42. In PSP, duplicate your finished image 4 times, having 5 layers total. Close off all layers except top layer, having it highlighted.
43. From Tool bar, select your Tube tool, find your white sparkle tub. Make your settings as in example below.

44. On the top layer, begin by clicking the star set at size 18 along the chain and on diamond. I made rows from top to bottom on the large diamond so it appears that the diamonds are going around it, but you may just randomly click sparkles on the diamond.
45. Close top layer, move down one layer, open and highlight it.
46. Change the sparkle tub size to 23, click diamonds along chain and on large diamond.
47. Close second layer, move down one to middle layer, open and highlight it.
48. Change the sparkle tub size to 27, click diamonds along chain and on large diamond.
49. Close middle layer, move down to next layer, open and highlight it.
50. Change the sparkle tub size to 23, click diamonds along chain and on large diamond.
51. Close this layer, move down to bottom layer, open and highlight it.
52. Change the sparkle tub size to 18, click diamonds along chain and on large diamond.
53. Open all layers. File/Save As/PSP Animation Shop (*psp) file.
54. Open Animation Shop. File/Open and browse to where you saved the PSP Animation Shop (*psp) file.
55. Click on the Animation button in the top tool bar and see if your animation works properly.
56. If you wish to slow the animation, Edit/Select All, Animation/Frame Properties and set to 15 or higher to slow it down. Try animation again.
57. Once all is as you wish it to be, File/Save As. When the box comes up, give your work a name and where to save it. Click Save. Then click Next three (3) times, Finish and you are done.
Thank you Eva and Pamela for testing these tutorials for me.
If you are going to use this tutorial for stationery, cards or place the tutorial/tag on another site, I would appreciate you contacting me for permission, giving Arasimages credit for the original tutorial and if possible, a link back to my site. Thank you.
Copyright © Arasimages All Rights Reserved