
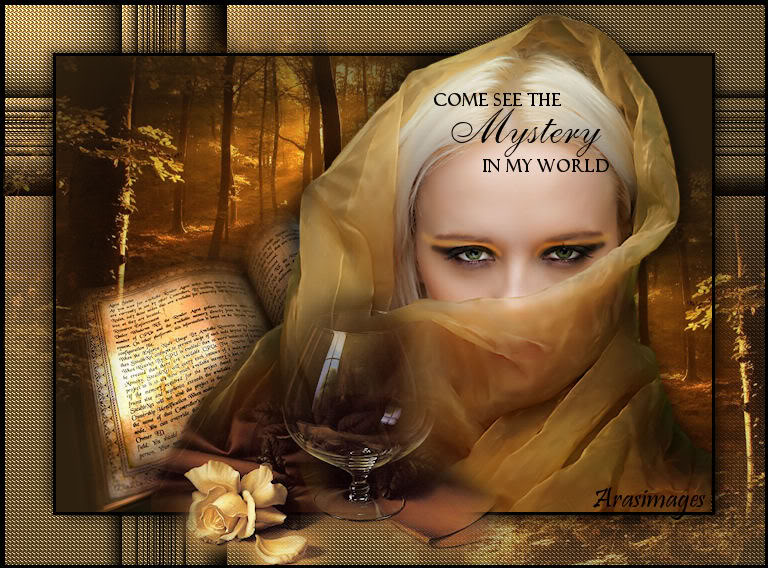
Mystery In My World
For Italian and Danish translation, click on the flags.


For this tutorial you will need the materials in the zip file below.

Thanks go to Pascale, Patry, Nikita of Reveries.fr, Corinne Vicaire and Arasimages for the tubes used in this tutorial. Please visit the tuber sites listed on my Links page. You will also find many lovely tubes in my all-free Tubes section.
Use the pointer below to mark your place along the way.
Unzip the materials into a working folder. Open the materials in PSP, copy and close originals. Place the pattern Goldbeads in your PSP/Patterns folder. You will need FiltersUnlimited/Sandflowers/Video Wand plugin to do this tutorial. I have used PSPX3 to create this tutorial but you may use an earlier version. It is assumed you have a working knowledge of PSP to do this tutorial.
1. In Materials Palette, set Foreground to Pattern/Goldbeads (settings at Angle 0, Scale 100), Background to color #2d200f.
2. New/New Image 762px by 562px. Flood fill with Background color #2d200f.
3. Open sunview481E.pspimage. Copy/Paste as New Layer.
4. Move to left side of image and up a little.
5. Paste as New Layer again. Image/Mirror. Place image to right side of image and down a little.
6. Open download_feeries_1228506060_feerie.pspimage. Copy/Paste as New Layer.
7. Image/Resize/Resize by 70%, Resize all layers unchecked.
8. Move book to left lower side of image.
9. Layers/New Raster Layer.
10. Flood fill new layer with Pattern Goldbeads.
11. Selections/Select All. Selections/Modify/Contract by 50.
12. Press Delete key one time.
13. Layers/New Raster Layer.
14. Flood fill with color #000000.
15. Selections/Modify/Contract by 3.
16. Press Delete key one time.
17. Effects/3-D Effects/Drop Shadow/Vertical 7, Horizontal 9, Opacity 50, Blur 16, color #000000.
18. Effects/3-D Effects/Drop Shadow/Vertical -7, Horizontal -9, Opacity 50, Blur 16, color #000000.
19. Selections/Invert.
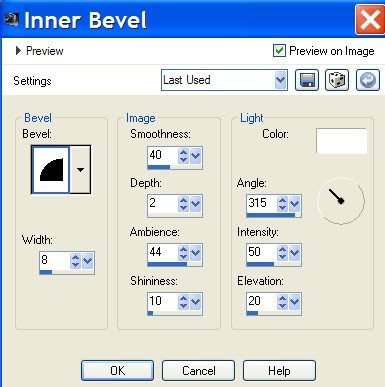
20. Effects/3-D Effects/Inner Bevel. Use settings as shown below.
21. Selections/Select None.
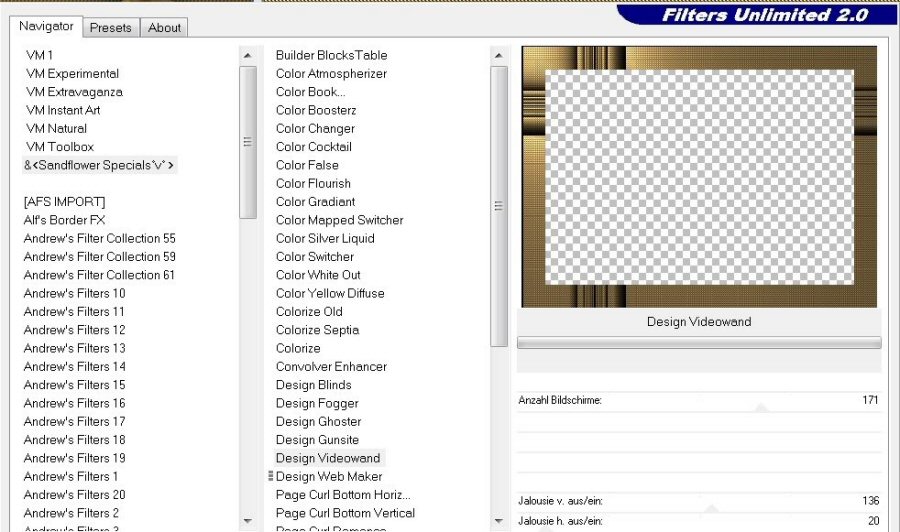
22. Activate Raster 5 (large border). Effects/Filters Unlimited/Sandflowers/DesignVideo Wand. Use settings as shown.
23. Pull Raster 5 (large border) beneath Raster 2. Go to top layer and highlight it to continue your work.
24. Open Tube.corinne.vicaire-femme 11.032.11. Copy/Paste as New Layer.
25. Image/Resize/Resize by 70%, Resize all layers unchecked.
26. Place woman in bottom right corner to fit within 3px black border.
27. Using Eraser tool, erase from or use Push tool on left side of woman's headpiece so there is no sharp edge.
28. Effects/3-D Effects/Drop Shadow/Vertical 7, Horizontal 9, Opacity 50, Blur 23, color #000000.
29. Effects/3-D Effects/Drop Shadow/Vertical -7, Horizontal -9, Opacity 50, Blur 23, color #000000.
30. Open PatryMists_DW_OpalescentImages.pspimages. Copy/Paste as New Layer.
31. Image/Resize/Resize by 75%, Resize all layers unchecked.
32. Image/Mirror. Move to left of center.
33. Effects/3-D Effects/Drop Shadow/Vertical -7, Horizontal -9, Opacity 50, Blur 23, color #000000.
34. Open Come see the Mystery text. Copy/Paste as New Layer.
35. Move text over woman's hair and forehead. Image/Add Borders/3px, color #000000.
36. Sign your name or leave your watermark. Convert to Raster Layer.
37. Merge/Merge Visible. Save as .jpg file in your working folder.
Thank you Eva and Pamela for testing these tutorials for me.
If you are going to use this tutorial for stationery, cards or place the tutorial/tag on another site, I would appreciate you contacting me for permission, giving Arasimages credit for the original tutorial and if possible, a link back to my site. Thank you.
Copyright © Arasimages All Rights Reserved