
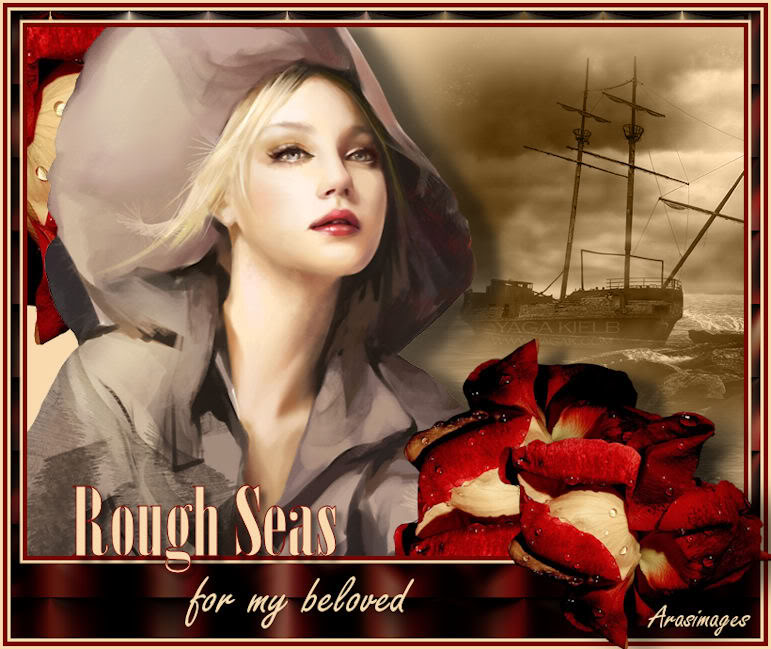
Rough Seas
For Italian and Danish translation, click on the flags.


For this tutorial you will need the materials in the zip file below.

Thanks go to Suzi Sgai Tubes, Benelol and Arasimages for the tubes used in this tutorial. Please visit the tuber sites listed on my Links page. You will also find many lovely tubes in my all-free Tubes section.
Use the bookmark below to mark your place along the way.

Unzip the materials into a working folder. Open the materials in PSP, copy and close originals. You will need plugin VM Instant Art/Origami Folder. I have used PSPX3 to create this tutorial but you may use an earlier version. It is assumed you have a working knowledge of PSP to do this tutorial.
1. In Materials Palette, set Foreground to color #f9daae, Background to color #770703.
2. New/New Image 762px by 562px. Flood fill with Foreground #f9daae.
3. Open SS_10.pspimage of sea. Copy/Paste as New Layer.
4. Blend Mode/Luminance (Legacy).
5. Pull sea layer down to bottom right corner.
6. Open Scenery3Nov07Bnll.pspimage of ship. Copy/Paste as New Layer.
7. Set Blend Mode to Luminance (Legacy).
8. Pull image to top right corner.
9. Open CurledRose.pspimage. Copy/Paste as New Layer.
10. Image/Mirror. Move to upper left side of image.
11. Open femmechapeau170411.png image. Copy/Paste as New Layer.
12. Image Resize/Resize by 80%, Resize all layers unchecked.
13. Pull lady to left side of image so left side and top fit.
14. Using Freehand Selection Tool, (use example settings below), select around her hand on right side of hat.

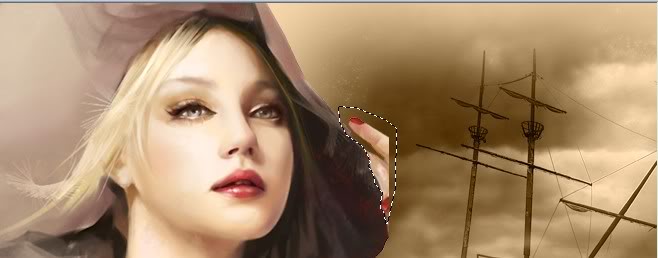
15. Once selected, press the Delete key twice to remove her hand. Selections/Select None.
16. Effects/3-D Effects/Drop Shadow. Vertical 10, Horizontal 30, Opacity 50, Blur 33, color #000000.
17. Open CurledRose.pspimage. Copy/Paste as New Layer.
18. Image Resize/Resize by 65%, Resize all layers unchecked.
19. Image/Flip. Place beneath the ship at bottom of image.
20. Effects/3-D Effects/Drop Shadow. Vertical 10, Horizontal 21, Opacity 50, Blur 22, color #000000.
21. Image/Add Borders/5px color #770703, Symmetric checked.
22. Image/Add Borders/3px color #f9daae, Symmetric checked.
23. Image/Add Borders/Top-Left-Right sides set to 10px, bottom set to 80px, Symmetric unchecked. Color #770703.
24. Using Magic Wand, activate the large border.
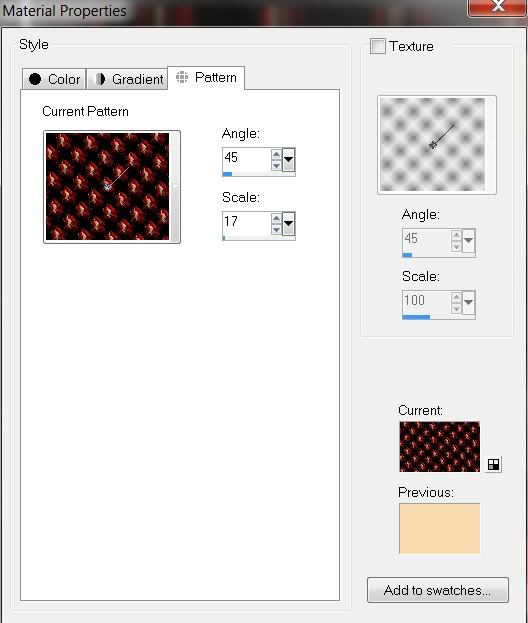
25. Open the CurledRose.pspimage. In Materials, set to Pattern using CurledRose.pspimage, Angle 45, Scale 17. (See example).
26. Flood fill the activated border with Pattern.
27. Adjust/Blur/Gaussian Blur, Radius 9.
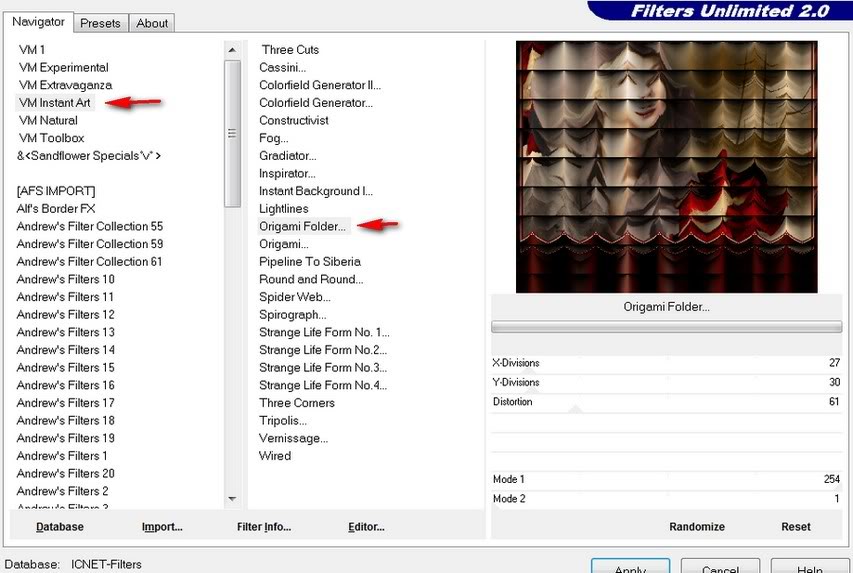
28. Effects/VM Instant Art/Origami Folder. (Use settings below).
29. Selections/Select None.
30. Image/Add Borders/3px color #f9daae, Symmetric checked.
31. Image/Add Borders/5px color #770703, Symmetric checked.
32. Image/Add Borders/3px color #f9daae, Symmetric Checked.
33. Open CurledRose.pspimage. Copy/Paste as New Layer.
34. Image/Resize/Resize by 58%, Resize all layers unchecked.
35. Pull resized rose down to bottom right corner.
36. Effects/3-D Effects/Drop Shadow. Vertical 10, Horizontal 21, Opacity 50, Blur 22, color #000000.
37. Using Font Bodoni MT Poster Compressed, Size 36, color #f9daae in Background, color #770703 in Foreground, type "Rough Seas". Important! Set Units to Points and Stroke width to 1. (Please use settings example below.).

38. Convert to Raster Layer. Move into place on bottom border.
39. Effects/3-D Effects/Drop Shadow, Vertical 6, Horizontal 6, Opacity 50, Blur 8, color #000000.
40. Set Units to Pixels and Stroke width to 0. Choose Font Freestyle Script, Size 60, color #f9daae and type "for my beloved".

41. Convert to Raster Layer. Move text to large part of border.
42. Add your watermark or your name. Convert to Raster Layer.
43. Merge/Merge Visible. Save as .jpg file.
Thank you Pamela and Eva for testing this tutorial for me.
If you are going to use this tutorial for stationery, cards or place the tutorial/tag on another site, I would appreciate you contacting me for permission, giving Arasimages credit for the original tutorial and if possible, a link back to my site. Thank you.
Copyright © Arasimages All Rights Reserved