
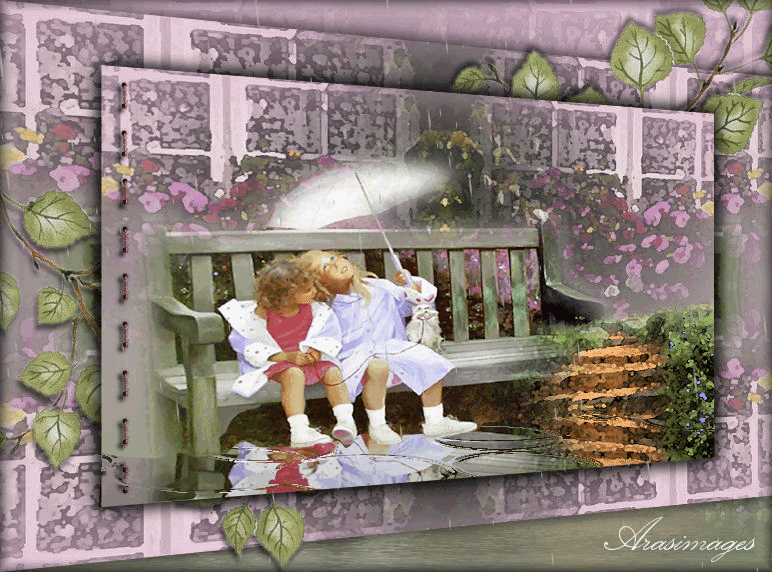
Friends In The Rain
For Italian, Danish, French and Spanish translation, click on the flags.


For this tutorial you will need the materials in the zip file below.

For a free Sqirlz program click HERE
Credit is given for materials when original author is known. Thanks go to Dakara, Sorensen and Marion and Deiter for tubes used in this tutorial. Please visit the tuber sites listed on my Links page. You will also find many more tubes in my all-free Tubes section.
Use the bookmark below to mark your place along the way.
Unzip the materials into a working folder. Open the materials in PSP, copy and close originals. You will need plugins Flaming Pear/Flood, Artistic/Watercolor and Simple/Left Side Mirror and the program Sqirlz. I have used PSPX3 to create this tutorial but you may use an earlier version. It is assumed you have a working knowledge of PSP to do this tutorial.
1. In Materials Palette, set Foreground to color #deb6d1, Background to color #919981.
2. Set Materials to Gradient, Style Radial, Angle 0, Repeats 0, Invert checked.
3. New/New Image 772px by 572px. Flood fill with Gradient.
4. Open calguismisted12039.pspimage of flowers. Copy/Paste as New Layer.
5. Move to upper right corner.
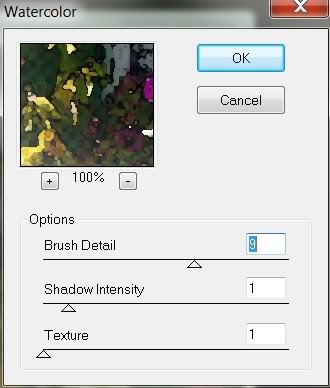
6. Effects/Artistic/Watercolor. (See example for settings). Set Opacity to 59.
7. Layers/Duplicate. Image/Mirror. Pull duplicated layer to left side. Then arrange both right and left layers so they meet in the middle with the green leaves closer together.
8. Open Sorensen_Designs Mist May 112-11.psp image of little girls. Copy/Paste as New Layer.
9. Image/Resize/Resize by 80%, Resize all layers unchecked.
10. Pull toward left bottom of image. (See my finished tutorial for placement).
11. Open mds3206Natur.pspimage of steps. Copy/Paste as New Layer.
12. Move to bottom right corner.
13. Effects/Artistic/Watercolor as in step #6. Merge/Merge Visible.
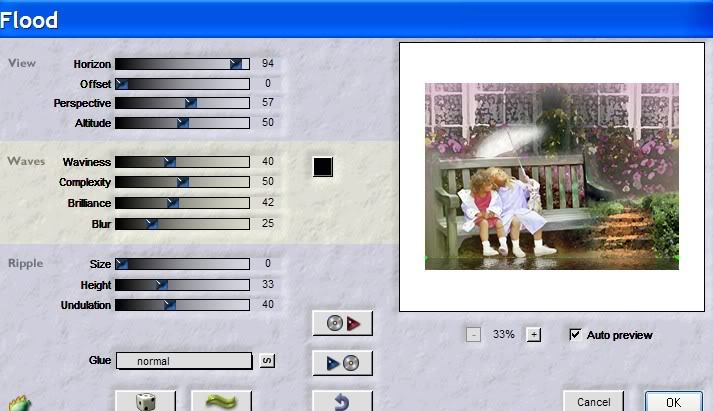
14. Effects/Flaming Pear/Flood. Use settings as seen below or use a top setting so the flood is just touching the girls feet.
15. COPY. Image will remain in memory and you will use it a few times.
16. New/New Image 772px by 572px. Flood fill with Gradient.
17. Paste as New Layer (the copied image from step #15).
l8. Lower Opacity to 33.
19. Paste as New Layer once more.
20. Effects/Simple/Top Left Mirror.
21. Effects/Geometric/Perspective-Horizontal, color transparent.
![]()
22. Effects/3-D Effects/Drop Shadow, Vertical -4, Horizontal 4, Opacity 50, Blur 20, color #000000.
23. Effects/3-D Effects/Drop Shadow, Vertical 4, Horizontal -4, Opacity 50, Blur 20, color #000000.
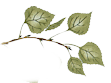
24. Open sonstigs_snagged05.pspimage of leaves. Copy/Paste as New Layer.
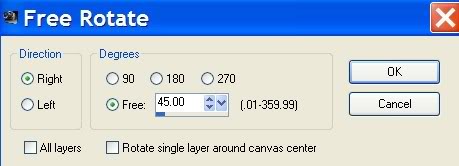
25. Image/Free Rotate, 45 degrees Right. Pull to bottom left of image.
26. Effects/3-D Effects, Drop Shadow, Vertical 6, Horizontal -2, Opacity 50, Blur 6, color #000000.
27. Duplicate. Image/Flip. Move to top right of image.
28. Copy/Paste as New Layer the merged image you made earlier. (Step #15).
29. Resize/Resize by 80%, Resize all layers unchecked.
30. Effects/Geometric/Perspective-Horizontal, color transparent as in Step #21.
31. Effects/3-D Effects, Drop Shadow, Vertical -4, Horizontal 4, Opacity 90, Blur 20, color #000000.
32. Effects/3-D Effects, Drop Shadow, Vertical 4, Horizontal -4, Opacity 90, Blur 20, color #000000.
33. Open stitchLusy.pspimage. Copy/Paste as New Layer.
34. Image/Free Rotate, 90 degrees, Right.
35. Move the stitching so it rests centered vertically on the left side of the little girls image. Erase the top and bottom stitches off the image.
36. Effects/3-D Effects/Drop Shadow, Vertical 4, Horizontal -4, Opacity 90, Blur 6, color #000000.
37. Sign your name or leave a watermark. Convert to Raster Layer.
38. Merge/Merge Visible.
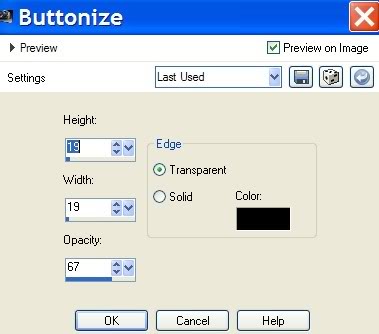
39. Effects/3-D Effects/Buttonize. See settings below.
40. Save as a .jpg file in your working folder.
THE TAG CAN BE LEFT AS IS OR YOU MAY DO THE ANIMATION OF RAIN AND PUDDLES. INSTRUCTIONS ARE BELOW:
1. Open Sqirlz program. File/Open your saved .jpg image from your working folder.
2. Click on the large red Y at the top of Sqirlz tool bar. When box comes up, choose the Rain/Snow AND Ripples. Click OK.
3. From tool bar, click on Reflect Options/Customize Rain/Snow. When the box comes up, change the Number of Raindrops/Snowflakes to 1004 and the Length to 52. Direction at bottom to 186. (You can play around with these settings to have more or less rain).
4. In the Tool bar, click on Reflect Options and choose both Customize Basic Ripples and Basic Ring Ripples, one at a time. When the box comes up, at the top right side, click on Water Color Darkness and another box will come up. Go down to the bottom and click on No Coloring and then OK. Do this with both Basic and Ring Ripples to remove a darkness in your water.
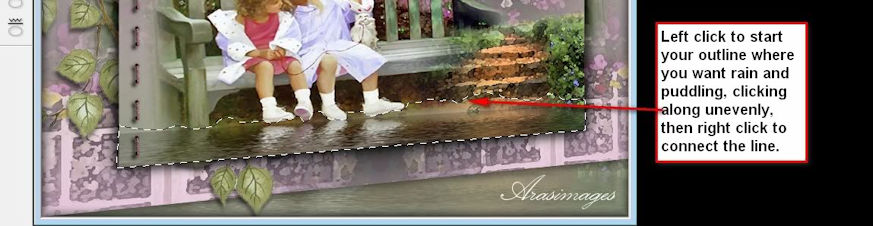
5. Click on Outline/Begin. Draw around the area where you want the puddling to occur. I drew unevenly on the top line and made the bottom and sides even.
6. Click on large Yellow arrow to show animation. If it is not what you like, go back to Outline/Delete and click Begin again and try over.
7. At the top of the Tool bar, you will see some red and blue dots. Click on those to show a box where you can set the speed your puddles move and rain to fall. I set mine to 25.
8. When you are satisfied with your animation, click on gif on the toolbar. Give your animated tag a name and click Save. When the small box comes up, set your frame rate. I left mine to 15.
9. You will see your "build" as it is saving.
10. Congratulations on completing a difficult animated tutorial!
Thank you Pamela and Eva for testing this tutorial for me.
Thank you Lili, Franie, msrf45 and Zenyra for your adorable versions of the tutorial.
If you are going to use this tutorial for stationery, cards or place the tutorial/tag on another site, I would appreciate you contacting me for permission, giving Arasimages credit for the original tutorial and if possible, a link back to my site. Thank you.
Copyright © Arasimages All Rights Reserved