
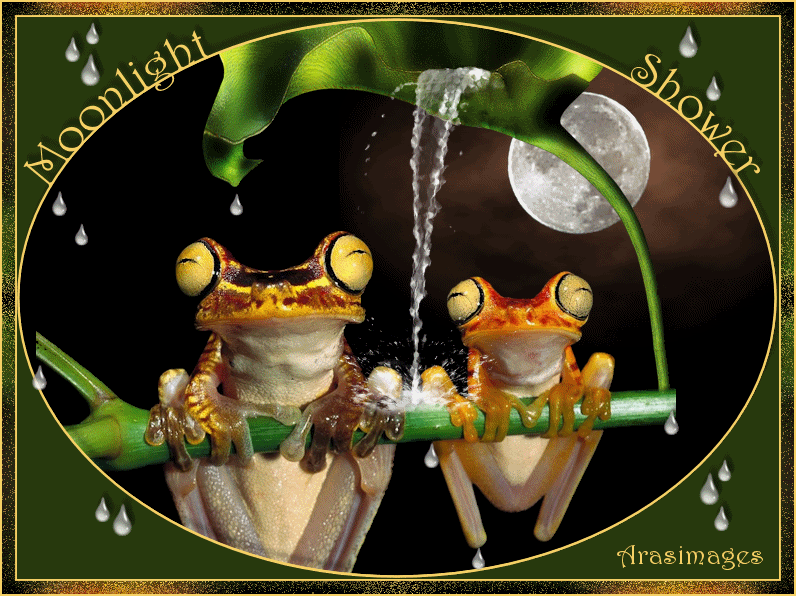
Moonlight Shower
For Italian, Danish and French translations, click on the flags.


For this tutorial you will need the materials in the zip file below.

Credit is given for materials used when original author is known. Tubes used in this tutorial are from Maryse and Arasimages. Please visit the tuber sites listed on my Links page. You will also find many more tubes in my all-free Tubes section.
Use the bookmark below to mark your place along the way.

Unzip the materials into a working folder. Open the materials in PSP, copy and close originals. Export the rain drop (straight) into your PSP Picture Tubes. You will need plugins Eye Candy 3.1, Toadies and AFS IMPORT/MIRROFF. I have used PSPX3 to create this tutorial but you may use an earlier version. It is assumed you have a working knowledge of PSP to do this tutorial.
1. In Materials Palette, set Foreground to color #000000, Background to color #f5d065.
2. New/New Image 762px by 562px. Flood fill with Foreground color #000000. Change Background color to #283a0e.
3. Open moon1bg_122399 PDPhoto.org pspimage. Copy/Paste as New Layer.
4. Move to upper right corner.
5. Open FrogsE.pspimage. Copy/Paste as New Layer.
6. Move frogs to bottom center.
7. Open MR_Splash Leave.pspimage. Copy/Paste as New Layer.
8. Image/Resize/Resize by 50%, Resize all layers unchecked.
9. Place leaf so water splashes on the frogs' branch. Erase or Freehand Select and delete the leaf stem off the frogs' branch.
10. Using the Preset Shapes in your Tool bar, choose Ellipse. Use settings below.

11. Close off the background color #283a0e.
12. Draw the Ellipse, using the Foreground color #f5d065. Stretch it to fit image using the side arrows.
13. Convert to Raster Layer. Open the Background color and flood fill outer corners with it. (Should be medium green).
14. Close off Background color #283a0e.
15. Using the Present Shapes in your Tool bar, choose Ellipse. Use settings below.

16. This thicker Ellipse will go over the first Ellipse.
17. LEAVE VECTOR LINES ACTIVE.
18. Switch Foreground color with Background color using double arrows by Materials color boxes, and select your Text Tool.
19. Choose Font Harrington, Size 48, color #f5d065. Place your cursor at the top of the Ellipse and look for the text "A" with the semi-circle below to appear. Begin typing with the word "Moonlight". Then space 38 times (this may vary for you a few spaces). Now continue to type "Shower".

20. Grab the center move node of the active vector box and move the words into position. You may have to play with the side nodes to get the words positioned just right, or try again using more or less spaces between words.
21. Convert to Raster Layer.
22. Effects/3-D Effects/Drop Shadow, Vertical -7, Horizontal 4, Opacity 68, Blur 9, color #000000.
23. Layers/New Raster Layer.
24. From Tool bar, choose the Tube tool. Find the water drop called "Rain straight".
25. Using Scale 100/80/70 sizes, randomly place rain drops on your image as you choose.
26. Effects/3-D Effects/Drop Shadow, Vertical -7, Horizontal 4, Opacity 68, Blur 9, color #000000.
27. Sign your name or leave a watermark. Convert to Raster Layer.
28. Merge/Merge Visible.
29. Image/Add Borders, 2px border, Symmetric checked, color #f5d065.
30. Image/Add Borders, 13px border, Symmetric checked, color #000000.
31. Activate 13px border using Magic Wand.
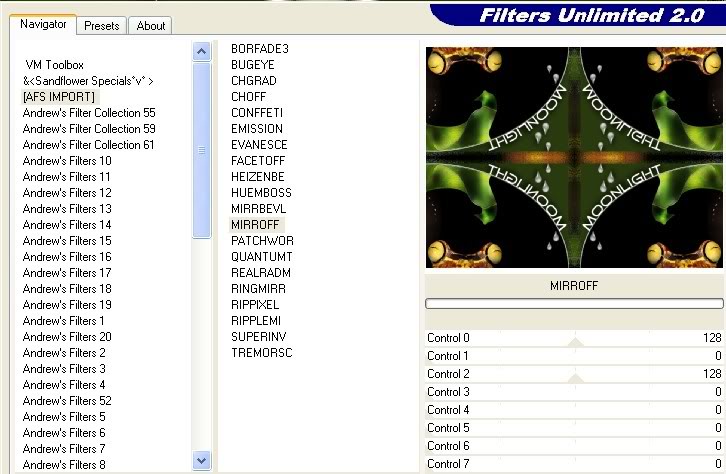
32. Effects/Filters Unlimited/AFS IMPORT/MIRROFF. See example below. (Your AFS Import plugin might not be in Filters Unlimited).
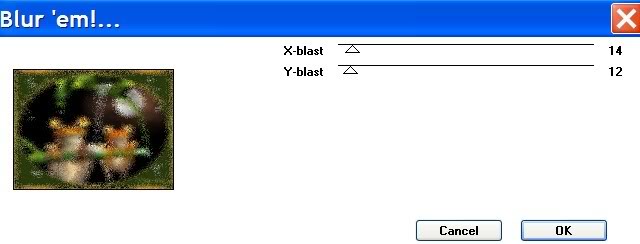
33. Effects/Toadies/Blur 'em. See example below. Selections/Select None.
34. Image/Add Borders, 2px border, Symmetric checked, color #f5d065.
35. Save as .jpg in working folder.
THE TAG MAY BE LEFT AS IS OR YOU MAY DO THE ANIMATION OF WATERFALL AND SPLASH. INSTRUCTIONS ARE BELOW:
1. Layers/Promote Background Layer.
2. Using your Freehand Selection tool/Magic Wand, left click on waterfall and splash, then with Freehand Selection tool, draw all around the extra water that is pouring/splashing and each extra little water droplets that you want to see moving. See settings below:

3. Duplicate 3 times so you have 4 layers in all.
4. Close off all layers except the top layer. Have this one activated.
5. Open Eye Candy 3.1/Jiggle. Use settings below:
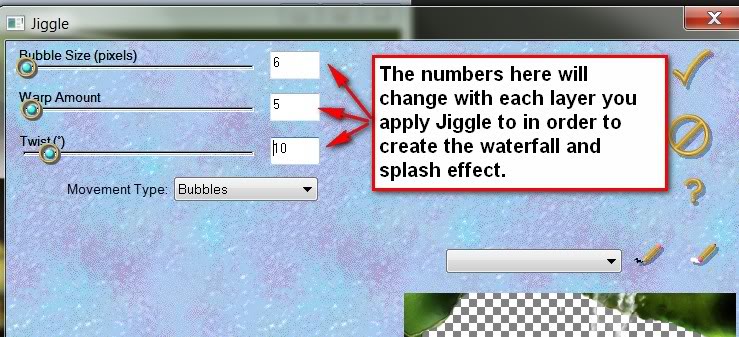
6. On the top layer, in Eye Candy 3.1, set to Bubble, Size 6/Warp 5/Twist 10. Close off this layer.
7. On next layer down, open and repeat with Size 18/Warp 5/Twist 19. Close off this layer.
8. On next layer down, open and repeat with Size 7/Warp 7/Twist 8. Close off this layer.
9. On bottom layer, open and repeat with Size 5/Warp 6/Twist 3. Selections/Select None.
10. Open all layers. Save as PSP Animation Shop (*psp) file in your working folder.
11. Open Animation Shop. File/Open the file you just saved.
12. Click on the animation button at the top to see if you like the way the water is flowing. I used a setting of 7 by going to Animation/Frame Properties and setting from 10 down to 7. The higher the number, the faster the water will flow.
13. Once you are satisfied, to save your animation, go to File/Save As. When the box comes up, give your work a name, type where to save it and click Save. Then click Next...Next...Next...Finish.
You are finished! I hope you have enjoyed giving the froggies a little shower. :)
Thank you Pamela and Eva for testing this tutorial for me.
If you are going to use this tutorial for stationery, cards or place the tutorial/tag on another site, I would appreciate you contacting me for permission, giving Arasimages credit for the original tutorial and if possible, a link back to my site. Thank you.
Copyright © Arasimages All Rights Reserved