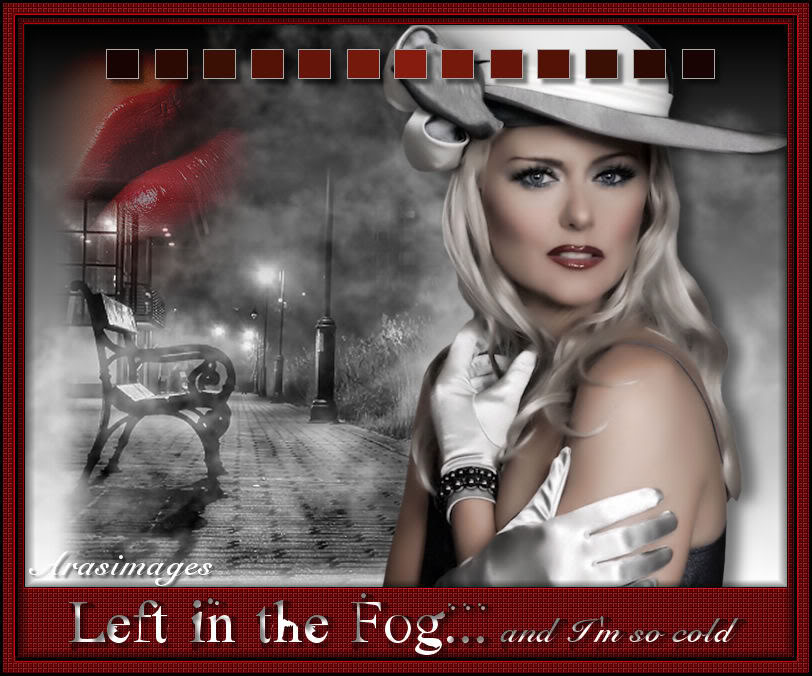

Left In The Fog
For Italian and Danish translation, click on the flags.
For this tutorial you will need the materials in the zip file below.
Credit is given for materials used when original author is known. Tubes used in this tutorial are from Corinne Vicaire, Sorensen and Arasimages. Thank you ladies for your beautiful work. Please visit the tuber sites listed on my Links page. You will also find many more tubes in my all-free Tubes section.
Use the bookmark below to mark your place along the way.

Unzip the materials into a working folder. Open the materials in PSP, copy and close originals. Export the brush into your PSP folder for Brushes. You will need the plugin Xero/Fritillary for this tutorial. I have used PSPX3 to create this tutorial but you may use an earlier version. It is assumed you have a working knowledge of PSP to do this tutorial although this is not a hard tutorial to do.
1. In Materials Palette, set Foreground to color #ffffff, Background to color #000000.
2. Create Gradient using the Foreground/Background colors, Style set to Linear, Angle 0, Repeats 0, Invert unchecked.
3. New/New Image 762px by 562px. Floodfill the new image with the Gradient.
4. Open Misted by Sorensen_Designs April 170-08.pspimage. Copy/Paste as New Layer.
5. Image/Mirror. Move to left middle of page and down a little toward the bottom.
6. Layers Palette/Blend Mode set to Luminance (Legacy).
7. From Tool bar, select the Paint Brush. From presets, find Fog131.

8. Layers/New Raster Layer.
9. Using default settings of the brush, Foreground color #ffffff in Materials Palette, left click bottom left area 2X, bottom right 1X, right center and top center of image 1X. Make sure you leave black showing in both upper corners.
10. Open Tube corinne.vicaire-femme 23.03.11.pspimage. Copy/Paste as New Layer.
11. Image/Resize/Resize by 86%, Resize all layers unchecked.
12. Place woman toward right side of image.
13. Effects/3-D Effects/Drop Shadow, Vertical 2, Horizontal 13, Opacity 50, Blur 20, color #000000.
14. Image/Add Borders/1px border in color #000000, Symmetric checked.
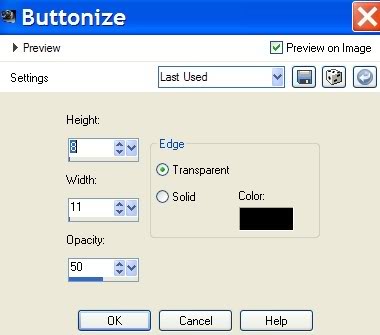
15. Effects/3-D Effects/Buttonize, color #000000.

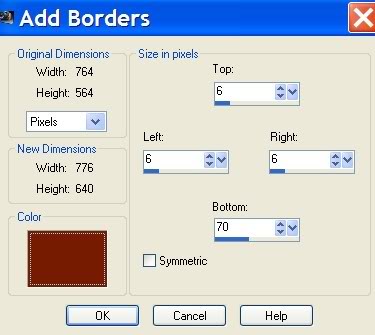
16. Image/Add Borders/6px borders on top, left and right side. 70px border on bottom, Symmetric NOT checked. Use color #690103 (red).

17. Use the Magic Wand to select the red border.
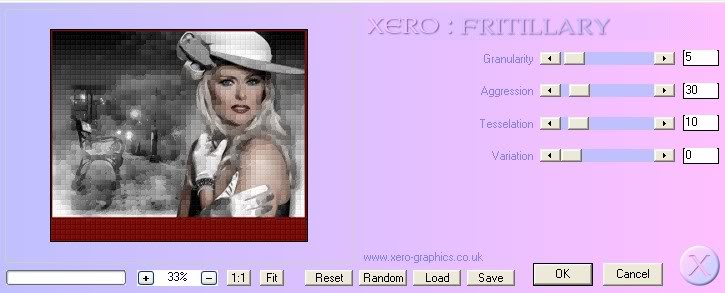
18. Effects/Xero/Fritillary. Use default settings as seen below.

19. Effects/3-D Effects/Buttonize, color #000000. (Same settings as in Step #15).
20. Effects/Edge Effects/Enhance. Selections/Select None.
21. Open Susan T 1699.pspimage. Copy/Paste as New Layer.
22. Image/Resize/Resize by 86%, Resize all layers unchecked.
23. Pull lips into upper left corner.
24. Blend Mode set to Hard Light. Opacity set to 50.
25. Open SQUARES.pspimage. Choose the Silver layer. Copy/Paste as New Layer.
26. Effects/3-D Effects/Drop Shadow, Vertical 5, Horizontal 5, Opacity 50, Blur 5, color #000000.
27. Pull into position toward top border.
28. In Materials Palette, set Background (bottom box) to color white, #ffffff.
29. In Tool bar, select the Text Tool. Find Font Ugly Face and set it to Size 60, color #ffffff.

30. Type the words "Left in the Fog...". Convert to Raster Layer.
31. Select the Font Snell BD BT, Size 36, color #ffffff.

32. Type the words "and I'm so cold". Convert to Raster Layer.
33. Using the Move tool, pull both sets of words into a nice place.
34. Merge/Merge Down.
35. Effects/3-D Effects/Drop Shadow, Vertical 5, Horizontal 5, Opacity 50, Blur 5, color #000000.
36. Still on the top layer, using the Magic Wand, click inside the large red border to activate all the letters.
37. Apply Drop Shadow again as in Step #35. Selections/Select None.
38. Image/Add Borders/3px border, Symmetric checked, color #000000.
39. Image/Add Borders/12px border, Symmetric checked, color #690103.
40. Select the 12px border with Magic Wand.
41. Effects/Xero/Frittilary. Use default settings and apply.
42. Effects/Edge Effects/Enhance. Selections/Select None.
43. Image/Add Borders/3px border, Symmetric checked, color #000000
44. Add your name or watermark, Convert to Raster Layer.
45. Merge/Merge Visible.
A big thank you to PamelaD and Evatexas for testing my tutorials for me.
If you are going to use this tutorial for stationery, cards or place the tutorial/tag on another site, I would appreciate you contacting me for permission, giving Arasimages credit for the original tutorial and if possible, a link back to my site. Thank you.
Copyright © Arasimages All Rights Reserved

