
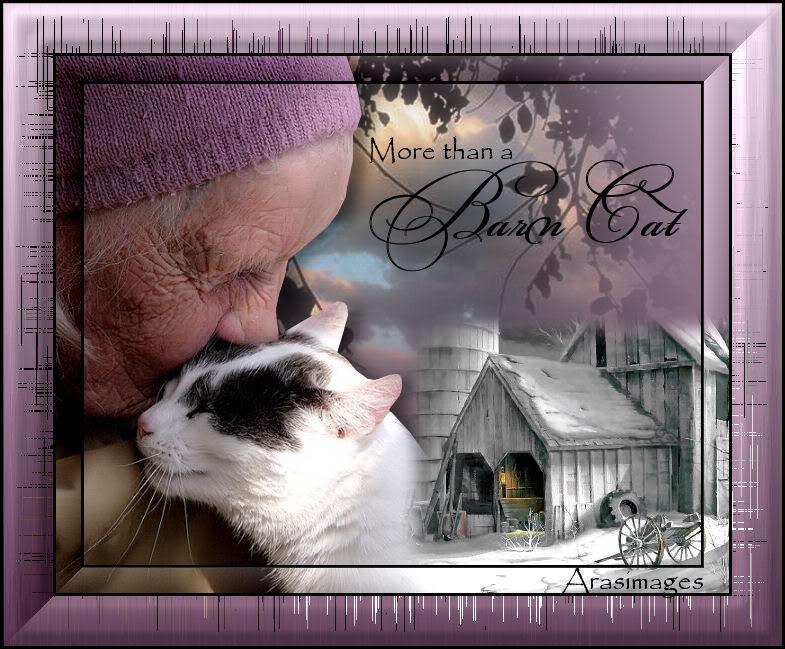
More Than A Barn Cat
For Italian and Danish translation, click on the flags.
For this tutorial you will need the materials in the zip file below.
Credit is given for materials used when original author is known. Tubes used in this tutorial are from http://www.onlinegraphic-resourses.com/ and Suzi Sgai Tubes. Thank you tubers for your beautiful work. Please visit the tuber sites listed on my Links page. You will also find many more tubes in my all-free Tubes section.
Use the bookmark below to mark your place along the way.

Unzip the materials into a working folder. Open the materials in PSP, copy and close originals. You will need the plugins Filters Unlimited 2 and AP/Paint for this tutorial. I have used PSPX3 to create this tutorial but you may use an earlier version. It is assumed you have a working knowledge of PSP to do this tutorial.
1. In Materials Palette, set Foreground to color #b69db0, Background to color #513148.
2. Create Gradient using the Foreground/Background colors, Style set to Linear, Angle 0, Repeats 0, Invert checked.
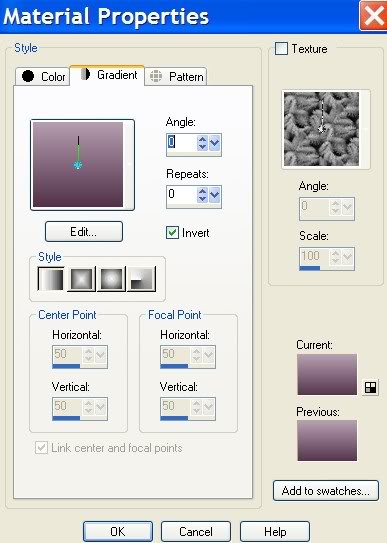
3. New/New Image 673px by 537px. Floodfill the new image with the Gradient.
4. Open contrasto_mara_soliel_06_08_2007.pspimage. Copy/Paste as New Layer.
5. Image/Mirror. Move upward and a little to the left.
6. Open SS_354.pspimage. Copy/Paste as New Layer. Move to left side of image.
7. Effects/3-D Effects/Drop Shadow, Vertical 3, Horizontal 14, Opacity 50, Blur 21, color #000000.
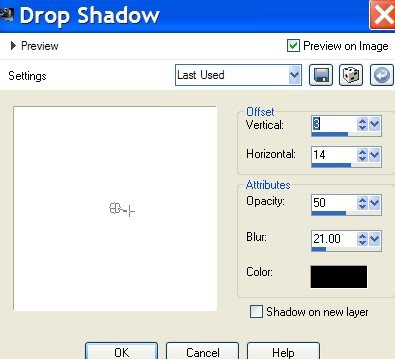
8. Open WinterBarnPTR.pspimage. Copy/Paste as New Layer.
9. Image/Mirror. Place in lower right corner.
10. Change the Foreground color in the Materials Palette to #ffffff.
11. Using the Color Changer (by Flood fill tool), left click on dark and light blue of WinterBarn image to change it to more of a white snowy color.
12. Image/Add Borders/3px border, color #000000, Symmetric checked.
13. Selections/Select All. Selections/Modify/Contract by 28.
14. Layers/New Raster Layer. Change Foreground color to #000000 and left click inside selection to flood fill with the black.
15. Selections/Modify/Contract by 3px. Press Delete key once.
16. Selections/Select None.
17. Merge/Merge Visible.
18. Effects/Filters Unlimited2/Buttons & Frames/3D Glassframe3. Use settings below:
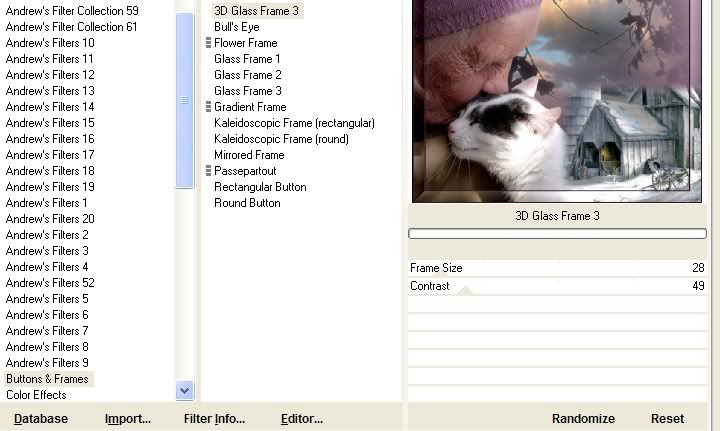
19. Image/Add Borders, 50px border, color #ffffff, Symmetric checked.
20. Select 50px border with Magic Wand to activate it.
21. Change Foreground color to #dec8d9.
22. Set to Gradient/Linear/Repeats 0, Angle 0, Invert checked.
23. Flood fill the 50px border with this Gradient.
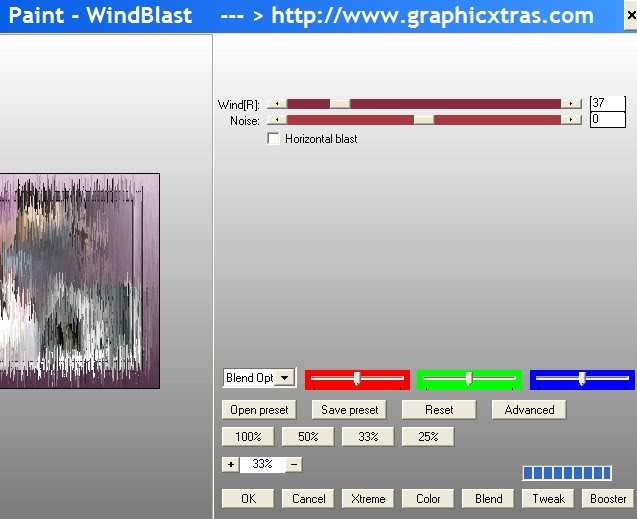
24. Effects/AP Paint/WindBlast. Use settings as shown below, first with Horizontal blast box unticked, then with Horizontal Blast box ticked. You will be applying WindBlast twice.
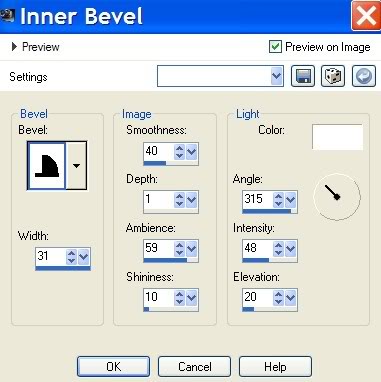
25. Effects/Inner Bevel. Use settings below.
26. Effects/Filters Unlimited 2/Buttons & Frames/3D Glassframe3. Use settings Frame size 50, Contrast 50.
27. Selections/Select None.
28. Image/Add Borders/3px border, color #000000, Symmetric checked.
29. In Tool bar, select the Text Tool. Find Font Papyrus. Set it to Size 28, color #000000. Use settings below.

30. Type the words "More than a". Convert to Raster Layer.
31. Select the Font BickhamFancyScript (BickhamFancy.ttf), Size 72, color #000000.

32. Type the words "Barn Cat". Convert to Raster Layer.
33. Using the Move tool, pull both sets of words into a nice place.
34. Add your name or watermark, Convert to Raster Layer.
35. Merge/Merge Visible.
A big thank you to PamelaD and Evatexas for testing my tutorials for me.
If you are going to use this tutorial for stationery, cards or place the tutorial/tag on another site, I would appreciate you contacting me for permission, giving Arasimages credit for the original tutorial and if possible, a link back to my site. Thank you.
Copyright © Arasimages All Rights Reserved

