
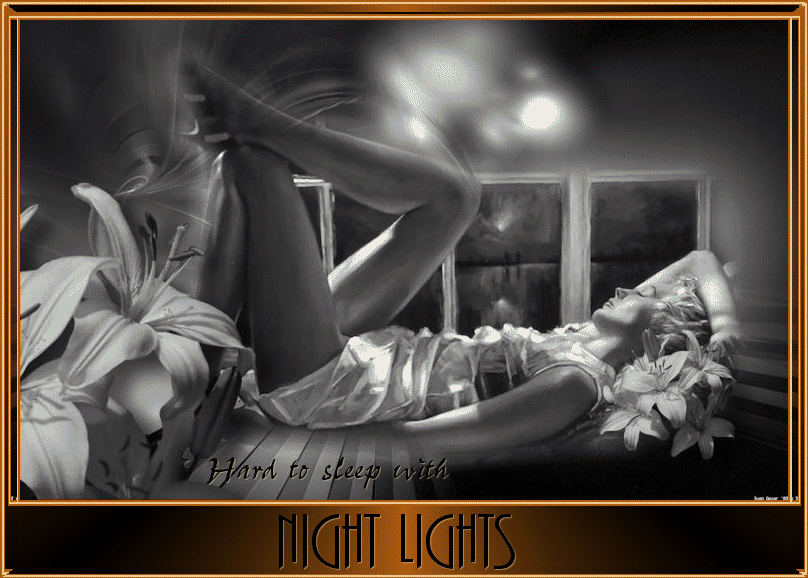
Night Lights
For Italian, Danish and French translation, click on the flags.


For this tutorial you will need the materials in the zip file below.

Credit is given for materials used when original author is known. Tubes used in this tutorial are from Sorensen_Designs and Arasimages. Thank you tubers for your beautiful work. Please visit the tuber sites listed on my Links page. You will also find many more tubes in my all-free Tubes section.
Use the bookmark below to mark your place along the way.
Unzip the materials into a working folder. Open the materials in PSP, copy and close originals. You will need the plugin Filters Unlimited 2/AFS for this tutorial. I have used PSPX3 to create this tutorial but you may use an earlier version. It is assumed you have a working knowledge of PSP to do this tutorial.
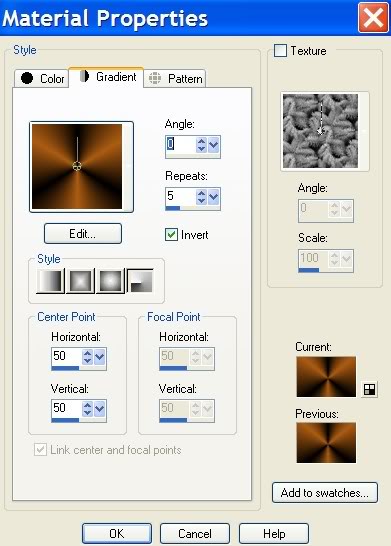
1. In Materials Palette, set Foreground to color #ac5c13, Background to color #000000.
2. Create Gradient using the Foreground/Background colors, Style set to Radial, Angle 0, Repeats 5, Invert checked.
3. Open Lost.jpg fractal image. Resize to 768px by 480px.
4. Open Sorensen_Design_Mist June 123-11.pspimage. Copy/Paste as New Layer.
5. Image/Resize/Resize by 80%, Resize all layers unchecked. Move a little to the right.
6. Open ArasFlowers9.pspimage. Copy tubed layer/Paste as New Layer.
7. Move flower to bottom left of image.
8. Effects/3-D Effects/Drop Shadow, Vertical 11, Horizontal 18, Opacity 50, Blur 20, color black.
9. Paste again as New Layer.
10. Image/Resize/Resize by 30%/Resize all layers unchecked.
11. Move resized flowers beneath woman's head.
12. Effects/3-D Effects/Drop Shadow, Vertical 11, Horizontal 18, Opacity 50, Blur 20, color black.
13. Image/Add Borders/2px border, color #ac5c13, Symmetric checked.
14. Image/Add Borders/2px border, color #edcb95, Symmetric checked.
15. Image/Add Borders/2px border, color #ac5c13, Symmetric checked.
16. Image/Add Borders/3px borders on top, left and right sides, 60px bottom, color #000000, Symmetric unchecked.
17. Activate the 60px border with Magic Wand. Flood fill with Gradient.
18. Selections/Selections None.
19. Image/Add Borders/2px border, color #ac5c13, Symmetric checked.
20. Image/Add Borders/2px border, color #edcb95, Symmetric checked.
21. Image/Add Borders/2px border, color #ac5c13, Symmetric checked.
22. At this point, sign your name or leave your watermark. Convert to Raster Layer.
23. Merge/Merge Visible.
23. Using the Selections tool, Selections type set to Rectangle, Mode set to Replace and Feather set to 0, draw a rectangle, selecting around the image before you added any borders. Selections/Invert.
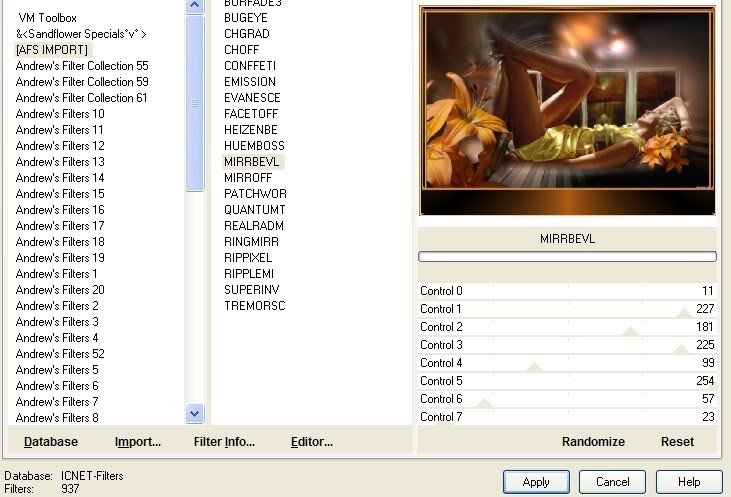
24. Effects/Filters Unlimited2/AFS Import/Mirror Bevel/use settings as in example below.
NOTE: If you choose to not use animation on your tag, then Selections/Select None. Open Text.psp. Copy/Paste as New layer and put in to place. Merge/Merge Visible. Save your work as a .jpg image, omitting the steps below.
HERE IS WHERE THE ANIMATION DIRECTIONS START.
25. Selections/Invert so marching ants are now around image inside borders.
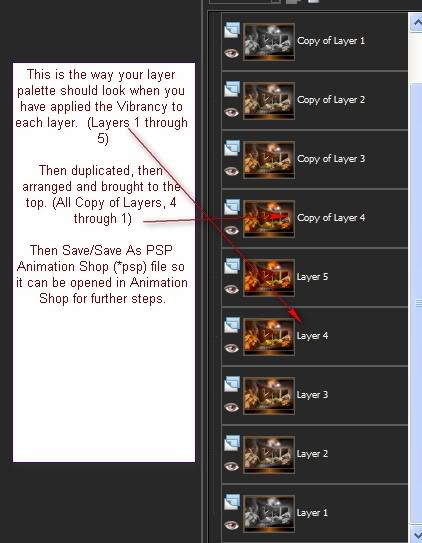
26. Duplicate 4 times, having 5 layers in all. Rename layers from bottom layer which would be Layer 1 to top layer which would be Layer 5.
27. Close off all layers except for bottom Layer 1. Highlight it.
28. Adjust/Hue & Saturation/Vibrancy, Set to -100 as seen in example below. (It looks like -10, but hover over it and it will show -100). (The bar will be advanced to the right when the setting is changed each time.)

29. Close off Layer 1. Go to Layer 2, open and highlight it.
30. Apply Vibrancy set to -53.
31. Close off Layer 2. Go to Layer 3, open and highlight it.
32. Apply Vibrancy set to -15.
33. Close off Layer 3. Go to Layer 4, open and highlight it.
34. Apply Vibrancy set to 32.
35. Close off Layer 4. Go to Layer 5, open and highlight it.
36. Apply Vibrancy set to 69. Close off this layer.
37. Go to Layer 4, duplicate it. Arrange/Bring to Top the duplicated layer.
38. Go to Layer 3, duplicate it. Arrange/Bring to Top the duplicated layer.
39. Go to Layer 2, duplicate it. Arrange/Bring to Top the duplicated layer
40. Go to Layer 1, duplicate it. Arrange/Bring to Top the duplicated layer.
41. Selections/Select None. Open all layers. Save/Save as/PSP Animation Shop (*psp) into your working folder. (Name it Night Lights).
42. Your layer palette should look like this now.
43. In Animation Shop, File/Open/Night Lights image you just saved. Edit/Select All.
44. File/Open/Text.psp file. Right click Copy on the top blue bar of image.
45. Edit/Propagate Paste.
46. Right click on FIRST frame of image. Paste/Into Selected Frame. Choose where your text should go and left click to set it into position.
47. Animation/Frame Properties/Set the frame speed to 30.
48. Click on the Animation in tool bar at top to check your animation. If you want it to go slower, set the speed higher.
49. When you are satisfied, File/Save As...give your work a name (Night Lights) and save as a .gif file. Click Save.
50. Click Next, Next, Next, Finish as the boxes go through the saving steps.
ALL FINISHED! Congratulations on working a complicated tutorial.
A big thank you to PamelaD and Evatexas for testing my tutorials for me.
If you are going to use this tutorial for stationery, cards or place the tutorial/tag on another site, I would appreciate you contacting me for permission, giving Arasimages credit for the original tutorial and if possible, a link back to my site. Thank you.
Copyright © Arasimages All Rights Reserved