
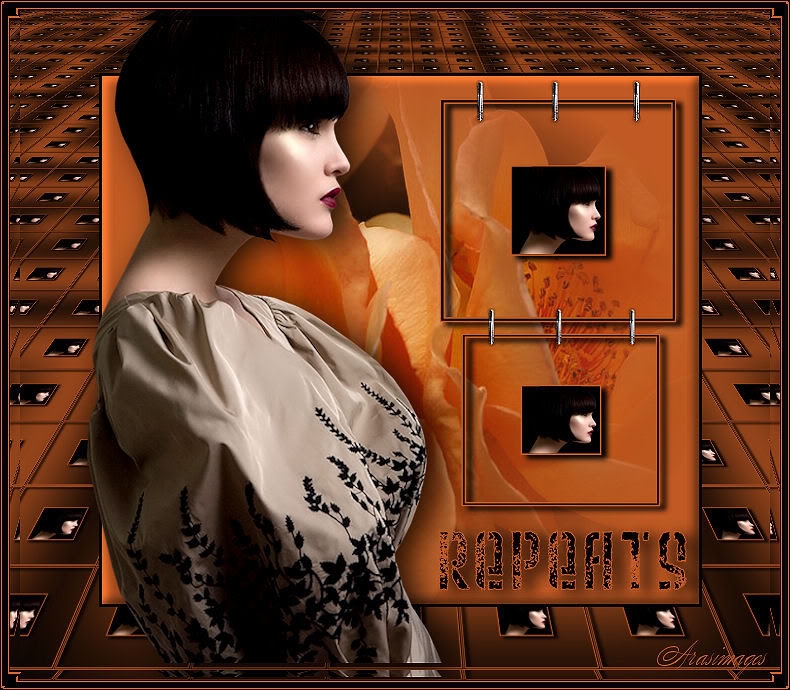
Repeats
For Danish translation, click on the flags.

For this tutorial you will need the materials in the zip file below.

Credit is given for materials used when original author is known. Tubes used in this tutorial are from Karine Dreams and Arasimages. Thank you tubers for your beautiful work. Please visit the tuber sites listed on my Links page. You will also find many more tubes in my all-free Tubes section.
Use the bookmark below to mark your place along the way.

Unzip the materials into a working folder. Open the materials in PSP, copy and close originals. You will need the plugin Filter MuRaMeister/Perspective Tiling and FiltersUnlimited/AFS IMPORT for this tutorial. You may open and minimize the font included in materials instead of putting it in your PSP/Fonts folder. It will show up in PSP. Place the Preset Shape .jsl in your PSP/Preset Shapes folder. I have used PSPX3 to create this tutorial but you may use an earlier version. It is assumed you have a working knowledge of PSP to do this tutorial.
1. Create a New Image 750px by 650px, transparent.
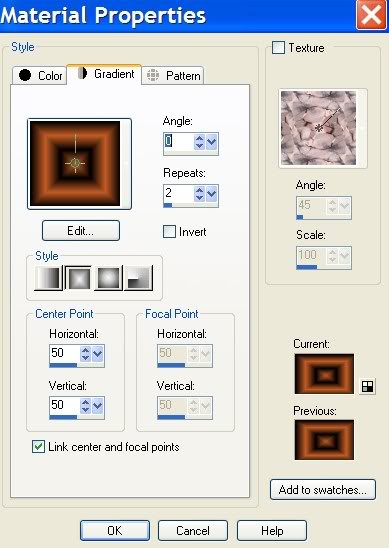
2. In Materials Palette, set Foreground to color #c35b24, Background to color #000000.
3. Create Gradient using the Foreground/Background colors, Style set to Rectangular, Angle 0, Repeats 2, Invert unchecked.
4. Flood fill New Image with Gradient.
5. Adjust/Blur/Gaussian Blur, Radius 42.
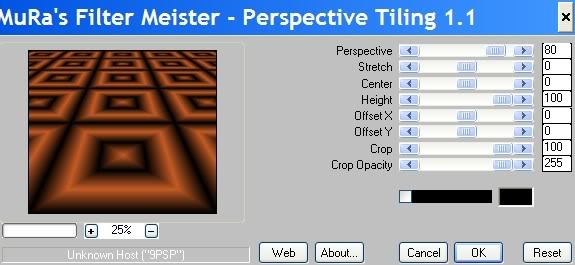
6. Effects/MuRaMeister/Perspective Tiling. Apply using settings below.
7. Layers/New Raster Layer.
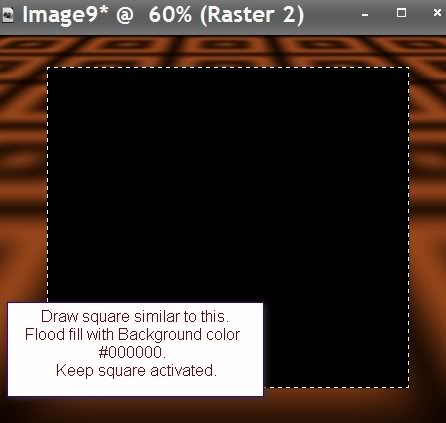
8. Using the Selections tool, draw a square like I have done here. Flood fill it with Background color #000000.
9. Selections/Modify/Contract by 3. Click Delete key once. Keep activated.
10. Layers/New Raster Layer.
11. Flood fill with foreground color #c35b24.
12. Open Peachy.pspimage. Copy/Paste into Selection.
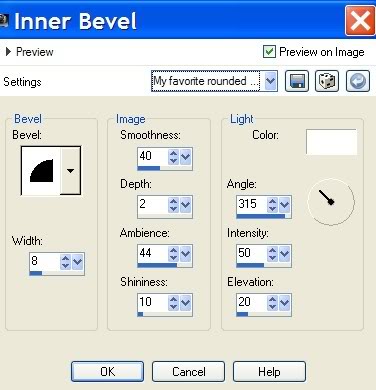
13. Effects/3-D Effects/Inner Bevel. Apply with settings as seen below.
14. Selections/Select None.
15. From Preset Shapes, select Tiles.jsl c.

16. In the Materials Palette, have the Foreground color set to the original #c35b24, Background color to #000000.
17. Using the Preset Shape c, draw a square about the same size as I have done. See example.
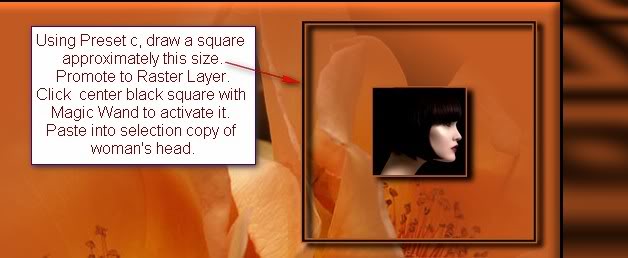
18. Layers/Promote to Raster Layer.
19. Effects/3-D Effects/Drop Shadow/Vertical 4, Horizontal 6, Opacity 100, Blur 8, color #000000.
20. Using the Magic Wand, click inside the center black square to highlight it.
21. Open the K@rine_Dre@ms_Pretty_Woman_1908_Aout_2011.pspimage.
22. Highlight the middle layer. Using the Selection tool,draw a square around the woman's head to select it. Right click/Copy.
23. Go back to the working image and Paste into Selection. Selections/Select None.
24. Create another smaller square using directions from Steps #15 through #23.
25. Move the smaller square beneath the top square as I have done in my finished image.
26. Having smaller square layer highlighted, Duplicate.
27. Image/Resize/Resize by 70%, Resize all layers not checked.
28. Effects/MuRaMeister/Perspective Tiling. Use same settings as in Step #6.
29. Pull this tiled layer below Raster 2.
30. Highlight (top layer) to continue.
31. Open Grapas.pspimage. Copy/Paste as New Layer.
32. Pull the three bars to the top lady within square.
33. Paste as New Image again. Image/Resize/Resize by 90%, Resize all layers unchecked.
34. Pull the resized bars to the top of the smaller square.
35. Open K@rine_Dre@ms_Pretty_Woman_1908_Aut_2011.pspimage. Copy/Paste as New Layer.
36. Image/Resize/Resize by 83%, Resize all layers not checked.
37. Move woman to left a little.
38. Effects/3-D Effects/Drop Shadow/Vertical 4, Horizontal 12, Opacity 80, Blur 46, color #000000.
39. Using Text tool, choose Font (Weltu) Weltron Urban, Size 30, Points (not Pixels), color #000000. (You may use a different Font if you like.) Type Repeats. Convert to Raster Layer.

40. Place in bottom right corner of orange background.
41. Effects/3-D Effects/Drop Shadow/Vertical 4, Horizontal 12, Opacity 80, Blur 21, color #000000.
42. Image/Add Borders/2px border, Symmetric checked, color #000000.
43. Image/Add Borders/2px border, Symmetric checked, color #c35b24.
44. Image/Add Borders/12px border, Symmetric checked, color #000000.
45. Image/Add Borders/2px border, Symmetric checked, color #c35b24.
46. Image/Add Borders/2px border, Symmetric checked, color #000000.
47. Select All/Modify/Contract by 20/Invert.
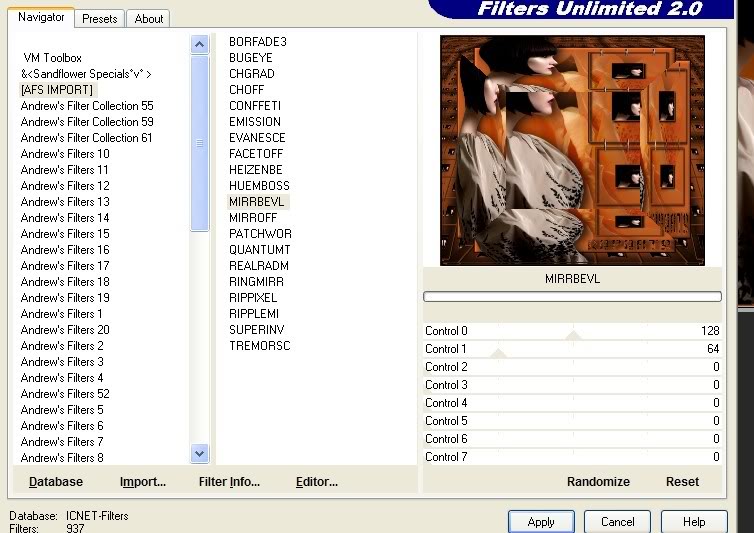
48. Effects/Filters Unlimited/AFS IMPORT/MIRRBEVL/(use settings as seen below.)
49. Selections/Select None.
50. Sign your name. Convert to Raster Layer.
51. Merge/Merge All.
A big thank you to PamelaD and Evatexas for testing my tutorials for me.
If you are going to use this tutorial for stationery, cards or place the tutorial/tag on another site, I would appreciate you contacting me for permission, giving Arasimages credit for the original tutorial and if possible, a link back to my site. Thank you.
Copyright © Arasimages All Rights Reserved