For this tutorial you will need the materials in the zip file below.

Credit is given for materials used when original author is known. Tubes used in this tutorial are from Maryse, Anna and Macha. Thank you tubers for your beautiful work and permission to use. Please visit the tuber sites listed on my Links page. You will also find many more tubes in my all-free Tubes section.
Use the bookmark below to mark your place along the way.

Unzip the materials into a working folder. Open the materials in PSP, copy and close originals. You will need the plugin Filters Xero/Porcelain and AlienSkin Xenofex 2/Constellation for this tutorial. You may open and minimize the font included in materials instead of putting it in your PSP/Fonts folder. It will show up in PSP. Place the Selection Soft Whispers in your PSP/Selections folder and zilverbeads in your PSP Patterns folder. I have used PSPX3 to create this tutorial but you may use an earlier version. It is assumed you have a working knowledge of PSP to do this tutorial.
1. Create a New Image 650px by 534px, transparent.
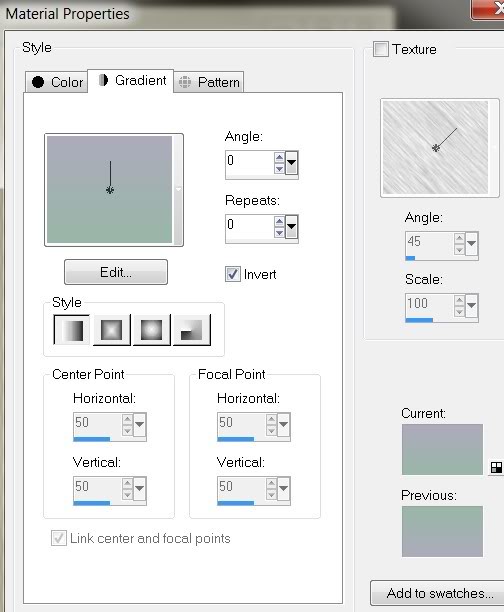
2. In Materials Palette, set Foreground to color #acaabc, Background to color #99b7a7.
3. Create Gradient using the Foreground/Background colors, Style set to Linear, Angle 0, Repeats 0, Invert checked.
4. Flood fill New Image with Gradient.
5. Layers/New Raster Layer. Select All.
6. Open anna.br-1154_spain.pspimage. Copy/Paste into Selection.
7. Set Opacity to 44. Blend Mode set to Luminance (Legacy). Selections/Select None.
8. Layers/New Raster Layer.
9. Selections/Load Save Selection/Load from Disk.
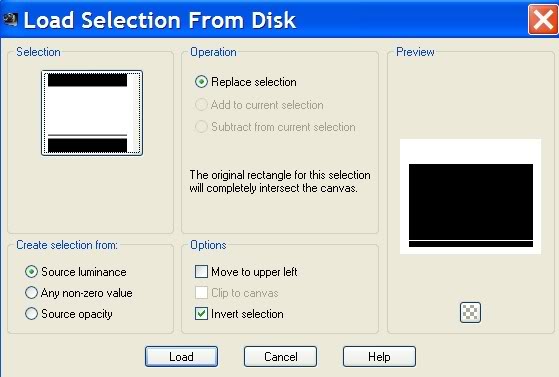
10. Flood fill Arasimages Soft Whispers Selection with Gradient
11. Selections/Invert.
12. Open Macha_010811_coldflowers.pspimage. Copy/Paste into Selection.
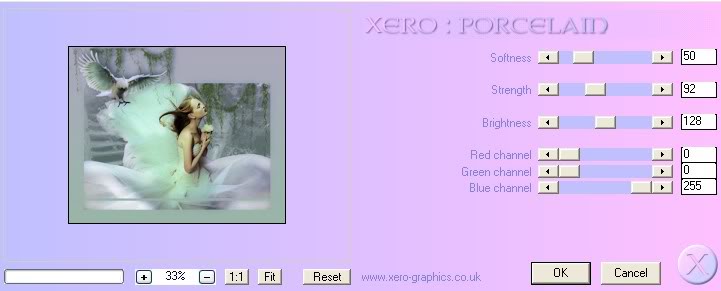
13. Effects/Xero/Porcelain. Use these settings below on the Background layer.
14. Selections/Invert.
15. Layers/New Raster Layer.
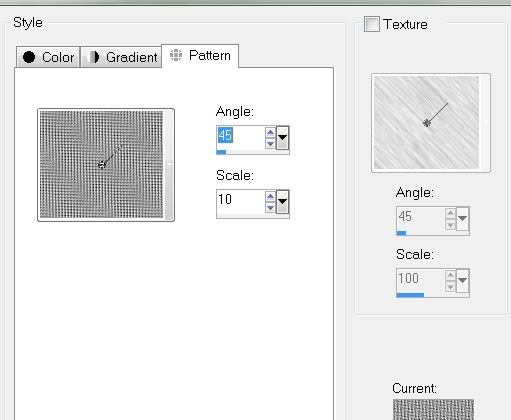
16. Materials Palette/Pattern, set to zilverbeads_jeanette, Angle at 45, Scale at 10.
17. Flood fill the active Selection areas with zilverbeads.
18. Selections/Modify/Contract by 2. Click Delete key once.
19. Selections/Select None.
20. Effects/Edge Effects/Enhance.
21. Open 103separateur18.pspimage. Copy/Paste as New Layer.
22. Image/Resize/Resize by 37%, Resize all layers unchecked.
23. Place in smallest Selection rectangle.
24. Effects/3-D Effects/Drop Shadow, Vertical -3, Horizontal -3, Opacity 72, Blur 9, Shadow on New Layer checked, Color #30475a.
25. Highlight Raster 5. Effects/Edge Effects/Enhance.
26. Open Exkizz_Magie_Vegetation.pspimage. Copy/Paste as New Layer.
27. Pull beneath Layer of woman, Raster 3, and place on right side of inner picture.
28. Go back to top layer, highlight and Paste again as New Layer.
29. Image/Mirror. Move to upper left corner.
30. Using the Free Hand Selection tool, Point to Point, select the moss that is over the glitter frame, delete. Selections/Select None. (Or use Eraser tool to remove moss).
31. Effects/3-D Effects/Drop Shadow, Vertical -3, Horizontal 9, Opacity 72, Blur 9, Shadow on New Layer checked, Color #30475a.
32. Highlight Raster 7 (top layer).
33. Open Mr_Flying Bird.pspimage. Copy/Paste as New Layer.
34. Resize/Resize by 32%, Resize all layers unchecked.
35. Using the Color Changer Tool (default settings), recolor the bird's inner wings using the Background color #99b7a7.
36. Move the bird into the upper left corner area.
37. Effects/3-D Effects/Drop Shadow, Vertical -8, Horizonal 11, Opacity 72, Blur 25, color #30475a.
38. Go back to top layer (Raster 8) to continue.
39. Pull the layer of the bird (Raster 8 below the inner Selection top line (Raster 4). Highlight Raster 4 and erase the line that covers the bird.
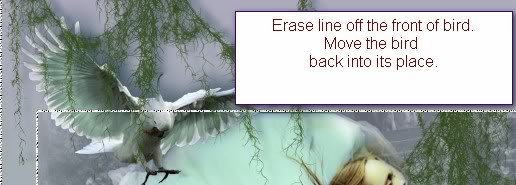
40. Pull the bird layer back up in its place above Raster 8 shadow layer.
41. Using the Text tool, select Harrington, Size 48 Pixels, color/switch zilverbeads to bottom (Background). Write Soft Whispers.

42. Convert to Raster Layer.
43. Move into position in upper right corner.
44. Effects/3-D Effects/Drop Shadow, Vertical -5, Horizonal 13, Opacity 100, Blur 12, Shadow on New Layer checked, color #30475a.
45. Go back to top layer (Raster 9.) Effects/Edge Effects/Enhance.
46. Sign your name; Convet to Raster Layer.
47. Close off Layers 4, 5 and 9. (These three are the lines, separateur and text and will have sparkles applied to them.)
48. Highlight bottom layer. Merge/Merge Visible. Rename this layer Background.
49. Copy. Open Animation Shop. Paste as New Animation in workspace of AS. Edit/Duplicate twice, having 3 frames in all.
50. Back to PSP. Close off Background layer.
51. Open all layers except Background layer. Merge/Merge Visible.
52. Duplicate twice, having 3 layers in all.
53. Close off the bottom two Merged layers, having the top layer opened and highlighted.
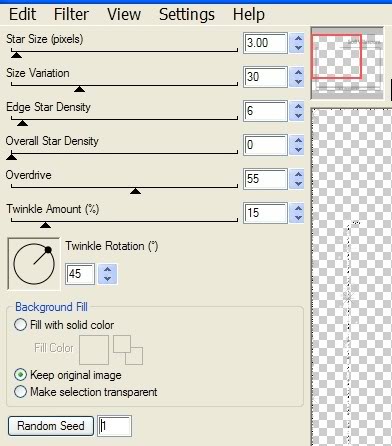
54. Effects/AlienSkin Xenofex2/Constellation. Use settings as seen below.
55. Close off the top layer, open and highlight the middle Merged layer. Effects/AlienSkin Xenofex2/Constellation. Click Random Seed one time. Apply.
56. Close off middle Merged layer, open and highlight bottom Merged layer. Apply the Random Seed like you did in the step above.
57. Open all the Merged layers.
58. File/SaveAs/PSP Animation Shop (*psp) file. Name it Constellation Animation.
59. Working in Animation Shop, File/Open Constellation Animation. Highlight the FIRST frame/Edit/Select All. Copy.
60. Go to the FIRST frame of the Background image and highlight it. Edit/Select All.
61. Right click INSIDE the FIRST frame of the Background image, Paste/Into Selected Frame, setting the Constellation Animation right where you want it, left click to set in place.
62. Click on the Animation button, check to see that your animated tutorial tag is just as you would like it. If not, click the Back arrow and repeat the Paste/Into Selected Frame till it is to your liking.
63. Now to save your work. File/Save As and your Save As box pops up. Name the animation file Soft Whispers, choose the Soft Whispers folder and click Save. Your Animation box pops up. Click Next 3 times as it prompts you and click Finish. Your image should be saved in your folder, and you are done.
Congratulations on working an animated tutorial!
A big thank you to PamelaD for testing this tutorial for me.
If you are going to use this tutorial for stationery, cards or place the tutorial/tag on another site, I would appreciate you contacting me for permission, giving Arasimages credit for the original tutorial and if possible, a link back to my site. Thank you.
Copyright © Arasimages All Rights Reserved