
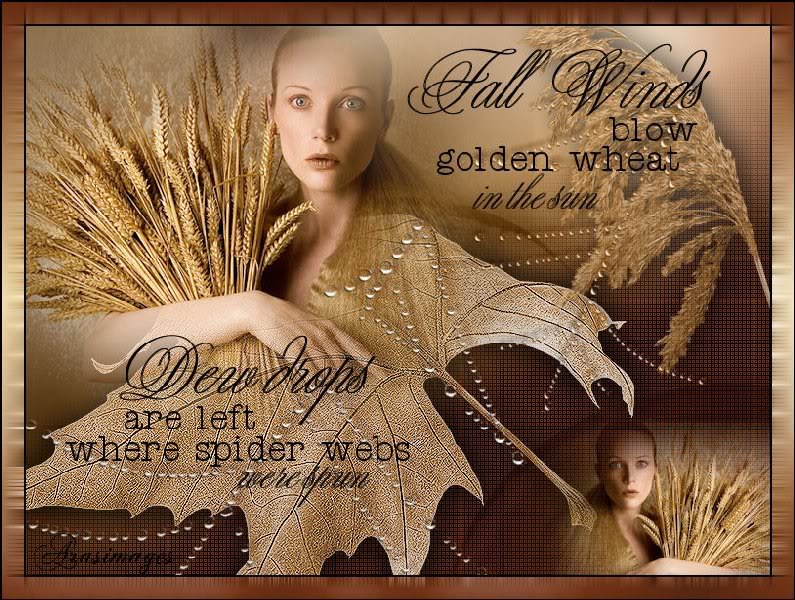
Fall Winds And Dew Drops
For Italian, Danish and Portuguese translation, click on the flags.


For this tutorial you will need the materials in the zip file below.

Credit is given for materials used when original author is known. Tubes used in this tutorial are from Patries, JHanna, Marif, HJR Designs and corinne.vicaire. Thank you tubers for your beautiful work and permission to use. Please visit the tuber sites listed on my Links page. You will also find many more tubes in my all-free Tubes section.
Use the bookmark below to mark your place along the way.

Unzip the materials into a working folder. Open the materials in PSP, copy and close originals. You will need the plugin Filters DC Layer, Mehdi and Screenworks for this tutorial. You may open and minimize the fonts included in materials instead of putting it in your PSP/Fonts folder. They will show up in PSP. Put the 20-20 Mask in your PSP/Masks folder. I have used PSPX3 to create this tutorial but you may use an earlier version. It is assumed you have a working knowledge of PSP to do this tutorial but beginners may not find it hard to do.
1. Create a New Image 762px by 562px, transparent. Selections/Select All.
2. In Materials Palette, set Foreground to color #eace8a, Background to color #6f2f13.
3. Open Mist corinne.vicaire-femme 02 26.02.11.pspimage. Copy bottom layer, Group Raster 1.
4. Paste into Selection. Selections/Select None.
5. Layers/New Raster Layer.
6. Flood fill with Background color #6f2f13.
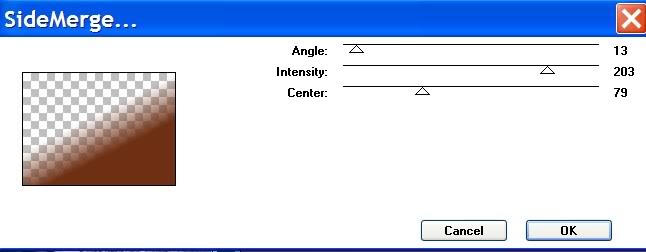
7. Effects/DC Layer/Side Merge.
8. Effects/Screenworks/Boxed Dot. Use default settings.
9. Open Marif_2007_08Aout_decor09.pspimage. Copy/Paste as New Layer.
10. Move into bottom right corner. Blend Mode to Luminance (Legacy), Opacity to 40.
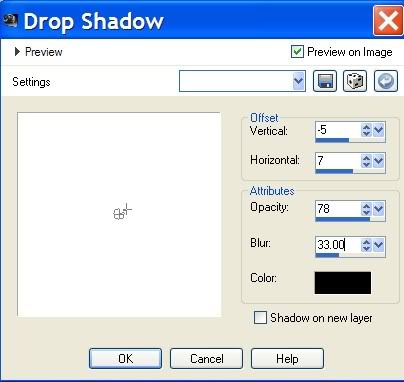
11. Effects/3-D Effects/Drop Shadow, Vertical -5, Horizontal 7, Opacity 78, Blur 33, color #000000.
12. Using your Eraser tool, erase the vertical lines off the left bulb's center.
13. Open HJR_AutumnLeaf001_03Nov2007.pspimage. Copy/Paste as New Layer.
14. Move toward lower left of image.
15. Effects/Edge Effects/Enhance.
16. Lower Opacity to 81.
17. Adjust/Sharpness/Sharpen.
18. Effects/3-D Effects/Drop Shadow/Vertical -5, Horizontal 7, Opacity 78, Blur 33, color #000000.
19. Effects/3-D Effects/Drop Shadow/Vertical 5, Horizontal -7, Opacity 78, Blur 33, color #000000.
20. Open Mist corinne.vicaire-femme 02 26.02.11.pspimage. Copy middle layer (Fusionne')/Paste as New Layer.
21. Image/Resize/Resize by 80%, Resize all layers unchecked.
22. Image/Mirror.
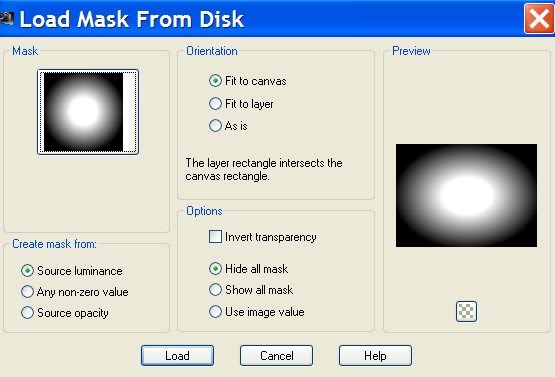
23. Layers/Load/Save Mask/Load Mask from Disk. Load.
24. In Layers Palette, Merge/Merge Group.
25. Move woman and wheat upward in center area of image.
26. Adjust/Sharpness/Sharpen.
27. Duplicate merged woman layer. Image/Mirror.
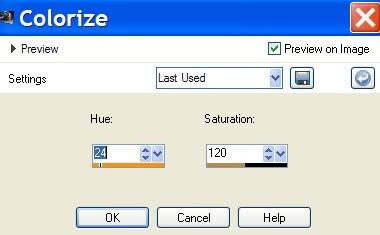
28. Image/Resize/Resize by 50%/Resize all layers unchecked.
29. Move resized woman into bottom right corner inside the bulb dome.
30. Open 1Patries_Riet-zootrotters_02-03-08.pspimage. Copy/Paste as New Layer.
31. Image/Resize/Resize by 80%/Resize all layers unchecked.
32. Image/Mirror. Place in upper right corner area.
33. Adjust/Hue & Saturation/Colorize. Use Hue of 24, Saturation of 120.
34. Layers/Opacity lower to 68.
35. Adjust/Sharpness/Sharpen.
36. Effects/3-D Effects/Drop Shadow/Vertical -5, Horizontal 7, Opacity 78, Blur 33, color #000000.
37. Open Sier les.PspTube. (Dew drops) Copy/Paste as New Layer.
38. Set Blend Mode to Luminance (Legacy).
39. Effects/3-D Effects/Drop Shadow, Vertical -5, Horizontal 7, Opacity 78, Blur 10, color #000000.
40. Image/Resize/Resize by 80%/Resize all layers unchecked.
41. Move dew drops to upper right side of image over grass clump so they drape downward.
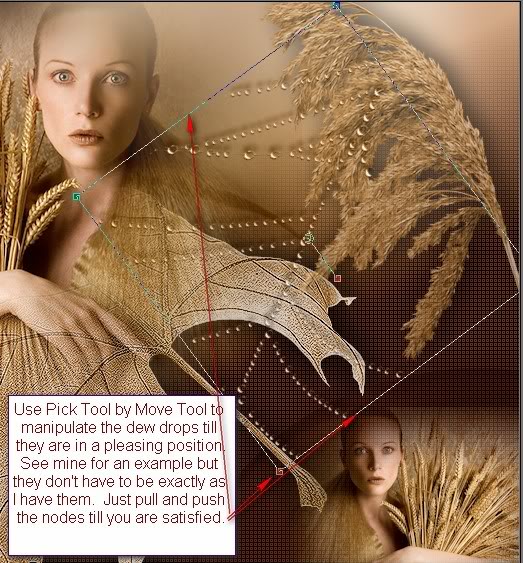
42. Using Pick tool nodes, Mode set to Free (Shift), push and pull till your dew drops look similar in place to mine. They do not have to be exact. (Older versions of PSP use Deformation tool.)

43. Paste as New Layer once again. Image/Mirror.
44. Blend Mode set to Luminance (Legacy).
45. Effects/Edge Effects/Enhance.
46. Effects/3-D Effects/Drop Shadow, Vertical -5, Horizontal 7, Opacity 78, Blur 10, color #622910.
47. Using Pick tool and nodes, Mode set to Free (Shift), push and pull till your dew drops are pleasing to you over the larger lady and leaf. Use Move tool to place.
48. Using the Eraser tool, erase any dew drops off the woman's skin on both layers of dew drops. (Optional: Erase extra dew drops at ends of lines if you wish...check my finished tag for an example).
49. Using Text tool, choose Font Young Love ES, size 100, Bold, color #000000, type the words "Fall Winds". Convert to Raster Layer. Move into place.

50. Using Text tool, choose Font Teletype, Size 36, color #000000, type the word "blow". Then type the words "golden wheat". Convert to Raster Layer after typing each set of words. Use Move tool to set into place.

51. Using Text tool, choose Font Young Love ES, size 60, Bold, color #000000, type the words "in the sun". Convert to Raster Layer. Move into place.

52. Using Text tool, choose Font Young Love ES, size 100, Bold, color #000000, type the words "Dew drops". Convert to Raster Layer. Move into place.
53. Using Text tool, choose Font Teletype, Size 36, color #000000, type the words "are left". Convert to Raster Layer. Move into place.
54. Repeat Step 53, type changing words to be "where spider webs".
55. Repeat Step 51, type changing words to be "were spun".
56. Image/Add Borders/2px border, color #000000, Symmetric checked.
57. Image/Add Borders/22px border, color #eace8a, Symmetric checked.
58. Click on 22px border with Magic Wand to activate it.
59. In Materials Palette, create a gradient from the Foreground #eace8a and Background #6f2f13, Linear, Angle 0, Repeats 1, Invert checked.
60. Flood fill 22px border with Gradient.
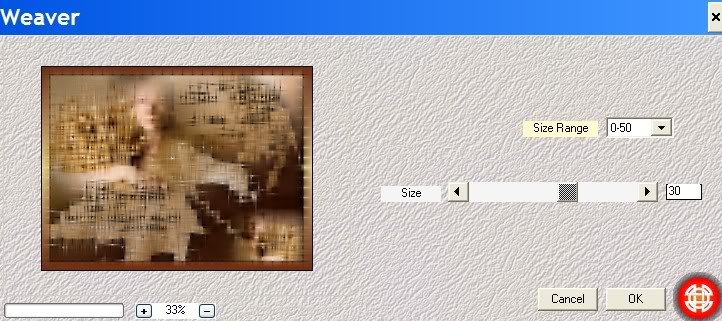
61. Effects/Mehdi/Weaver. Use settings below.
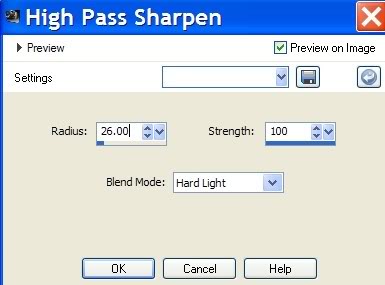
62. Adjust/Sharpness/High Pass Sharpen. Selections/Select None.
63. Image/Add Borders/2px border, color #000000, Symmetric checked.
64. Sign your name or leave your watermark. Convert to Raster Layer.
65. Merge/Merge Visible. Save as .jpg file.
Thank you for working this tutorial. I hope you enjoyed it; come back again soon for another one.
Big hugs for you dear PamelaD for your faithful checking of my written tutorials.
If you are going to use this tutorial for stationery, cards or place the tutorial/tag on another site, I would appreciate you contacting me for permission, giving Arasimages credit for the original tutorial and if possible, a link back to my site. Thank you.
Copyright © Arasimages All Rights Reserved