
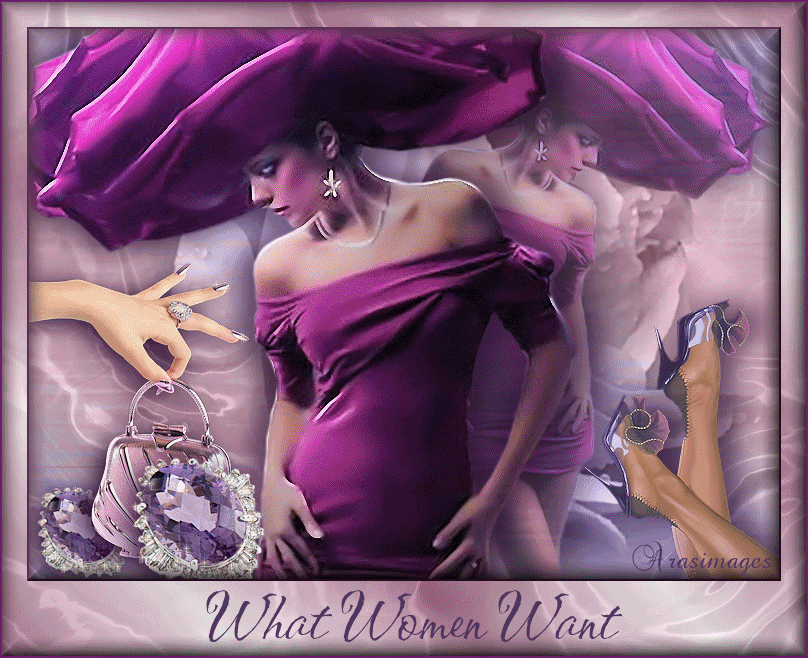
What Women Want
For Italian and Danish translation, click on the flags.


For this tutorial you will need the materials in the zip file below.

Credit is given for materials used when original author is known. Tubes used in this tutorial are from Pascale, Macha, Alejandra Rosales and Sorensen_Designs. Thank you tubers for your beautiful work and permission to use. Please visit the tuber sites listed on my Links page. You will also find many more tubes in my all-free Tubes section.
Use the bookmark below to mark your place along the way.

Unzip the materials into a working folder. Open the materials in PSP, copy and close originals. Place the gh_Texture_05 into your PSP Texture Folder. Place the Landscape Night Gradient in your PSP Gradient folder. Export the White Star PSP tube into your PSP Picture Tubes. You will need the plugins Filter Forge 2 and Xero for this tutorial. I have used PSPX3 to create this tutorial but you may use an earlier version. It is assumed you have a working knowledge of PSP to do this tutorial.
1. Create a New Image 750px by 550px, transparent.
2. In Materials Palette, set Foreground to Landscape night Gradient, Background to color #70206b.
3. Set the Gradient to Style Linear, Angle at 45, Repeats at 3, Invert unchecked.
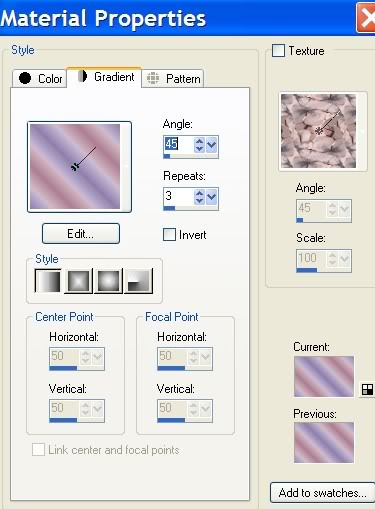
4. Flood fill the transparent image with the Gradient.
5. Adjust/Blur/Gaussian Blur, Radius at 27.
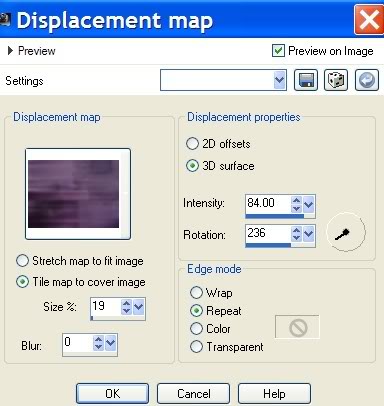
6. Effects/Distortion/Displacement Maps. Use settings as seen below.
7. Effects/Edge Effects/Enhance.
8. Layers/New Raster Layer.
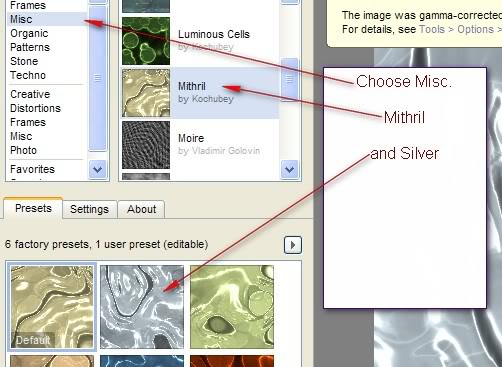
9. Effects/Filter Forge 2. Use settings as seen below.
10. Set Blend Mode to Luminance (L), Opacity at 46.
11. Open Sorensen_Designs Mist Sept 139-11.pspimage. Copy/Paste as New Layer.
12. Set Blend Mode to Luminanace (L).
13. Open Macha_050811_femmemauve.pspimage.Copy/Paste as New Layer.
14. Image/Mirror.
15. Image/Resize/Resize by 70%, Resize all layers unchecked.
16. Move lady over toward the right side of image.
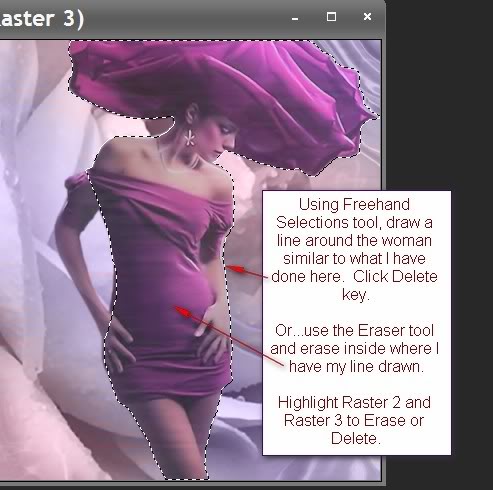
17. Using the Selections/Freehand Selections tool or the Eraser tool, you will now erase the bleed-through layers off woman (see directions in next step, settings below).

18. If using Freehand Selections, draw around woman having Rasters 2 highlighted. Press Delete key. Go to Raster 3, highlight and press Delete key. Deselect. If using the Eraser tool, highlight each Raster as above and erase the shadows off woman.
19. Now go back to top layer (Raster 4) to continue.
20. Effects/Xero/Porcelain. Use Default settings. Drop Opacity to 70.
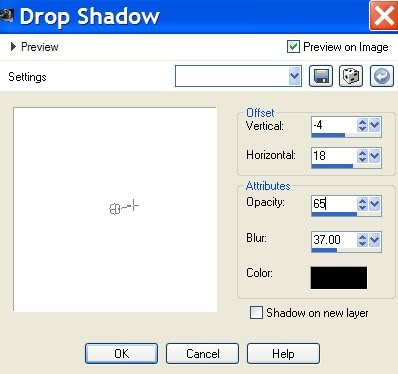
21. Effects/3-D Effects/Drop Shadow/Vertical -4, Horizonal 18, Opacity 65, Blur 37, color #2b0d31.
22. Open Macha_050811_femmemauve.pspimage again. Copy/Paste as New Layer.
23. Move woman to left of first woman.
24. Effects/3-D Effects/Drop Shadow/Vertical -4, Horizonal 18, Opacity 65, Blur 37, color #2b0d31.
25. Effects/3-D Effects/Drop Shadow/Vertical 4, Horizonal -18, Opacity 65, Blur 37, color #2b0d31.
26. Adjust/Sharpness/Sharpen.
27. Open kjb_ black_mules.pspimage. Copy/Paste as New Layer.
28. Image/Resize/Resize by 70%, Resize all layers unchecked.
29. Image/Mirror. Move legs and shoes to bottom right corner.
30. Adjust/Sharpness/Sharpen.
31. Effects/3-D Effects/Drop Shadow/Vertical -4, Horizonal 18, Opacity 65, Blur 37, color #2b0d31.
32. Open Pascale_180711_DesignBag&Hand.pspimage. Copy/Paste as New Layer.
33. Image/Resize/Resize by 40%, Resize all layers unchecked.
34. Image/Mirror.
35. Move purse to left side of image, toward bottom.
36. Effects/3D Effects/Drop Shadow/Vertical 4, Horizontal -8, Opacity 65, Blur 37, color #2b0d31.
37. Adjust/Sharpness/Sharpen.
38. Open 3010-jewelring17 R Alejandra RosalesUT-13-07-11.pspimage. Copy/Paste as New Layer.
39. Using Freehand Selections Tool, draw around the band of the ring, press Delete key, deselect. Or...use Eraser tool to erase band.
40. Image/Resize/Resize by 40%, Resize all layers unchecked.
41. Move jewelring to left, placing over right side of purse.
42. Effects/3D Effects/Drop Shadow/Vertical 4, Horizontal -8, Opacity 100, Blur 37, color #2b0d31.
43. Layers/Duplicate.
44. Image/Resize/Resize by 70%, Resize all layers unchecked.
45. Move this layer below purse layer (Raster 7). Place in bottom left corner.
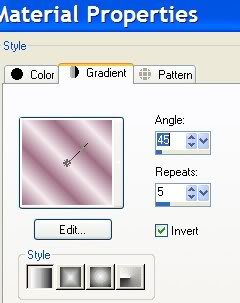
46. Image/Add Borders/Add 2px border, Symmetric checked, color #70206b.
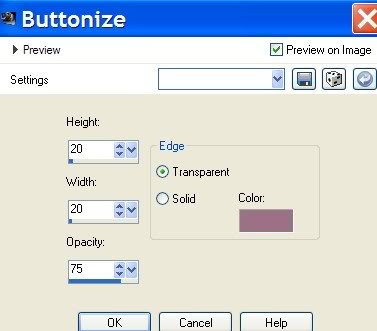
47. Effects/3D Effects/Buttonize, color #9f6985. Use settings below.
48. Image/Add Borders/Add 25px border to top, both sides, 75px bottom, Symmetric unchecked, color #ffffff.
49. Using Magic Wand, select inside large border.
50. In Materials Palette, change Foreground to #f4ebee, Background to #9f6985.
51. Create Gradient using Style Linear, Angle 45, Repeats 5, Invert checked.
52. Flood fill the large border with Gradient. Keep activated.
53. Effects/3D Effects/Buttonize, color #9f6985. Use settings in Step #47.
54. Layers/New Layer. Repeat Steps #9 and #10 using settings shown.
55. Repeat Step #53 to Buttonize. Selections/Select None.
56. Change Background color to #4d3660. Using Text tool, select CAC Shishoni Brush, Size 72 and Background color, type "What Women Want".

57. Convert to Raster Layer. Center in bottom border.
58. Effects/3D Effects/Drop Shadow/Vertical 4, Horizontal -8, Opacity 100, Blur 37, color #f4ebee.
59. Image/Add Borders/Add 2px border, Symmetric checked, color #70206b.
60. Sign your work. Merge/Merge Visible if there is more than one layer.
61. We will now put the animated sparkles on the appropriate places. (OPTIONAL)
62. Duplicate the finished image three times, having 4 layers in all. Close off all layers except the top layer.
63. Activate the Tube tool, choose "White Star". Settings as shown below.

64. On the top layer, randomly click the first stars with Scale at 45. Not too many as these are the larger stars.
65. Close off top layer. Move down to next layer, highlight it.
66. Set Scale at 35 and randomly click the places you want to sparkle on the woman's ring and the jewelring.
67. Close off this layer. Move down to next layer, highlight it.
68. Set Scale at 25 and again randomly click the places you want to sparkle.
69. Close off this layer. Move down to bottom layer, highlight it.
70. Set Scale at 15 and again randomly click the places you want to sparkle...you might wish to do more of these than the others as they are smaller.
71. Open all layers. File/Save As/save as PSP Animation Shop (*psp) image, naming it What Women Want.
72. Open Animation Shop. File/Open file What Women Want. Check it by clicking on the Animation button at the top. If your sparkles are going too fast to suit you, Edit/Select All/click the Animation/Frame Properties and change from 10 to 13. If all is working as you wish, then you are ready to save the animated image.
73. File/Save As/Save as .gif image. When the box comes up, it will allow you to give your work a name, direct where to save it and save as a .gif image. Save. Click Next, Next, Next, Finish. Congratulations! You have now completed a long animated tutorial.
Big hugs for PamelaD and Evatexas for their faithful checking of my written tutorials.
If you are going to use this tutorial for stationery, cards or place the tutorial/tag on another site, I would appreciate you contacting me for permission, giving Arasimages credit for the original tutorial and if possible, a link back to my site. Thank you.
Copyright © Arasimages All Rights Reserved