
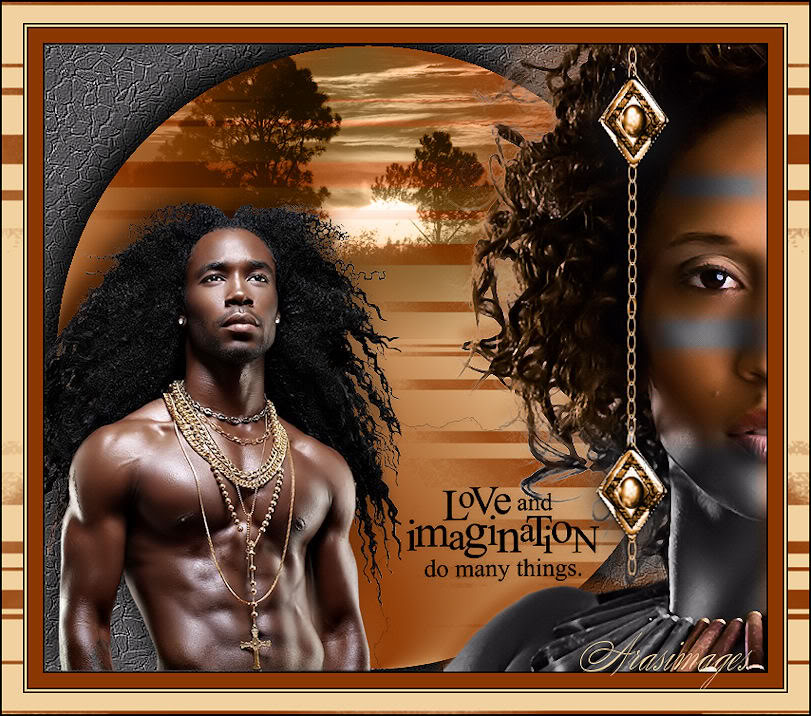
Love and Imagination
For Italian, Danish and German translation, click on the flags.
For this tutorial you will need the materials in the zip file below.
Credit is given for materials used when original author/tuber is known. Tubes used in this tutorial are from Corinne.Vicaire, Macha, and Arasimages. The Grunge lines are from DieheArt. Export the love.gif into your PSP brushes folder. Place Small stones.bmp in the PSP/Textures folder. Thank you tubers for your beautiful work and permission to use. Please visit the tuber sites listed on my Links page. You will also find many more tubes in my all-free Tubes section.
Use the bookmark below to mark your place along the way.

Unzip the materials into a working folder. Open the materials in PSP, copy and close originals. You will need the no plugins for this tutorial. I have used PSPX3 to create this tutorial but you may use an earlier version. It is assumed you have a working knowledge of PSP to do this tutorial.
1. Create a New Image 760px by 660px, transparent. Flood fill with color #716f71.
2. Effects/Texture Effects/Texture. Choose the texture small stones. Use color #c0c0c0.
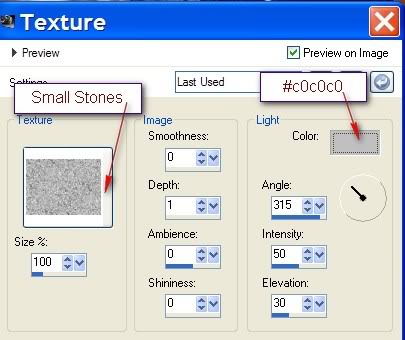
3. Effects/Edge Effects/Enhance. Close off this layer.
4. Layers/New Raster Layer.
5. In Materials Palette, set Foreground to #f1d19f, Background to color #8b3702.
6. Set the Gradient to Style Linear, Angle at 45, Repeats at 2, Invert unchecked.
7. Flood fill the New Raster layer with the Gradient.
8. Adjust/Blur/Gaussian Blur setting Radius to 30.
9. Effects/Geometric Effects/Circle set to transparent.
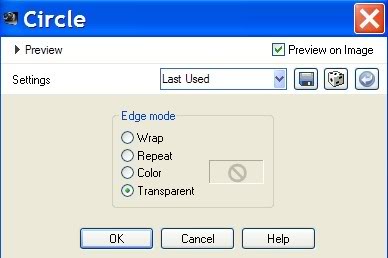
10. Selections/Select All. Selections/Float/Defloat.
11. Layers/New Raster Layer.
12. Flood fill with Background color #8b3702.
13. Open Grunge_Lines_Brushes_Part_1_by_DieheArt_28_.png.
14. Highlight working image. Layers/New Mask Layer/From Image. Choose the Grunge_Lines_Brushes from drop down. Click OK.
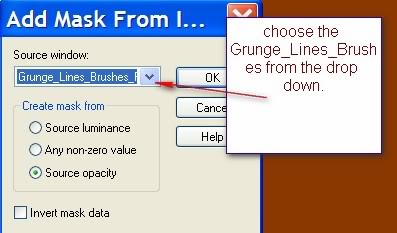
15. Layers/Merge/Merge Group.
16. Open middle layer of Sunrise5E.pspimage. Copy/Paste as New Layer.
17. Move sunrise image upward about half way. Blend Mode set to Luminance (Legacy).
18. Selections/Invert. Click Delete key. Selections/Invert again.
19. Effects/3D-Effects/Drop Shadow, Vertical -11, Horizontal -11, Opacity 100, Blur 54, color #000000.
20. Effects/3D-Effects/Drop Shadow, Vertical 11, Horizontal 11, Opacity 100, Blur 54, color #000000.
21. Selections/Select None. Merge/Merge Visible.
22. Move the circle over toward the left a little. Open bottom layer (Raster 1).
23. Open Tube corinne.vicaire-homme 01 23.02.11.pspimage. Copy/Paste as New Layer.
24. Image/Resize/Resize by 62%, Resize all layers unchecked.
25. Move man to left bottom corner.
26. Effects/3D-Effects/Drop Shadow, Vertical -11, Horizontal -11, Opacity 50, Blur 26, color #000000.
27. Open Macha_0410_bicolore.pspimage. Copy/Paste as New Layer.
28. Move woman over to right side of image, leaving left half showing.
29. Image/3D Effects/Drop Shadow, Vertical -13, Horizontal 2, Opacity 50, Blur 16, color #8b3702.
30. Open P@t_bj_et.pspimage. Copy/Paste as New Layer.
31. Adjust/Hue and Saturation/Colorize. Hue set to 24, Saturation to 196.
32. Image/Resize/Resize by 85%, Resize all layers unchecked.
33. Move so the top of the chain is touching the upper border of image. Place near woman's face.
34. Adjust/Sharpness/High Pass Sharpen.
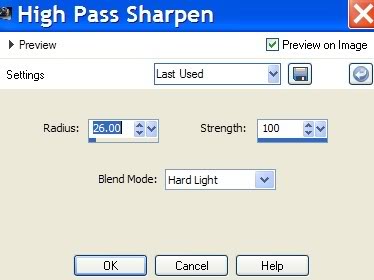
35. In Materials Palette, change Background color to #000000.
36. Layers/New Raster Layer.
37. From Tool bar, select Brush tool. Find Love.gif brush. Stamp between man and woman as I have done.

38. Image/Add Borders/2px border, Symmetric checked, color #000000.
39. Image/Add Borders/15px border, Symmetric checked, color #8b3702.
40. Image/Add Borders/2px border, Symmetric checked, color #000000.
41. Image/Add Borders/2px border, Symmetric checked, color #f1d19f.
42. Image/Add Borders/2px border, Symmetric checked, color #000000.
43. Image/Add Borders/22px border, Symmetric checked, color #f1d19f.
44. Using Magic Wand, activate the 22px border by clicking in it.
45. Layers/New Raster Layer. Flood fill with color #8b3702.
46. Open the Grunge_Lines_Brushes_Part_1_by_DieheArt_28_.png.
47. Highlight your working image. Layers/New Mask Layer/From Image. Choose the Grunge_Lines_Brushes from drop down. Click OK.
48. Layers/Merge/Merge Group.
49. Layers/Duplicate. Image/Mirror. Selections/Select None.
50. Image/Add Borders/2px border, Symmetric checked, color #000000.
51. Sign/stamp your name or leave your watermark.
52. Image/Resize/Resize by 95%, Resize all layers checked.
53. Adjust/Sharpness/Sharpen.
FINISHED!
Big hugs to PamelaD and Evatexas for their faithful checking of my written tutorials.
If you are going to use this tutorial for stationery, cards or place the tutorial/tag on another site, I would appreciate you contacting me for permission, giving Arasimages credit for the original tutorial and if possible, a link back to my site. Thank you.
Copyright © Arasimages All Rights Reserved


