
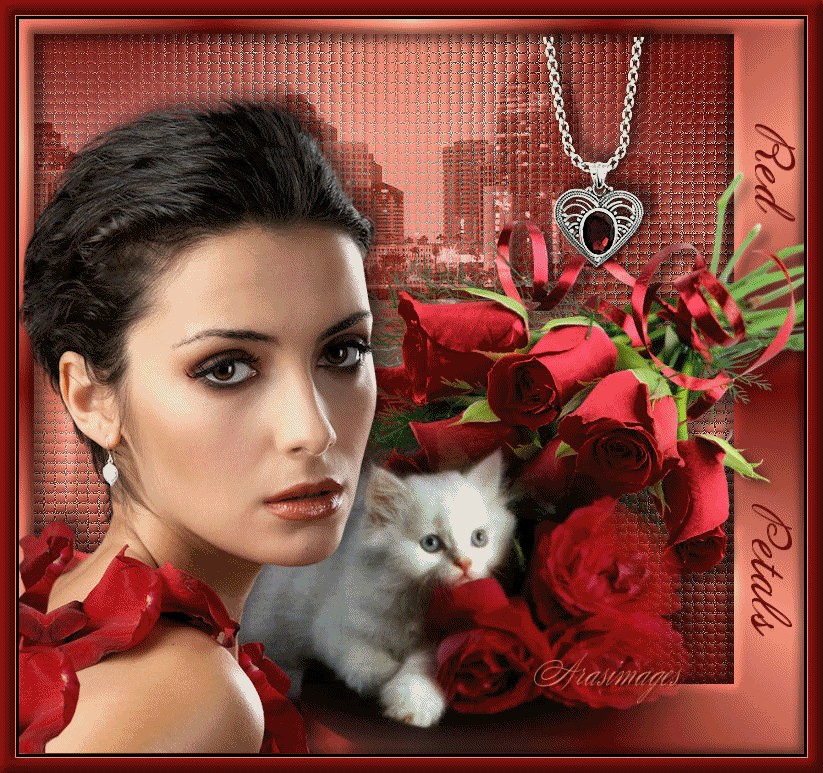
Red Petals
For Italian, Danish, German and French translation, click on the flags.


For this tutorial you will need the materials in the zip file below.

Credit is given for materials used when original author/tuber is known. Tubes used in this tutorial are from Misssilly, Anna.br, and Arasimages. Thank you tubers for your beautiful work and permission to use. Please visit the tuber sites listed on my Links page. You will also find many more tubes in my all-free Tubes section.
Use the bookmark below to mark your place along the way.

Unzip the materials into a working folder. Open the materials in PSP, copy and close originals. You will need the no plugins for this tutorial. Open the Font AnnabelleJF and minimize it; it will show up in your PSP Font list so you will not have to install it in your Fonts folder. I have used PSPX3 to create this tutorial but you may use an earlier version. It is assumed you have a working knowledge of PSP to do this tutorial.
1. In Materials Palette, set Foreground color to #f09279, Background color to #650d09.
2. Create a Gradient by setting Style to Radial, Repeats 7, Angle 0, Invert unchecked.
3. Create a New Image 700px by 650px, transparent. Flood fill with Gradient.
4. Adjust/Blur/Gaussian blur, Radius set to 30.
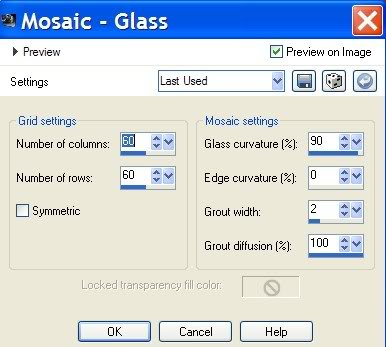
5. Effects/Texture/Mosiac-Glass. Use settings below.
6. Effects/Edge Effects/Enhance.
7. Open san_diego_skyline2 Courtesy PDPhoto.org.pspimage. Copy/Paste as New Layer.
8. Move skyline up and towards the right.
9. Set Blend Mode to Luminance (Legacy). Lower Opacity to 76%.
10. Duplicate/Move duplicated image to left so the buildings overlap.
11. Merge/Merge Visible.
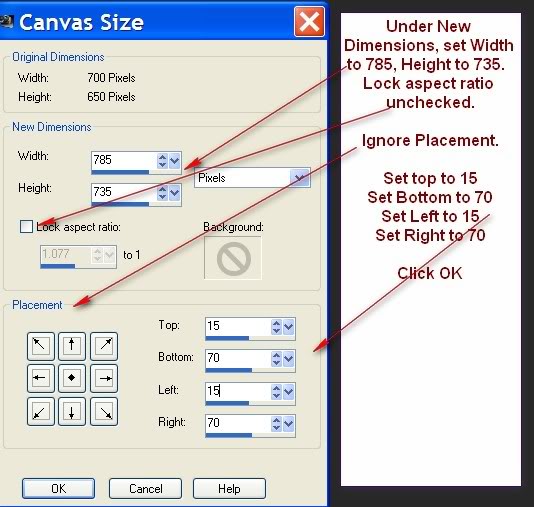
12. Image/Canvas_Size. Use settings as seen below. Follow directions on the snapshot.
13. In Materials Palette, change Radial Gradient Repeats to 11.
14. Using Magic Wand, click within the transparent border.
15. Layers/New Raster Layer. Flood fill with new Gradient.
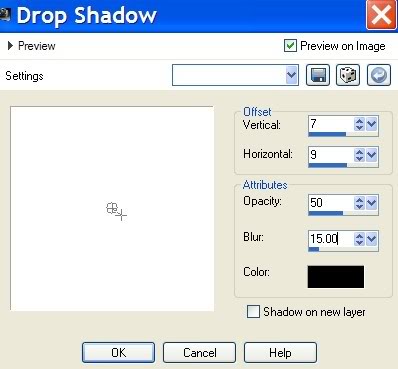
16. Effects/3D-Effects/Drop Shadow, Vertical 7, Horizontal 9, Opacity 50, Blur 15, color #000000.
17. Effects/3D-Effects/Drop Shadow, Vertical -7, Horizontal -9, Opacity 50, Blur 15, color #000000.
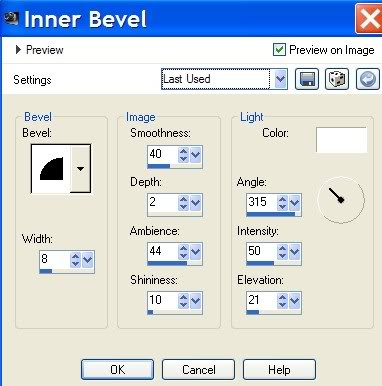
18. Effects/Inner Bevel. Use settings as seen below.
19. Selections/Select None.
20. Open RedBouquet.pspimage recolored layer. Copy/Paste as New Layer. Move roses to right side of image.
21. Effects/3D-Effects/Drop Shadow, Vertical 7, Horizontal 9, Opacity 50, Blur 15, color #000000.
22. Open Misssilly-Kitten-Feb2008.pspimage. Copy/Paste as New Layer.
23. Move kitty and roses to bottom. Duplicate/Merge/Merge Down.
24. Open anna.br-1174_petalsas.pspimage. Copy/Paste as New Layer.
25. Image/Resize/Resize by 84%, Resize all layers unchecked.
26. Move woman to left bottom corner.
27. Effects/3D-Effects/Drop Shadow, Vertical -9, Horizontal 9, Opacity 50, Blur 24, color #000000.
28. Open Pendant6.pspimage. Highlight chain layer. Copy/Paste as New Layer.
29. Image/Resize/Resize by 55%, Resize all layers unchecked.
30. Highlight Pendant6 heart layer. Copy/Paste as New Layer.
31. Image/Resize/Resize by 55%, Resize all layers unchecked.
32. Move both chain and heart into place at top right side of image. Merge/Merge Down.
33. Adjust/Sharpness/Sharpen.
34. Effects/3D-Effects/Drop Shadow, Vertical -9, Horizontal 9, Opacity 50, Blur 15, color #000000.
35. Using the Text tool, find Font AnnabelleJF. Size to 48, color #650d09. (See snapshot below).

36. Write "Red". Using the nodes, turn the word "Red" so it aligns vertically. Move to top right border.
37. Convert to Raster Layer.
38. Write the word "Petals". Using the nodes, turn the word "Petals" so it aligns vertically. Move to bottom right border.
39. Convert to Raster Layer.
40. Sign your name or leave watermark. If doing so leaves a Vector layer, Convert to Raster Layer.
41. Image/Add Borders/Add 3px border with color #000000, Symmetric checked.
42. Image/Add Borders/Add 1px border with color #f09279, Symmetric checked.
43. Image/Add Borders/Add 15px border with color #650d09, Symmetric checked.
44. Using Magic Wand, select the 15px border.
45. Effects/Inner Bevel. Use settings as seen in Step #18.
46. Selections/Select None.
47. Save as JPG file in your working folder as Red Petals.
IF YOU WISH TO MAKE THE EYES BLINK ON EITHER THE KITTY OR LADY OR BOTH, FOLLOW THE INSTRUCTIONS BELOW.
1. In PSP, duplicate your finished Red Petals tag three times, having four layers in all.
2. Rename the layers from the bottom upward: Original, Kitty blink, Original 2, Lady blink.

3. Close off top layer and layer beneath it. (Lady layer and Original 2).
4. Highlight Kitty Layer. Using the Push tool from tool bar, set to settings below, using short strokes, gently push till the eye is covered. Do each eye in this manner until you are satisfied. Close off this layer.


5. Open and activate top lady layer. Using the Push tool again, using settings below, using small short strokes, push the dark eyeshadow until her eyes are covered as if they were closed.

6. You can click on the eye (open and close) by the layer to see the eyes blink. Once you are satisfied, open all layers, save as PSP Animation Shop(*psp) file in your working folder.
7. Open Animation Shop. File/Open/go to the file you just saved and open it in Animation Shop.
8. Click Frame 1 and set Animation/Frame Properties/Display time to 250.
9. Click Frame 3 and set Animation/Frame Properties/Display time to 175.
10. Click Frame 4 and set Animation/Frame Properties/Display time to 15.
11. Check the animation by clicking on the View Animation button at the top. If all is to your liking, File/Save As/. When the box comes up give your work its name, type where to save it (your working folder), and Save. As the box changes, click Next, Next, Next, Finish.
12. Your animated tag is now finished and saved as a .gif file in your working folder.
Congratulations! This was a complicated tutorial and I hope you have enjoyed learning something new or simply working the tutorial.
Big hugs to PamelaD and Evatexas for their faithful checking of my written tutorials, and to PamelaD for assisting me in creating the animation.
If you are going to use this tutorial for stationery, cards or place the tutorial/tag on another site, I would appreciate you contacting me for permission, giving Arasimages credit for the original tutorial and if possible, a link back to my site. Thank you.
Copyright © Arasimages All Rights Reserved