
Winter Flight
For Italian, Danish and French translation, click on the flags.


For this tutorial you will need the materials in the zip file below.

Thanks go to Charlieonline; to Nikita; Tinnad and Monique for the beautiful tubes used. Please visit the tuber sites listed on my Links page.
Use the bookmark below to mark your place along the way.
Unzip the materials into a working folder. Open the materials in PSP, copy and close originals. You will need no plugins to do this tutorial. I have used PSPX3 to create this tutorial but you may use an earlier version. It is assumed you have a working knowledge of PSP.
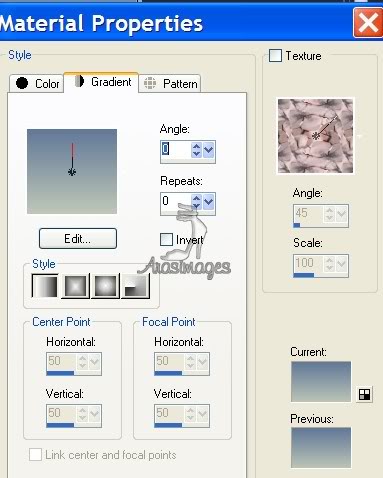
1. In Materials Palette, set Foreground to #bec7b7, Background to #617898. Under the Gradient tab, set the Style to Linear, Angle 0, Repeats 0, Invert unchecked.
2. New/New Image 762px by 670px. Flood fill with Gradient.
3. Layers/New Raster Layer. Selections/Select All.
4. Open ch-Winter-WordArt/pspimage. Copy/Raster 1 (first) layer, Paste into Selection.
5. Blend Mode set to Luminance (Legacy). Lower Opacity to 73. Selections/Select None.
6. Layers/New Raster Layer. Selections/Select All.
7. Open pine trees winter.pspimage. Copy/Paste into Selection.
8. Blend Mode set to Luminance (Legacy). Lower Opacity to 56. Selections/Select None.
9. Open tubes tinnad(6).pspimage. Copy/Paste as New Layer.
10. Image/Resize/Resize by 80%/Resize all Layers unchecked.
11. Move grasses to bottom left corner.
12. Adjust/Sharpness/Sharpen.
13. Open 12286689900_animaux.pspimage. Copy/Paste as New Layer.
14. Move swans down and centered.
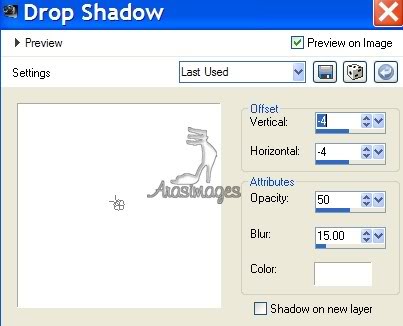
15. Effects/3D Effects/Drop Shadow/Vertical -4, Horizontal -4, Opacity 50, Blur 15, color #ffffff. Repeat this step.
16. Open Copper Alt Caps Expert.tff font. Minimize to task bar. Select the text tool, select the font, size it to 150, color #eef1f6.

17. Type "W", then change the size to 72 and type "inter" and "flight".
18. Convert to Raster Layer and move into place across the top area.
19. Layers/New Raster Layer.
20. From Tool bar, select Paint Brush tool. From drop down, choose Snowflake31 brush, set to Size 80, color #eef1f6, all other settings as seen below in example. Stamp 5 times as you see them in my finished tag or to your own liking.

21. Now select Snowflake33 brush and set to size 80, color #eef1f6 (all the other settings the same as above) stamp once in top right corner, then change size to 50, and stamp 3 more times as you see them in my finished tag or to your liking.
22. Lower Opacity to 88.
23. Effects/3D Effects/Drop Shadow/Vertical -4, Horizontal -4, Opacity 50, Blur 15, color #ffffff. (This is to keep them soft looking and not dominating the image).
24. Image/Add Borders/2px border, Symmetric checked, color #ffffff.
25. Image/Add Borders/12px border, Symmetric checked, color #dddece.
26. Image/Add Borders/2px border, Symmetric checked. Color #ffffff.
27. Image/Add Borders/22px border, Symmetric checked. Color #000000.
28. Using Magic Wand, select the 22px border to activate it.
29. Recreate the original Gradient you made in Step #1, using a Foreground color of #dddece.
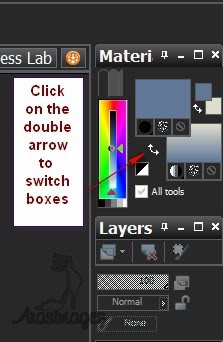
30. Using the double arrows in the Materials by the larger color boxes, click on them to flip the blue to the top, the gradient to bottom.
31. Using the Background Gradient, flood fill the activated 22px border.
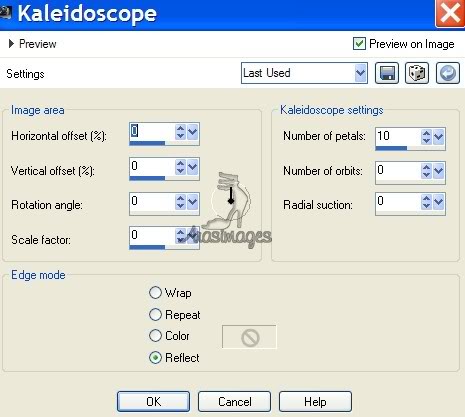
32. Effects/Reflection Effects/Kaleidascope. Use settings below.
33. Effects/Edge Effects/Enhance.
34. Effects/Distortion Effects/Pixelate. Use settings below.
![]()
35. Effects/Edge Effects/Enhance More.
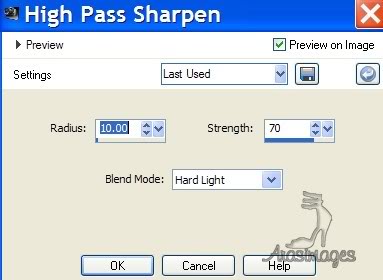
36. Adjust/Sharpness/High Pass Sharpen.
37. Image/Add Borders/2px border, Symmetric checked, color #ffffff.
38. Image/Add Borders/12px border, Symmetric checked, color #dddece.
39. Image/Add Borders/2px border, Symmetric checked, color #617898.
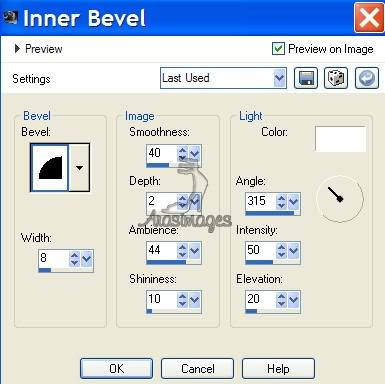
40. Effects/3D Effects/Inner Bevel, use settings below.
41. Selections/Select None.
42. Open SCR57.png. Copy/Paste as New Layer.
43. Image/Resize/Resize by 80%/Resize all layers unchecked.
44. Move ribbon into upper right corner.
45. Adjust/Sharpness/Sharpen.
46. Effects/3D Effects/Drop Shadow/Vertical -4, Horizontal -4, Opacity 50, Blur 15, color #2d3d55.
47. Sign your name, Convert to Raster Layer or place your watermark.
48. Merge/Merge Visible. Save as .jpg file named Winter Flight in your working folder.
49. Open Animation Shop. File/Open neige.gif. Highlight first frame, Edit/Select All. Copy.
50. File/Open Winter Flight .jpg file from your folder.
51. From the tool bar at the top, click Duplicate 3 times, you should have 5 frames of Winter Flight.
52. Click FIRST frame of Winter Flight, Edit/Select All.
53. Right click inside first frame, left click Paste/Paste into Selected Frame. Take the snow to the upper left corner to start, left click to paste into place. Continue pasting sections until your entire background is filled with snow, at least 14 times! Do more if you want more snow. Check your snowfall by clicking on View Animation button at the top. (Be sure you don't put snow on the frame nor the ribbon!)
54. File/Save As. A box will come up and you will name your image, state where to save it and click Save. As the box changes, keep clicking Next, Next, Next, then Finish. That is all there is to saving an animated image!
You are done! I hope you enjoyed the journey. Hugs! Ara
A big thank you to Evatexas and PamelaD who so faithfully test my tutorials for me.
If you are going to use this tutorial for stationery, cards or place the tutorial/tag on another site, I would appreciate you contacting me for permission, giving Arasimages credit for the original tutorial and if possible, a link back to my site. Thank you.
Copyright © Arasimages All Rights Reserved