

Bethlehem Birth
For Danish translation, click on the flags.

For this tutorial you will need the materials in the zip file below.

Thanks go to Sorensen_Designs to Soleil and Gwyneth for the beautiful tubes used. Please visit the tuber sites listed on my Links page.
Use the bookmark below to mark your place along the way.

Unzip the materials into a working folder. Open the materials in PSP, copy and close originals. Place the Pattern in your PSP Patterns folder. You will need the plugins Xero and Filters Unlimited to do this tutorial. I have used PSPX3 to create this tutorial but you may use an earlier version. It is assumed you have a working knowledge of PSP.
1. In Materials Palette, set Foreground to #b6c0b7, Background to #4b5157.
2. In Materials Palette, set Style to Linear, Repeats to 0, Angle to 2, Invert unchecked.

3. New/New Image Width 650px by Height 750px.
4. Selections/Select All.
5. Open FR11.png. Copy/Paste into Selection. Selections/Select None. CLOSE THIS LAYER OFF FOR NOW.
6. Layers/New Raster Layer. Selections/Select All.
7. Open Gwyneth_kit19.pspimage. Highlight Raster Layer 6. Copy/Paste into Selection.
8. Selections/Select None. Set Opacity to 68.
9. Using Gwyneth-kit19, choose Layer 10. Copy/Paste as New Layer.
10. Image/Free Rotate/Rotate 90 Degrees Left.

11. Blend Mode set to Luminance (L), Opacity to 62.
12. Effects/3D Effects/Drop Shadow/Vertical 2, Horizontal 2, Opacity 50, Blur 2, color #000000.
13. Duplicate. Move the bars to the left side of image as I have mine. Merge/Merge Down.
14. Using Selections Tool, Select the bottom half of the two bars, click delete key to leave only the top half showing. Selections/Select None.
15. Duplicate/Image/Mirror.
16. Open Sorensen_Designs Mist April 129-11.pspimage. Copy/Paste as New Layer.
17. Image/Resize/Resize by 82%, Resize all layers unchecked.
18. Pull image down almost to the bottom, centered.
19. Effects/Xero/Clarity. Use settings below.
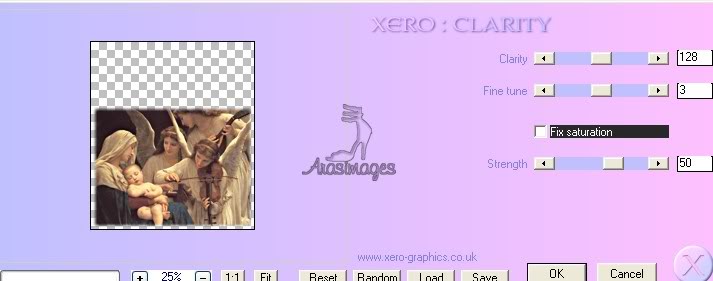
20. Adjust/Sharpness/Sharpen.
21. Open rose-blanche-ruban3-tranza-azul-Soleil-23-01-07.png. Copy/Paste as New Layer.
22. Image/Resize/Resize by 80%, Resize all layers unchecked.
23. Image/Free Rotate 90 degrees Left. Move braid to bottom of image.
24. Effects/3D Effects/Drop Shadow/Vertical -7, Horizontal -7, Opacity 57, Blur 7, Color #000000. Repeat using Vertical 7, Horizontal 7, all the rest the same.
25. Duplicate. Pull image to middle area above image of people.
26. Duplicate bottom layer of braid. Image/Flip.
27. Highlight top layer to continue.
28. Duplicate top layer. Image/Free Rotate 90 degrees Left.
29. Move the braid to the right side of image.
30. Duplicate. Image/Mirror.
31. Pay close attention to the elimination part...it could be tricky. Close off the two side vertical braids.
32. Using the Selections tool, select a narrow strip along each side of the image. See example.
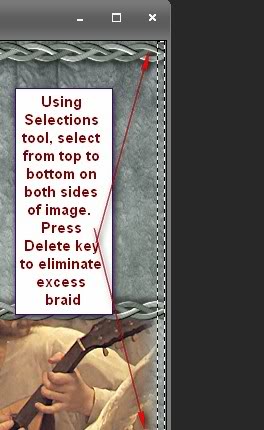
33. Highlight EACH layer of the horizontal braid (top, bottom and middle), click the Delete key on each one to eliminate the excess braid that shows behind the vertical braid on the sides. Selections/Select None.
34. Open the two side braids, and highlight the top one to continue.
35. Open Noel43.png. Copy/Paste as New Layer.
36. Image/Resize/Resize by 27%, Resize all layers unchecked.
37. Move to right top corner of image.
38. Lower Opacity to 79. Adjust/Sharpness/Sharpen.
39. Effects/3D Effects/Vertical 7, Horizontal 7, Opacity 57, Blur 7, color #000000.
40. Duplicate. Image/Mirror.
41. Merge/Merge Visible.
42. COPY MERGED LAYER.
43. Effects/Filters Unlimited/Distortion Filters/Smelter 1.

44. Blend Mode set to Luminance (L), Opacity to 24.
45. Open bottom layer, Raster 1.
46. Activate top layer. Paste as New Layer (Merged copy).
47. Image/Resize/Resize by 80%, Resize all layers unchecked.
48. Adjust/Sharpness/Sharpen.
49. Effects/3D Effects/Vertical 7, Horizontal 7, Opacity 57, Blur 7, color #000000.
50. Effects/3D Effects/Vertical -7, Horizontal -7, Opacity 57, Blur 7, color #000000.
51. Open rose-blanche-ruban3-Soleil-23-01-07.png. Using Selections tool, select around 5 of the ornate images on the right side of tube. I started from bottom up as the top one is missing a little bit at the end.
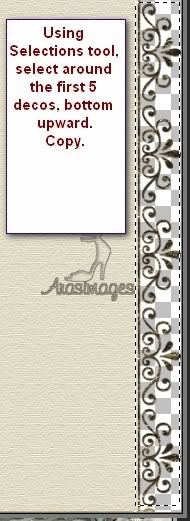
52. Copy/Paste as New Layer on main image.
53. Image/Resize/Resize by 77%, Resize all Layers unchecked.
54. Using Eraser tool, carefully erase excess bar on each end so only the ornate part shows.

55. Pull beneath the layer below (Raster 2). Move into place on the right side so both ends are even.
56. Effects/3D Effects/Drop Shadow Vertical 7, Horizontal 7, Opacity 57, Blur 7, color #000000.
57. Adjust/Sharpness/Sharpen. Duplicate/Image/Mirror.
58. Duplicate. Image/Free Rotate at 90 degrees, Left. Pull down to bottom of image. Set into place nicely. Using Eraser tool, carefully erase excess bar ( leaving four decos).
60. Duplicate. Image/Flip.
61. You may use the text file in materials or Activate Text tool and do your own. Choose Font Cataneo BT (TT0952M_.TTF), Size 30, color #f3eee1. Activate top layer. Type the words "and lo, the Babe was born in Bethlehem...the very SON OF GOD". If you click the Enter key at the end of each line, you will end up with four lines of text.

62. Convert to Raster Layer. Move the text into place between the gold angels.
63. Effects/3D Effects/Drop Shadow/Vertical 3, Horizontal 3, Opacity 57, Blur 3, color #000000.
64. Image/Add Borders/5px border, color #4b5157, Symmetric checked.
65. Activate the 5px border with the Magic Wand.
66. In your Material Palette, click on the Pattern tab and find the pattern plaatje bewerken (gold beads), use settings as shown below.

67. Flood fill the activated 5px border with the pattern.
68. Adjust/Sharpness/Sharpen. Selections/Select None.
69. Sign your name or leave your watermark. Convert to Raster Layer and Merge/Merge Visible if necessary.
You are finished and I thank you for working my Christmas tutorial. Hugs, Ara.
A big thank you to Evatexas and PamelaD who so faithfully test my tutorials for me.
If you are going to use this tutorial for stationery, cards or place the tutorial/tag on another site, I would appreciate you contacting me for permission, giving Arasimages credit for the original tutorial and if possible, a link back to my site. Thank you.
Copyright © Arasimages All Rights Reserved