

Christmas Cardinal
For Italian, Danish and German translation, click on the flags.


For this tutorial you will need the materials in the zip file below.

Thanks go to Zuzzanna; to Nikita;Tinnad and MTM Briditte for the beautiful tubes used. Please visit the tuber sites listed on my Links page.
Use the bookmark below to mark your place along the way.

Unzip the materials into a working folder. Open the materials in PSP, copy and close originals. You will need plugin Xero to do this tutorial. I have used PSPX3 to create this tutorial but you may use an earlier version. It is assumed you have a working knowledge of PSP.
1. In Materials Palette, set Foreground to #ffffff, Background to #5a1212.
2. New/New Image 700px by 600px. Flood fill with Foreground #ffffff.
3. Layers/New Raster Layer. Flood fill with Background #5a1212.
4. Layers/Load/Save Mask/Load Mask from Disk.
5. Find Mask zuzzanna_winther Mask. Load.
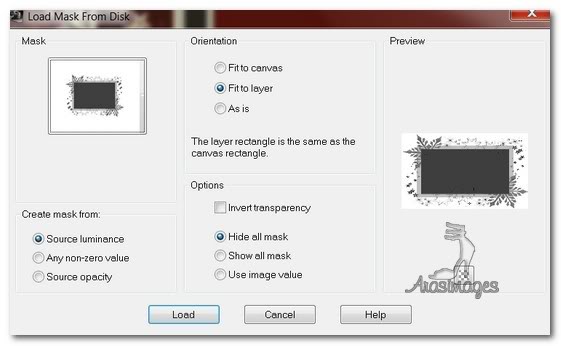
6. Layers/Merge/Merge Group.
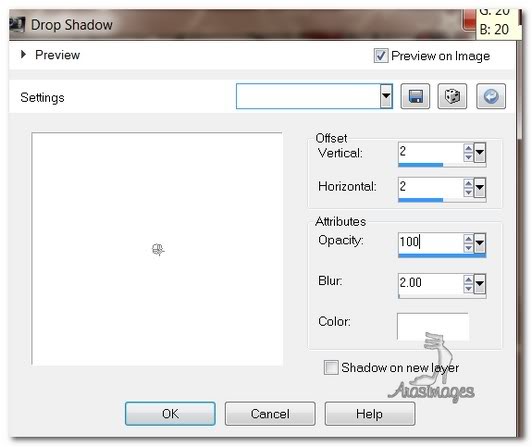
7. Effects/3D Effects/Drop Shadow Vertical 2, Horizontal 2, Opacity 100, Blur 2, color #ffffff.
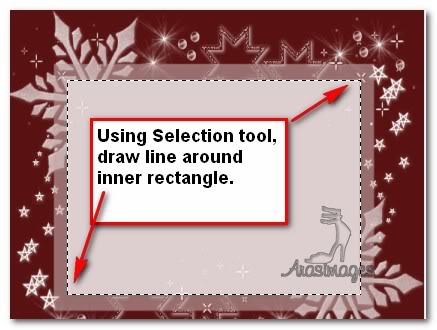
8. From Tool bar, select the Selections tool, Rectangle and draw a rectangle inside the Mask as seen below.
9. Layers/New Raster Layer. Flood fill with Background color #5a1212.
10. Selections/Modify/Contract by 4px. Press Delete key.
11. Selections/Invert.
12. Effects/3D Effects/Drop Shadow Vertical 4, Horizontal 4, Opacity 50, Blur 31, color #000000.
13. Effects/3D Effects/Drop Shadow Vertical -4, Horizontal -4, Opacity 50, Blur 31, color #000000.
14. Open TUBES TINNAD (10).psp. Copy/Paste as New Layer.
15. Drop Opacity to 57.
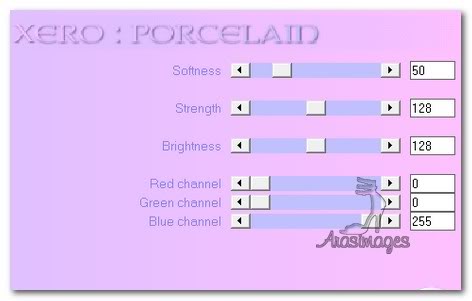
16. Effects/Xero/Porcelain. Use settings as seen below.
17. Selections/Select None.
18. Open MTM_fruit12_Take_It_In_20 Juni2006.pspimage. Copy/Paste as New Layer.
19. Image/Resize/Resize by 91/Resize all layers unchecked.
20. Place berries at the top of inner rectangle, fitting in nicely.
21. Effects/3D Effects/Drop Shadow, Vertical 4, Horizontal 3, Opacity 50, Blur 7, color #000000.
22. Open 1220639630-animaux.pspimage. Copy/Paste as New Layer.
23. Image/Resize/Resize by 77%/Resize all layers unchecked.
24. Place Cardinal image to right side of rectangle.
25. Effects/3D Effects/Drop Shadow, Vertical 8, Horizontal 10, Opacity 60, Blur 21, color #000000.
26. Effects/3D Effects/Drop Shadow, Vertical 6, Horizontal 3, Opacity 52, Blur 20, color #000000.
27. Using Font Morning Limerink BTN, Size 48, color #5a1212, (see settings below), write "Merry", hit Enter then type "Christmas."

28. Use turn node on text box to turn text at an angle to match that of the wood.
29. Convert to Raster Layer.
30. Close off top 3 layers. Activate Raster 1/Merge/Merge Visible. (Now Merged Layer).
31. Copy Merge Layer/Paste as New Image on open space in workspace.
32. Using New Image, Image/Add Borders/3px border, Symmetric checked, color #ffffff.
33. Image/Add Borders/30px border, Symmetric checked, color #5a1212.
34. Image/Add Borders/3px border, Symmetric checked, color #ffffff.
35. Add your name or leave watermark. Convert to Raster layer and Merge/Merge Visible if necessary.
36. Save the New Image in working folder as Background.jpg.
37. In Layers Palette, close off Merge Layer. Open top 3 layers. Activate top layer/Merge/Merge Visible.
38. Save this newly Merged Layer in your working folder, naming it Foreground as an Animation Shop (*psp) file.
39. Open Animation Shop program. File/Open Background, Foreground and Christmas Cardinal Snowfall.gif files.
40. Working on Background file, Edit/Duplicate 8 times, having 9 frames in all.
41. Highlight the first frame of Background file. Edit/Select All.
42. Working with the Snow .gif, highlight the first layer, Edit Select All. Edit/Copy.
43. Working on the Background file, Right click INSIDE the first frame/Paste/Paste into Selected Frame and place the snow inside the rectangle. Left click into place. Keep snow off edges of rectangle.
44. Working on the Foreground image of the bird and berries. Edit/Copy. Edit/Propagate Paste.
45. Go to the Background image with the snow inside the rectangle. Make sure your first frame is highlighted. Edit/Select All. On first frame, right click/Paste/Paste into Selected Frame. Left click into place.
46. View/Animation. See that the snow is falling gently and all is as you want it to be. If not, use UNDO arrow and redo steps until you are satisfied.
47. Once all is working properly, File/Save As. When the box appears, name your tag and name the place where you are saving it. Save. As boxes change, continue to click Next, Next, Next then Finish.
You are done! I hope you enjoyed the journey. Hugs! Ara
A big thank you to Evatexas and PamelaD who tested this tutorial for me.
If you are going to use this tutorial for stationery, cards or place the tutorial/tag on another site, I would appreciate you contacting me for permission, giving Arasimages credit for the original tutorial and if possible, a link back to my site. Thank you.
Copyright © Arasimages All Rights Reserved