
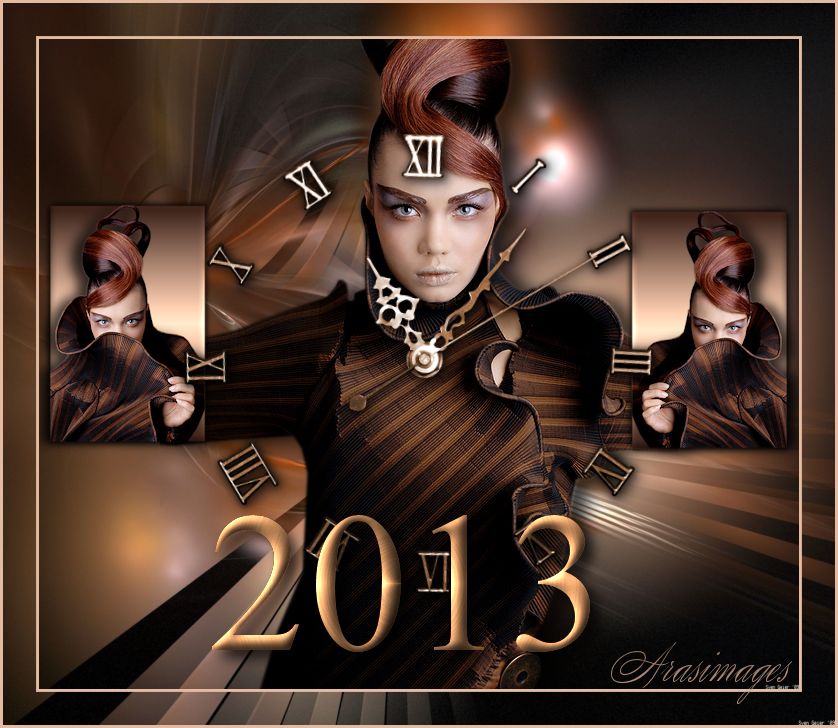
Woman of the Future
For Italian, Danish and German translation, click on the flags.


For this tutorial you will need the materials in the zip file below.

Thanks go to Dakara for the lady tubes and to Sven Geier for the beautiful fractal background Lost used. The clock image origin is unknown; if this is your work, please let me know so I may give you credit. Please visit the tuber sites listed on my Links page for other lovely tubes.
Use the arrow below to mark your place along the way.

Unzip the materials into a working folder. Open the materials in PSP, copy and close originals. Place the Font included in materials in your PSP Fonts folder. Place Arasimages Selections 1 in your Selections Folder. You will need AlienSkin Impact plugin to do this tutorial. I have used PSPX4 to create this tutorial but you may use an earlier version. It is assumed you have a working knowledge of PSP although this may be considered an easy tutorial.
1. In Materials Palette, set Foreground to #e3bba1, Background to #28150f.
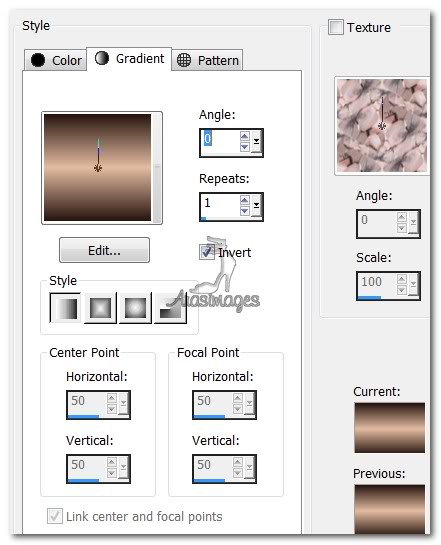
2. Create Gradient using Style Linear, Angle 0, Repeats 1, Invert checked.
3. New/New Image 760px by 650px. Selections/Select All.
4. Open the Fractal Lost Background. Copy/.Paste into Selection.
5. Selections/Select None.
6. Open cal-guis-6beauty-310208.pspimage. Copy/Paste as New Layer.
7. Using eraser tool, erase the lines above her left and below her right sleeve endings.
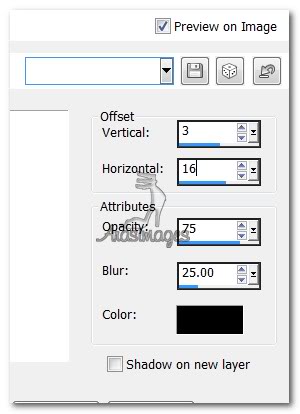
8. Effects/3D Effects/Drop Shadow, Vertical 3, Horizontal 16, Opacity 75, Blur 25, color #000000.
9. Adjust/Sharpness/Sharpen.
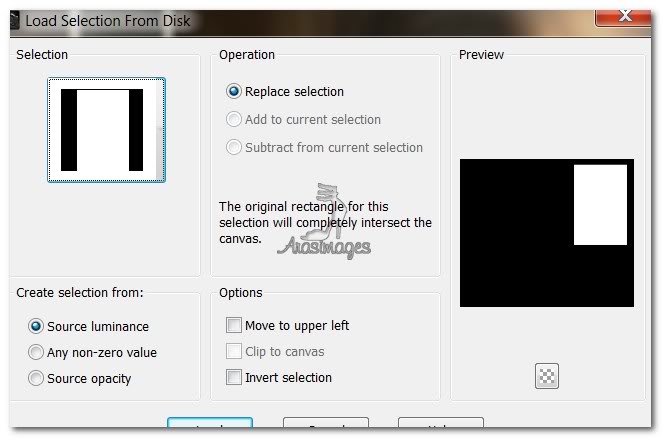
10. Selections/Load/Save Selection/Load Selection from Disk. Find Arasimages Selection 1, Apply.
11. Layers/New Raster Layer. Flood fill Selection with Gradient.
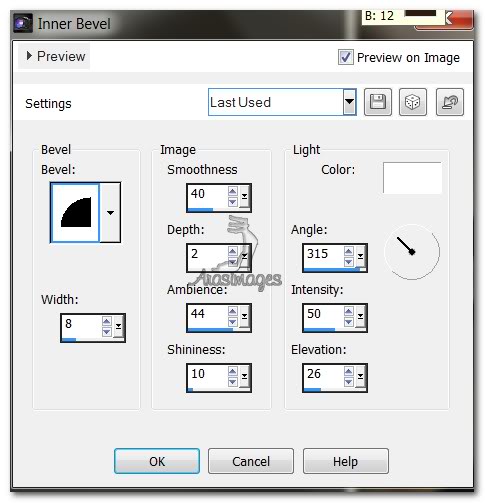
12. Effects/3D Effects/Inner Bevel. Use settings below, color #ffffff.
13. Effects/3D Effects/Drop Shadow, Vertical -3, Horizontal -3, Opacity 75, Blur 12, color #000000.
14. Effects/3D Effects/Drop Shadow, Vertical 3, Horizontal 3, Opacity 75, Blur 12, color #000000.
15. Layers/New Raster Layer.
16. Open cal-guis-3beauty-3102008.pspimage. Copy/Paste into Selection.
17. Selections/Select None.
18. Effects/3D Effects/Drop Shadow, Vertical 3, Horizontal 16, Opacity 75, Blur 25, color #000000.
19. Merge/Merge Down.
20. Image/Resize/Resize by 67%, Resize all layers unchecked.
21. Adjust/Sharpness/Sharpen.
22. Duplicate. Image/Mirror Horizontally. Move mirrored image to left side, positioning each lady so she rests at end of main lady's arms.
23. Make sure the top layer is highlighted to continue your work.
24. Open midnight_fantasy_clock_shadow.pspimage. Copy/Paste as New Layer.
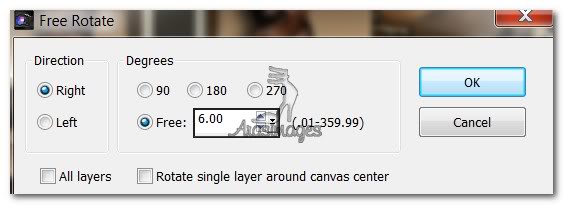
25. Image/Free Rotate. Rotate/Free by 6 degrees Right.
26. Effects/3D Effects/Drop Shadow, Vertical 3, Horizontal 3, Opacity 75, Blur 20, color #000000.
NOTE: If you want to create this tutorial with your own words and leave off the year 2012, set the font to a smaller size and type in the words you want. Example: "Woman of the Future." Continue on with the tutorial from step #29.
27. Using the Text tool, find the font Iskoola Pota. Set size to 200, Color #28150f. (See settings).

28. Type in the numbers "2012" or the current year. Convert to Raster Layer.
29. Selections/Selections All. Activate Magic Wand and click on one of the numbers to activate them. Selections/Defloat.
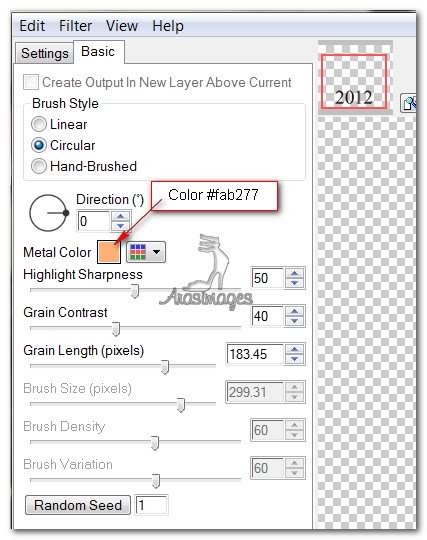
30. Effects/AlienSkin/Impact/Brushed Metal.
31. Effects/3D Effects/Drop Shadow, Vertical 8, Horizontal 8, Opacity 80, Blur 20, color #000000.
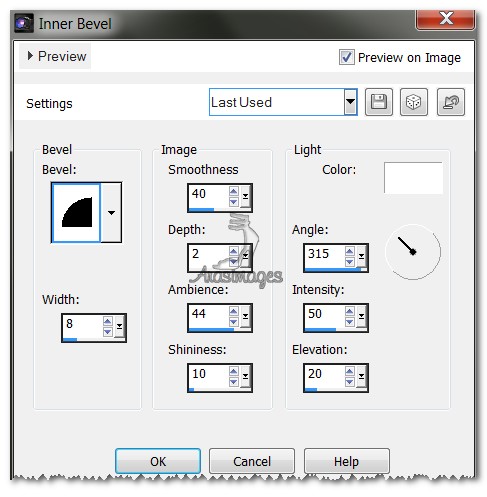
32. Effects/3D Effects/Inner Bevel. REPEAT. Use settings as seen below, color #ffffff.
33. Selections/Select None.
34. Image/Add Borders/3px border, Symmetric checked, color #e3bba1 (foreground).
35. Image/Add Borders/33px border, Symmetric checked, color #28150f (background).
36. Using Magic Wand, select the 33px border.
37. Open Lost Fractal Background.jpg. Copy/Paste into Selection.
38. Selections/Select None.
39. Image/Add Borders/3px border, Symmetric checked, color #e3bba1 (foreground).
38. Sign your name or leave your watermark. Convert to Raster Layer and Merge/Merge Visible if needed.
39. Save as .jpg image.
40. You are finished! I hope you have a wonderful new year full of good health, prosperity and love!
A big thank you to Evatexas and PamelaD who tested this tutorial for me.
If you are going to use this tutorial for stationery, cards or place the tutorial/tag on another site, I would appreciate you contacting me for permission, giving Arasimages credit for the original tutorial and if possible, a link back to my site. Thank you.
Copyright © Arasimages All Rights Reserved