

Visitor
For Italian, Danish and German translation, click on the flags.


For this tutorial you will need the materials in the zip file below.

Thanks go to SDT to ellis and to Silvie for the lovely tubes used. Please visit the tuber sites listed on my Links page for other lovely tubes.
Use the symbol below to mark your place along the way.

Unzip the materials into a working folder. Open the materials in PSP, copy and close originals. Export the Brush into your PSP/Brushes folder. You will need plugins MuraMeister and Alienskin Xenofex 2 to do this tutorial. I have used PSPX3 to create this tutorial but you may use an earlier version. It is assumed you have a working knowledge of PSP.
1. In Materials Palette, set Foreground to #dfd9cb, Background to #d58c6b.
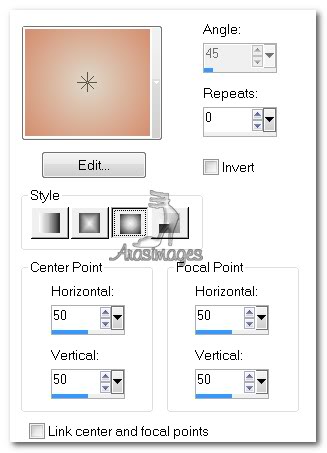
2. Create Gradient using Style Sunburst, Repeats 0, Invert unchecked.
3. New/New Image 762px by 662px. Flood fill with Gradient.
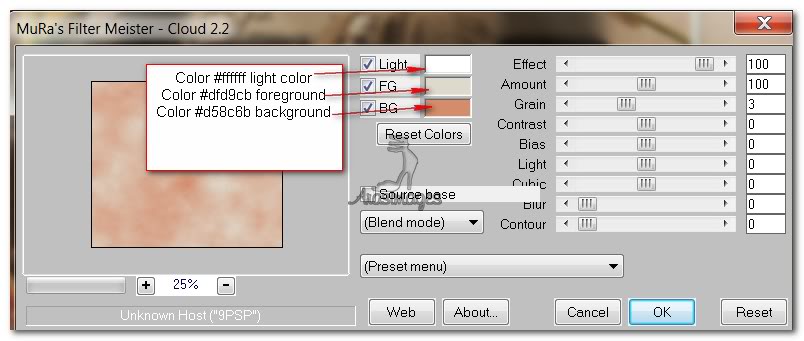
4. Effects/MuraMeister/Cloud. Use settings below.
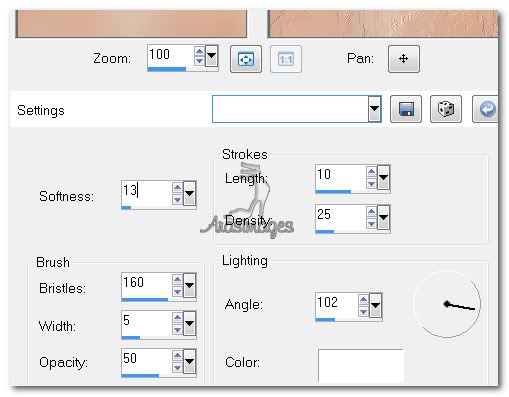
5. Effects/Art Media Effects/Brush Strokes. Use settings below, color #ffffff.
6. Using Selections tool, select a rectangle across the bottom about the size I have in my finished image.
7. Layers/New Raster Layer. Flood fill with Gradient.
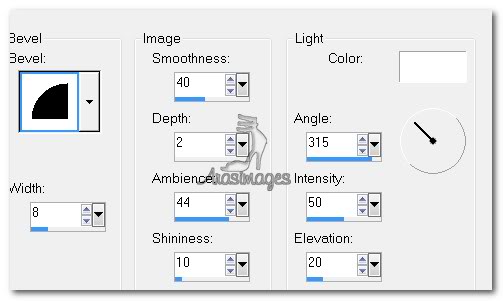
8. Effects/3D Effects/Inner Bevel. Use settings below, color #ffffff.
9. Effects/3D Effects/Drop Shadow, Vertical 3, Horizontal 3, Opacity 60, Blur 11, color #000000.
10. Selections/Select None.
11. Duplicate. Image/Flip.
12. Open piscina.pspimage. Copy/Paste as New Layer. Using the Pick tool, pull the image to fit between the two rectangles. (Raster 2 and Copy of Raster 3).
13. Adjust/Hue and Saturation/Colorize. Hue set to 12, Saturation set to 143.
14. Image/Resize/Resize by 80%/Resize all layers unchecked.
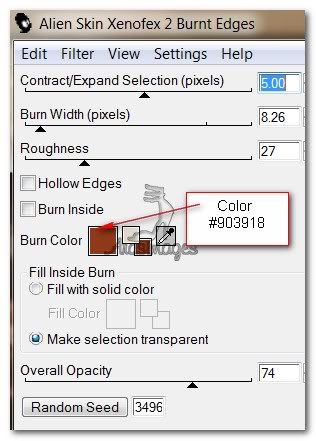
15. Effects/AlienSkin Xenofex II/Burnt Edges. Use settings below.
16. Effects/3D Effects/Drop Shadow. Vertical 6, Horizontal 6, Opacity 60, Blur 11, color #000000.
17. Effects/3D Effects/Drop Shadow. Vertical -6, Horizontal -6, Opacity 60, Blur 11, color #000000.
18. Highlight top layer to continue.
19. Layers/New Raster Layer.
20. In Materials Palette, change Background color to #903918. Your Gradient is now changed.
21. From the Tool bar, select Paint Brushes. Find the Brush Tree Branch 008. Leave at default settings and left click (using Gradient) the first branch so it comes out of the left side of image. Then right click (using Background color) another branch above the first branch.
22. Effects/3D Effects/Drop Shadow. Vertical 1, Horizontal 1, Opacity 100, Blur 1, color #000000.
23. Open Tube3748_Orchidee_18_07_1l_sdt.pspimage. Copy/Paste as New Layer.
24. Move the flower to the lower left corner of the image.
25. Effects/3D Effects/Drop Shadow. Vertical -6, Horizontal 100, Opacity 60, Blur 16, color #000000.
26. Again Paste as New Layer.
27. Image/Resize/Resize by 40%/Resize all layers unchecked.
28. Image/Mirror. Image/Flip. Move flower to upper left corner.
29. Effects/3D Effects/Drop Shadow. Vertical -6, Horizontal 100, Opacity 60, Blur 16, color #000000.
30. Again Paste as New Layer.
31. Image/Resize/Resize by 50%/Resize all layers unchecked.
32. Move flower to upper right corner. Apply a Drop Shadow as you have done in Step #29.
33. Open Bird1_14.6.pspimage. Copy/Paste as New Layer. Erase away the branch under the bird using the Eraser Tool. Use settings below, dropping the Size lower than 30 if needed.

34. Image/Resize/Resize by 40%/Resize all layers unchecked.
35. Image/Mirror. Move bird onto lower branch.
36. Apply a Drop Shadow as you have done in Step #29.
37. Open Tube1507_Woman_Titan_02_10_08_sdt.psp image. Copy/Paste as New Layer.
38. Image/Mirror. Place to center right in image so her dress flows over the bottom rectangle.
39. Effects/3D Effects/Drop Shadow. Vertical -6, Horizontal 100, Opacity 60, Blur 16, color #000000.
40. Effects/3D Effects/Drop Shadow. Vertical 6, Horizontal 6, Opacity 60, Blur 16, color #000000.
41. Image/Add Borders/3px border, Symmetric checked, color #341b0e.
42. Image/Add Borders/3px border, Symmetric checked, color #dfd9cb.
43. Image/Add Borders/10px border, Symmetric checked, color #903918.
44. Image/Add Borders/3px border, Symmetric checked, color #dfd9cb.
45. Image/Add Borders/33px border, Symmetric checked, color #341b0e.
46. Using Magic Wand, select inside the 33px border. Using the Brush Tree branch 08 and the Gradient made with Foreground color #dfd9cb, Background color #341b0e, stamp around the 33px border.
47. Adjust/Sharpness/Sharpen. Selections/Select None.
48. Image/Add Borders/3px border, Symmetric checked, color #dfd9cb.
49. Using Font AnnabelleJF TTF, Italized checked, Size 72, color #341b0e, type "Listen". Use turn node to turn the word to be vertical. Move into proper place on right side of image. Convert to Raster Layer.

50. Using Font Bell MT TTF, Size 28, color #341b0e, type "to my". Move into proper place at bottom of image. Convert to Raster Layer.

51. Using Step 49 as your example, type the word "Visitor". Move into proper place at bottom of image. Convert to Raster Layer.
52. Sign your name or leave watermark. Merge/Merge Visible.
53. Adjust/Sharpness/Sharpen. Save as .jpg file in place of your choice.
Thank you Evatexas and PamelaD for testing this tutorial for me.
If you are going to use this tutorial for stationery, cards or place the tutorial/tag on another site, I would appreciate you contacting me for permission, giving Arasimages credit for the original tutorial and if possible, a link back to my site. Thank you.
Copyright © Arasimages All Rights Reserved